SharePoint Security – State of the Union
A call to action regarding SharePoint and Security
Citizens of SharePoint!
I would like to say a little something about SharePoint and Security.
The usual focus when talking about IT and Security is technical aspects of security, it is a global phenomenon and it has always been like that. My most private thinking on the reasons for this is, that technical solutions simply are a lot more fun than the boring processes and policies. Take a Windows laptop for example, when discussing security it always comes down to Bit locker instead of discussing how you work to be secure.
SharePoint is no different, but in the SharePoint industry I feel that we have taken it even further, we do not even feel that Security is that much fun, or even that important maybe, the SharePoint community feels that custom solutions and architectural designs, maybe even corporate branding are a lot more fun than any aspect of Security.

Titanic, the unsinkable ship that sunk
In my personal opinion this is a shame and my hope is that this will gradually change in the future toward a more Security aware SharePoint community.
Developing new solutions, new custom applications and designing the world’s most elaborate SharePoint architecture will for a while yet I realize, be more interesting to the individual engineer than promoting the importance of keeping your local admin groups clean and why you should not logon using the farm account, for the most experienced Certified Master same as for the SharePoint IT-Pro beginner.
This is a fact and the risk is that we will start to see downsides from this as SharePoint for real has by now, found its rightful place in most every company’s infrastructure, all over the world.
Now you are probably starting to wonder how I can be so bold to state these things unfounded and without proof? You are probably thinking that you yourself is not like that, you do care about Security and all this is just about everyone else, if even that. Maybe some of us are better and some are worse, but we can all do better.
I have a feeling and I have some proof:
– I have for a while now worked dedicated with SharePoint Security, reviewing existing SharePoint environments and designing and implementing fresh new environments. During this period I have yet to come by a Security aware design of a SharePoint environment (my own designs excluded obviously).
– I have customers that have come to me and stated that part of the reason that they have contacted me, is that there simply is no other partner that focuses on SharePoint and Security and that can offer the services that I do. I am according to my customer, without competition, at least in my part of the world.
– I have seen from the SharePoint conference participant surveys, that of all of the topics that the participants want to hear more about next year, Security is always at the very bottom of the list.
– The number one rated and watched session at TechEd this year, was about hacker tools…
I may be wrong but I doubt it, security is not really on our agenda.
In my experience, all of us in this larger and larger SharePoint community, should pay a little extra attention on Security in all that we do. Not only in the Security technical aspects that we implement because we have to, take for example Kerberos authentication (Link to guide). Kerberos is a great Security feature that will enhance the Security in most SharePoint environments, but not many implementations have been made for the Security aspects of it, but for the simple reason that a double-hop scenario required it and thus it was implemented (visit my blog for an easy step by step guide to Kerberos in SharePoint).
Also, many, many SharePoint environments out there are setup by developers, I beg your pardon developers, but your focus is often to get a working test and development platform up and running, not to make it secure and stable. Also, after a solution has been developed and tested for functionality, your job is often done. The result is often something that is less than perfect in terms of Security.
It would be really nice if we could all help to change this, if we could all do just a few things that will in fact make the SharePoint environment more secure or at least, make it harder to penetrate and easier to keep track of.
I have made a list of things that we could all easily think of and do, and that would help SharePoint Security awareness.
Keep the number of local server administrators down to a minimum (0).

In most SharePoint environments we can assume that a local server administrator can get access to all of the content in SharePoint. Use domain groups, add an individual’s user account only as needed and remove when he/she is done.
You’ll find a command at the end that will show you a course list of the members of the local administrators group.
Do not disable the Loopback check on your Web servers.
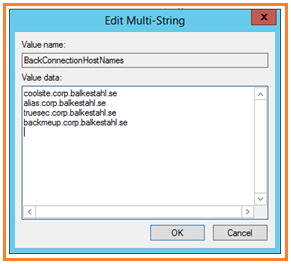
This is a great Security feature, it will make life a little harder on a possible intruder, so why disable it. Add the URLs you need instead. If you buy a house and it has an alarm installed, you do not disable it, you grant access to the members of your family. Also worth mentioning, you should always avoid browsing from the server, but some features like search may depend on accessing the local server so a configuration may be the best answer.
You’ll find a PowerShell script at the end how you can easily configure it to allow the URL’s you need instead of disabling it completely.
Disable the SQL authentication and especially the SA account.

These account are completely unmanaged and unmonitored, it is a popular backdoor for any hacker.
They are rarely used and when used often by legacy applications, if they are, find out why and reconfigure or put the legacy app on a separate instance or server.
Never use Shared accounts (Never ever!).

I still see people defending the ‘setup account’ (shared installation and configuration user) and they state that it is given special permissions that are required later on. Operations people with a lot of people coming and going often use a ‘server monitor’ account that can be borrowed and used to get easy and fast access to the server. It is often a local account and often has a password that is well known by all…
In my opinion, there is never or very rarely a reason to keep a shared account. If you absolutely feel that you must, use a domain account and more importantly, disable it when it is not used. Also, change the password regularly.
Keep the Windows Firewall On (Ports-Link/Conf-Link).

Need I even explain this? It is however a sad fact that it is often disabled even in a production environment. It should be used and on in all environments, the development environment would else make an easy target for the evil hacker.
Configure it even during development, there are many ways to do it, PowerShell may be the simplest, check my blog blksthl.com on how to.
If you don’t do it right away, you or your customer will most likely forget to enable and configure it when you are done.
Keep the IE ESC On – Internet Explorer Enhanced Security Configuration.

A server is not really meant for us to browse SharePoint sites or the internet, use a client machine or a separate test server if you have to. If you MUST browse from this particular SharePoint server, disable it for admins only and enable it when done.
You’ll find a PowerShell script at the end how you can easily configure it.
Use HTTPS on Central Administration site.
Often, too often, https is used for web applications bt usually not for the central administration site, it is a bit of configuring and thinking to get it working, but it is a recommended way to protect your Environment. Remember, passwords will at times be transfered in cleartext on the central admin site.
Follow the Word of Spencer Harbar to get it done:
Using SSL for Central Administration with SharePoint 2013
http://www.harbar.net/archive/2013/02/13/Using-SSL-for-Central-Administration-with-SharePoint-2013.aspx
***
Summary,
My hope is, that we will all try do something extra when it comes to Security in the future, do your best to leave a better more secure environment behind, take a while instructing the customer on the importance of keeping the environment secure even after you have left. Make them aware as well.
If you or your customers need a wakeup call, please watch my dear colleague’s session from TechEd North America this year voted no 1, Marcus Murray and Hasain Alshakarti at Truesec:
Live Demonstration: Hacker Tools You Should Know and Worry About
http://channel9.msdn.com/Events/TechEd/NorthAmerica/2013/ATC-B309#fbid=SxGCyIja7i5
After you or your customer has seen what can be done with simple tools avalable to all…perhaps the general attitude towards security processes may improve a bit?
Final word: It is not all about cool buzzwords/technologies like oauth or claims or federations, it is even more about processes and boring policies…
| Configure Loopbackcheck (Link) In a PowerShell prompt running as administrator: Get-Item -path ”HKLM:\System\CurrentControlSet\Control\Lsa\MSV1_0” | new-Itemproperty -Name “BackConnectionHostNames” -Value (“coolsite.corp.balkestahl.se”, “alias.corp.balkestahl.se”) -PropertyType “MultiString” (Replace mine with your own URL’s and add more using double quotes and a comma and space as separator) Make the changes stick with: Restart-Service IISADMIN
Configure IE ESC (Link) In a PowerShell prompt running as administrator: function Disable-IEESC { $AdminKey = “HKLM:\SOFTWARE\Microsoft\Active Setup\Installed Components\{A509B1A7-37EF-4b3f-8CFC-4F3A74704073}” Set-ItemProperty -Path $AdminKey -Name “IsInstalled” -Value 0 Stop-Process -Name Explorer } Disable-IEESC (You have to hit enter twice after pasting the script)
Crude list of all members of Local Administrators In a PowerShell prompt running as administrator: Gwmi win32_groupuser | where-object {$_.groupcomponent –like ‘*”Administrators”‘} | ft partcomponent There are better looking examples out there but this is a one-liner that does the trick… |
References:
DisableLoopbackCheck & SharePoint: What every admin and developer should know. (Spencer Harbar folks)
http://www.harbar.net/archive/2009/07/02/disableloopbackcheck-amp-sharepoint-what-every-admin-and-developer-should-know.aspx
A quick guide to configuring the Loopback check
https://blog.blksthl.com/2013/05/07/a-quick-guide-to-configuring-the-loopback-check/
Configure automatic password change in SharePoint 2013 using PowerShell
https://blog.blksthl.com/2013/05/14/configure-automatic-password-change-in-sharepoint-2013-using-powershell/
TCP/IP Ports of SharePoint 2013
https://blog.blksthl.com/2013/02/21/tcpip-ports-of-sharepoint-2013/
A guide to https and Secure Sockets Layer in SharePoint 2013
https://blog.blksthl.com/2012/12/20/a-guide-to-https-and-secure-sockets-layer-in-sharepoint-2013/
How to disable IE Enhanced Security in Windows Server 2012
https://blog.blksthl.com/2012/11/28/how-to-disable-ie-enhanced-security-in-windows-server-2012/
The first Kerberos guide for SharePoint 2013 technicians
https://blog.blksthl.com/2012/09/26/the-first-kerberos-guide-for-sharepoint-2013-technicians/
Using SSL for Central Administration with SharePoint 2013
http://www.harbar.net/archive/2013/02/13/Using-SSL-for-Central-Administration-with-SharePoint-2013.aspx
Thanks to:
Hasain Alshakarti – TrueSec
Marcus Murray – TrueSec
TrueSec Sweden / TrueSec US
Spencer Harbar – harbar.net
Andrija Marcic – Microsoft

___________________________________________________________________________________________________
Consider?
Regards

Twitter | Technet Profile | LinkedIn