Office 365 – DTD is prohibited in this document issue


 Office365logo       SP2013logo

Got trouble Connection PowerShell to SharePoint online? This could be the resolution to your troubles.
I had this myself, or we had it in our Company tenant. This is what the issue was and this is how I fixed it:

When trying to connect to PowerShell for SharePoint Online, using the Connect-SPOService command, we got a error that did not tell us anything.

PS dtd error 1

The error is:
Connect-SPOService : For security reasons DTD is prohibited in this document. To enable DTD processing set DtdProcessing property on XmlReaderSettings to Parse and pass the settings into XmlReader.Create method.

Well, its almost a joke right…
When searching the web for information on this particular, I struck zero…all I could find related to the ISP and the default search provider something. I quickly dismissed them as unrelated.
Then after some time had passed, I found a similar issue, this seemed related and it was a connectivity issue same as mine (If I still had the link I would give credit to where credit is due). This fellow had resolved the issue by adding a missing DNS record.
This made me think, since our tenant has existed since way Before Office 365 existed (BPOS) perheps we were also missing some of the required DNS records?
I checked with my collegues, and apparently we were missing the record as well.

So, if you ever see or get the ‘DTD prohibited’ issue, remember to check the DNS for the following record:

Type: CNAME
Alias: MSOID
Target: clientconfig.microsoftonline-p.net
Info: Used by Office 365 to direct authentication to the correct identity platform More Information

After I added this to DNS, Connect-SPOService works just fine!

SPO-Connect


Microsoft’s official explaination on the DNS record:
What’s the purpose of the additional Office 365 CNAME record?

When you run a client application that works with Office 365 such as Lync, Outlook, Windows PowerShell or Microsoft Azure Active Directory Sync tool, your credentials must be authenticated. Office 365 uses a CNAME record to point to the correct authentication endpoint for your location, which ensures rapid authentication response times.If this CNAME record is missing for your domain, these applications will use a default authentication endpoint in the United States, which means authentication might be slower. If this CNAME record isn’t configured properly, for example, if you have a typo in the Points to address, these applications won’t be able to authenticate.

If Office 365 manages your domain’s DNS records,, Office 365 sets up this CNAME record for you.

If you are managing DNS records for your domain at your DNS host, to create this record, you create this record yourself by following the instructions for your DNS host.


References and Credits
Nope, not this time…Credits & many thanks to To all of you.

_________________________________________________________

Enjoy!

Regards

Twitter | Technet Profile | LinkedIn

Advertisement

Office 365 guide series – Function to resolve a users OneDrive for Business URL


 Office365logo       SP2013logo

Hi SharePoint Online PowerShellers!

This time I will give you a Quick but great function to use if you are working with OneDrive for Business:

Function to resolve a users OneDrive for Business URL

Aggklockax

Simple solution, great to have, unbelievably efficient…

Ok, this is perhaps my shortest post ever…I’ll just explain real Quick.
OneDrive for Business gets it URL from the tenantname and the users UserPrincipalName. Creating this every time can be troublesome…
This is what I use, a function I created last summer when I was tired of doing them one at the time…

It works even with users that have a different domain in the UPN than what is the tenant name.
This is it:

Function GetODfBURL($UserPrincipalName, $TenantName)
# Creates a correct ODfB URL from email and TenantName/OrgName, returns URL as a String
{
    # ConStructing OneDrive personal URL from the UPN/Email address
    $StrUser = $UserPrincipalName
    $pos= $StrUser.IndexOf("@")
    $len = $StrUser.Length -1
    $StrUser = $StrUser.SubString(0, $pos)
    $StrUser = $StrUser -replace "\.", "_"
    $Orgpos = $pos + 1
    $Orglen = $len - $pos
    $StrOrg = $UserPrincipalName.SubString($Orgpos, $Orglen)
    $StrOrgNamePos = $StrOrg.IndexOf(".")
    $StrOrgName = $StrOrg.SubString(0, $StrOrgNamePos)
    $StrOrgSuffixPos = $StrOrgNamePos +1
    $StrOrgNameLen = $StrOrg.Length - $StrOrgSuffixPos
    $StrOrgSuffix = $StrOrg.SubString($StrOrgSuffixPos, $StrOrgNameLen)
    $StrOrg = $StrOrg -replace "\.", "_"
    $PersonalOrgURL = "https://" + $TenantName + "-my.sharepoint.com/personal/"
    $SiteUrl= $PersonalOrgURL + $StrUser
    $SiteUrl= $SiteUrl+ "_" + $StrOrg
    return $SiteUrl
}
$ODfBURL = GetODfBURL "thomas.balkestahl@blksthl.se" "blksthl"

This will give the URL: https://blksthl-my.sharepoint.com/personal/thomas_balkestahl_blksthl_se

Thats it. Use it or not 🙂


References and Credits


Nope, not this time…

Credits & many thanks to

To all of you.

_________________________________________________________

Enjoy!

Regards

Twitter | Technet Profile | LinkedIn

Office 365 guide series – Verify Provisioned OneDrives using PowerShell


 Office365logo       SP2013logo

Hi SharePoint Online administrators!

This time I will show you how to:

Verify if a provisioned OneDrive for Business site was provisioned.

AminneBrukx

 Is this really right…? What did they…(Åminne bruk, Värnamo, Sweden)


If you followed my previous post, Office 365 guide series – Provision OneDrive for Business using PowerShell then you will mst likely have a bunch of sites that you Think you have provisioned and are not really sure if it worked?
There are obviously ways to verify manuelly but if the list of users was long, then that is not the funniest work out there…

I suggest you use this script instead…:-)

If you have a single emaildomains in your oranization use the first one, if you have multiple emaildomains, use the second.
All you have to do is copy or retype the script to a Prompt/ps1 or ISE session, then run the script. You have the option to save some time by entering your account name in the script(see start)


1. Script 1 Use this script if your organization only uses one domainname as email domain. For example, if you use only ‘contoso.com’ then you should use this script.
2. Script 2 Use this script if your organization only uses multiple domainnames as email domains. For example, if you use ‘contoso.com’, ‘microsoft.com’, northwindtraders.com’ as UPN names within your O365 tenant, then use this script. You will here be asked for the domain used in the O365 tenant address.
3. Example 1 Example of a usecase with multiple emaildomains and script 2.
4. Example 2 Example of a usecase with a single emaildomain and script 1.

Note: If you copy paste the code from here into a PowerShell promt or ISE, please verify that all quotes and doublequotes are copied correctly, character coding may cause problems. 


Single email domain in your oranization:

***** SCRIPT 1 STARTS HERE *****

#
# By Thomas Balkeståhl - http://blog.blksthl.com
#
$o365cred = Get-Credential -Username "thomas.balkestahl@cramo.onmicrosoft.com" -Message "Supply a Office365 Admin"
$Userlist = read-host "submit your list of users that have been provisioned"
$Userlist = $Userlist -replace " ", ""
$Emails = $userlist -split ","
#Splitting list into Array
Foreach($Email in $Emails)
{
    # Constructing URL from the UPN/Email address
    $struser = $Email
    $pos= $strUser.IndexOf("@")
    $len = $struser.Length -1
    $strUser = $strUser.SubString(0, $pos)
    $strUser = $strUser -replace "\.", "_"
    $orgpos = $pos + 1
    $orglen = $len - $pos
    $strOrg = $Email.SubString($orgpos, $orglen)
    $strOrgNamePos = $strOrg.IndexOf(".")
    $strOrgName = $strOrg.SubString(0, $strOrgNamePos)
    $strOrgSuffixPos = $strOrgNamePos +1
    $strOrgNameLen = $strOrg.Length - $strOrgSuffixPos
    $strOrgSuffix = $strOrg.SubString($strOrgSuffixPos, $strOrgNameLen)
    $strOrg = $strOrg -replace "\.", "_"
    $PersonalOrgURL = "https://" + $strOrgName + "-my.sharepoint.com/personal/"
    $SiteUrl= $PersonalOrgURL + $strUser
    $SiteUrl= $SiteUrl+ "_" + $strOrg
    write-host "Verifying user:" $Email
$HTTP_Request = [System.Net.WebRequest]::Create($SiteUrl)
$HTTP_Request.UseDefaultCredentials = $true
$HTTP_Request.Credentials = $o365cred
try {
    $HTTP_Response = $HTTP_Request.GetResponse()
}
catch [System.Net.WebException] {
    $HTTP_Response = $_.Exception.Response
}
$HTTP_Status = $HTTP_Response.StatusCode
If ($HTTP_Status -eq 200 -or $HTTP_Status -eq 403 )   { 
    Write-Host -ForegroundColor Green "Site for user $Email exists!" 
}
Else {
    Write-Host -ForegroundColor Yellow "The OneDrive site for user $Email does not respond, try again later or provision it again"
}
$HTTP_Request = $null
$HTTP_Response = $null
$HTTP_Status = $Null
}

***** SCRIPT 1 ENDS HERE *****

If you have multiple email domain in your oranization, use this second script:
***** SCRIPT 2 STARTS HERE *****

#
# By Thomas Balkeståhl - http://blog.blksthl.com
#
$O365Admin = read-host "Supply your Office 365 Admin username(UPN)"
# Add you admin account below, uncomment and comment out the line above to save time...
# $O365Admin = "admin.user@domain.com"
$o365cred = Get-Credential -Username $O365Admin -Message "Supply a Office365 Admin"
$strO365OrgName = read-host "submit your O365 orgname (Only organization, like 'contoso')"
$Userlist = read-host "submit your list of users that have been provisioned"
$Userlist = $Userlist -replace " ", ""
$Emails = $userlist -split ","
#SPlitting list into Array
Foreach($Email in $Emails)
{
    # Constructing URL from the UPN/Email address
    $struser = $Email
    $pos= $strUser.IndexOf("@")
    $len = $struser.Length -1
    $strUser = $strUser.SubString(0, $pos)
    $strUser = $strUser -replace "\.", "_"
    $orgpos = $pos + 1
    $orglen = $len - $pos
    $strOrg = $Email.SubString($orgpos, $orglen)
    $strOrgNamePos = $strOrg.IndexOf(".")
    $strOrgName = $strOrg.SubString(0, $strOrgNamePos)
    $strOrgSuffixPos = $strOrgNamePos +1
    $strOrgNameLen = $strOrg.Length - $strOrgSuffixPos
    $strOrgSuffix = $strOrg.SubString($strOrgSuffixPos, $strOrgNameLen)
    $strOrg = $strOrg -replace "\.", "_"
    $PersonalOrgURL = "https://" + $strO365OrgName + "-my.sharepoint.com/personal/"
    $SiteUrl= $PersonalOrgURL + $strUser
    $SiteUrl= $SiteUrl+ "_" + $strOrg
    write-host "Verifying user:" $Email
$HTTP_Request = [System.Net.WebRequest]::Create($SiteUrl)
$HTTP_Request.UseDefaultCredentials = $true
$HTTP_Request.Credentials = $o365cred
try {
    $HTTP_Response = $HTTP_Request.GetResponse()
}
catch [System.Net.WebException] {
    $HTTP_Response = $_.Exception.Response
}
$HTTP_Status = $HTTP_Response.StatusCode
If ($HTTP_Status -eq 200 -or $HTTP_Status -eq 403 )   { 
    Write-Host -ForegroundColor Green "Site for user $Email exists!"
}
Else {
    Write-Host -ForegroundColor Yellow "The OneDrive site for user $Email does not respond, try again later or provision it again"
}
$HTTP_Request = $null
$HTTP_Response = $null
$HTTP_Status = $Null
}

***** SCRIPT 2 ENDS HERE *****

Example 1

Multiple emaildomains
O365 Orgname: contoso
Users: test.user1@contoso.com, test.user2@northwind.com, test.user3@contoso.com, test.user4@contoso.com, test.user5@contoso.com

PS1

Like you can see, the list contains users with different emaildomains, contoso and northwind. THe submitted O365 orgname is however used to verify the OneDrive site, contoso.
In this example, the user test.user@contoso.com does not seem to have the OneDrive site provisioned.

Example 2

Single emaildomain
Users: test.user1@contoso.com, test.user2@contoso.com, test.user3@contoso.com, test.user4@contoso.com, test.user5@contoso.com

PS2

Like you can see, the list contains users with only contoso as emaildomain.
In this example, the user test.user2@contoso.com does not seem to have the OneDrive site provisioned. Try to provision again/verify manuelly.

References and Credits


Office 365 guide series – Provision OneDrive for Business using PowerShell
https://blog.blksthl.com/2014/08/07/office-365-guide-series-provision-onedrive-for-business-using-powershell/


Credits & many thanks to

Jörgen Andersson, Xperta

Always, Mattias Gutke at CAG


SP2013logo

_________________________________________________________

Enjoy!

Regards

Twitter | Technet Profile | LinkedIn

Office 365 guide series – Provision OneDrive for Business using PowerShell


 Office365logo       SP2013logo

Hi SharePoint Online administrators!

This time I will show you how to:

Provision OneDrive for Business using only PowerShell.

Lisebergx

Get the people up there…into the Clouds…(Liseberg, Gothenburg, Sweden)

Time to roll out OneDrive for Business in the Enterprise? Or maybe you just want to implement OneDrive for Business in a controlled way, and you may not be a hardcore developer either.

If you want to do any kind of preparation before letting the users into their OneDrives, then you will need to have them created/provisioned first, after that you can go ahead and give yourself permission (separate blogpost) and migrate a users files (separate blogpost), preconfigure, brand, and so on.
I have in this guide tried to offer a way to provision the OneDrive for Business to your users in a way that do not require you to know C#, Visual Studio or any development at all, how does that sound? All you need to do is follow this guide to the letter, and you will be sucessfull.

The only way I have found so far to provision a users OneDrive for Business as a administrator is to use code developed by the Office AMS Community Project. This includes among other things, a great Visual Studio sample Project for provisioning users OneDrive for business, and this is really spot on. But…it is not that easy to get going, for a non-developer it may prove to be impossible.

I have used code developed in the samples but I will only use PowerShell to execute it. This is what will make it easy for others (such as you?) to use.
The Office AMS Project also includes the SharePoint client assemblies needed to do anything with SPO using CSOM, Client Side Object Model(Code executed on the client).

In order to get started provisioning your users OneDrive for Business sites(or we can just as well call them MySites, since this is wat they really are…), you just follow these steps:

Quickguide

1. Download Download and unpack the Office App Model Samples from Codeplex, last tested version is currently 2.0 found here: DOWNLOAD Office AMS.
2. Get assemblies Locate the Microsoft.sharepoint.client assembles in the unpacked Office App Model Samples folders, located in <unpack location>\Office App Model Samples v2.0\Assemblies\16\ Copy the files Microsoft.SharePoint.Client.dll, Microsoft.SharePoint.Client.UserProfiles.dll and Microsoft.SharePoint.Client.Runtime.dll and put them in a folder of your choice, I used C:\Temp\ in my sample. (You can also leave the files as is, but then you have to alter the PowerShell code to reference the path in the Office AMS folders)
3. Run the script In a PowerShell prompt/ISE running as admin, run the PowerShell script available below andHERE (Download as Word file), this will load the code needed to access SPO and start provisioning. (Verify and update if needed the $MyAssemblies line at the very bottom)
4. Execute Execute the code in your PowerShell prompt/ISE running as admin (It has to be the same prompt/ISE used to execute the script), use this syntax: Syntax: [OneDriveforBusiness.Provision]::Execute(<SharePointAdminURL>,<GlobalTenantAdminAccount>,<AdminAccountPassword>,<ListofUsersEmailSeparatedbyCommas>)
5. Done – Verify… Done! Verify that the sites have been provisioned by entering the address in your browser of choice.
References/Credits Reference links and credits


The detailed Guide:

1. Download


New!
Download the latest version of SharePoint Server 2013 Client Components SDK x86 or x64. This SDK contains the dll’s needed.
During the install, the dll’s will be added to the following path:
C:\Program Files\Common Files\microsoft shared\Web Server Extensions\16\ISAPI\

Download the latest version (Office App Model Samples 2.0 – July 2014 – Update 1) of the Office App Model Samples, the Project has been renamed to the more formal Office365 Developer Patterns & Practices but it is still the same.
The last tested version is currently 2.0 found here: DOWNLOAD Office AMS


Back to Menu

2. Get the assemblies

Unpack the files to a location of choice. (The files will ironically enough not synch very well if stored in a OneDrive for Business synchronized folder – long path among other issues).
Locate the ‘assemblies\16’ folder, in this folder you will find the 3 files we need, Microsoft.SharePoint.Client.dll, Microsoft.SharePoint.Client.UserProfiles.dll and Microsoft.SharePoint.Client.Runtime.dll. Either you put these Three files in a better location, or you make a note of the path to the folder.

Back to Menu

3. Run the script

Start a PowerShell prompt/ISE running as administrator. This is where all the magic will happen. Copy the powershell script below, or download the scriptfile HERE (Word file), then add the script to the Prompt/ISE.
Before executing the script, you will need to alter one thing, the path to the assembly files. Update the line where we give a value to the $MyAssemblies to reflect where you have your SharePoint.client dll files. This is crucial since the code needs to be able to access these asseblies during execution.

$MyAssemblies = (‘C:\Temp\Microsoft.SharePoint.Client.dll’,’C:\Temp\Microsoft.SharePoint.Client.Runtime.dll’,’C:\Temp\Microsoft.SharePoint.Client.UserProfiles.dll’,’System’,’System.Security’)

Unless you have stored your SharePoint.client.dll’s in C:\Temp folder, you will have to update the Three paths to reflect where the files are stored. Example:

$MyAssemblies = (‘C:\Users\Thomas\Documents\Office App Model Samples v2.0\Assemblies\16\Microsoft.SharePoint.Client.dll’,’C:\Users\Thomas\Documents\Office App Model Samples v2.0\Assemblies\16\Microsoft.SharePoint.Client.Runtime.dll’,’C:\Users\Thomas\Documents\Office App Model Samples v2.0\Assemblies\16\Microsoft.SharePoint.Client.UserProfiles.dll’,’System’,’System.Security’)

Once this is done, you can go ahead and execute the script.

HERE (Download as Word file)

# By Thomas Balkeståhl - blog.blksthl.com August 6 2014
#
# 1. Run script to load the C# code into the Assembly
# 2. Execute using the following syntax:
#
# Syntax:  [OneDriveforBusiness.Provision]::Execute(<SharePointAdminURL>,<GlobalTenantAdminAccount>,<AdminAccountPassword>,<ListofUsersEmailSeparatedbyCommas>)
# Example: PS C:\> [OneDriveforBusiness.Provision]::Execute("https://donkeymind-admin.sharepoint.com","globaladmin@donkeymind.com","MyVerySecretPassWord1!","user1@donkeymind.com,user2@donkeymind.com,user3@donkeymind.com")
# Input:            
# adminurl = The Tenanat Admin URL for your SharePoint Online Subscription, example: "https://donkeymind-admin.sharepoint.com".
# adminuser = The Credentials of the user who has tenant admin permission, example: "admin@donkeymind.com".
# password = The password in cleartext to your tenant admin account(I know, not ideal...but it was a quick and dirty to make it work).
# users = The email IDs for users who's personal site you want to create in the form of a comma-separated string, example: "user1@donkeymind.com,user2@donkeymind.com,user3@donkeymind.com". Do not enter more than 200 users at a time.
$MyCSharpSource = @" 
using Microsoft.SharePoint.Client;
using Microsoft.SharePoint.Client.UserProfiles;
using System;
using System.Collections.Generic;
using System.Linq;
using System.Security;
using System.Text;
using System.Threading.Tasks;
namespace OneDriveforBusiness
{
    public class ProvisionOneDrive
    {
        public static void Execute(string adminurl, string adminuser, string password, string users)
        {
        
            string siteUrl = adminurl;
            string userName = adminuser;
        
            SecureString pwd = GetPassword(password);
            string[] emailIds = GetEmailId(users);
            /* End Program if no Credentials */
            if (string.IsNullOrEmpty(userName) || (pwd == null) || emailIds == null || string.IsNullOrEmpty(siteUrl))
                return;
            SharePointOnlineCredentials _creds = new SharePointOnlineCredentials(userName, pwd);
            CreatePersonalSiteUsingCSOM(_creds, siteUrl, emailIds);
            Console.Read();
        }
        public static SecureString StringToSecure(string nonSecureString)
        {
            SecureString _secureString = new SecureString();
            foreach (char _c in nonSecureString)
                _secureString.AppendChar(_c);
            return _secureString;
        }
        // tenantAdminUrl = The Tenanat Admin URL for your SharePoint Online Subscription
        // spoCredentials = The Credentials of the user who has tenant admin permission.
        // emailIDs = The email IDs for users whos personal site you want to create.
        public static void CreatePersonalSiteUsingCSOM(SharePointOnlineCredentials spoCredentials, string tenantAdminUrl, string[] emailIDs)
        {
            using (ClientContext _context = new ClientContext(tenantAdminUrl))
            {
                try
                {       
                    _context.AuthenticationMode = ClientAuthenticationMode.Default;
                    _context.Credentials = spoCredentials;
                    ProfileLoader _profileLoader = ProfileLoader.GetProfileLoader(_context);
                    _profileLoader.CreatePersonalSiteEnqueueBulk(emailIDs);
                    _profileLoader.Context.ExecuteQuery();
                    Console.Write("Provisioning of the users supplied has been initiated, please allow for the provisioning to finish, this can take up to 5 minutes.");
                }
                catch (Exception _ex)
                {
                    Console.WriteLine(string.Format("Provisioning failed, find the problem and try again. The error message is {0}", _ex.Message));
                }
            }
        }
        
        public static SecureString GetPassword(string password)
        {
            SecureString sStrPwd = new SecureString();
            foreach (char ch in password) sStrPwd.AppendChar(ch);
            return sStrPwd;
        }
        public static string[] GetEmailId(string users)
        {
            string[] emailID;
            try
            {
                string Output = "Provisioning the supplied list of users: " + users;
                Console.WriteLine(Output);
                string emailInput = users;
                if (!string.IsNullOrEmpty(emailInput))
                {
                    emailID = emailInput.Split(new char[] { ',' });
                    return emailID;
                }
                else
                {
                    return null;
                }
            }
            catch (Exception e)
            {
                Console.WriteLine(e.Message);
            }
            return null;
        }
    }
}
"@
$ass1 = [System.Reflection.Assembly]::LoadFile("c:\temp\Microsoft.SharePoint.Client.dll") 
$ass2 = [System.Reflection.Assembly]::LoadFile("c:\temp\Microsoft.SharePoint.Client.Runtime.dll") 
$ass3 = [System.Reflection.Assembly]::LoadFile("C:\temp\Microsoft.SharePoint.Client.UserProfiles.dll")
$MyAssemblies = @( $ass1.FullName, $ass2.FullName,$ass3.Fullname,"System","System.Core","System.Security")
Add-Type -ReferencedAssemblies $MyAssemblies -TypeDefinition $MyCSharpSource -Language CSharp -PassThru

HERE (Download as Word file)

Back to Menu

4 Executing the provisioning code

ISE2

We have now loaded the code into memory (a .NET Framework class in your Windows PowerShell session), where it will be available just like if we had created a C# DLL and loaded it into the GAC. Remember though, the code is now static and connot be altered. If you need to make any Changes, have a look in the references section where I will show how to be able to alter the code after it has been loaded once.

Now, we have to call on the code laoded into memory, this is done from the same prompt/ISE used to load the code, the code only exists in that prompt session so it will not be available in any other prompt.

Use the following syntax to execute:

Syntax: [OneDriveforBusiness.ProvisionOneDrive]::Execute(<SharePointAdminURL>,<GlobalTenantAdminAccount>,<AdminAccountPassword>,<ListofUsersEmailSeparatedbyCommas>)

Example: PS C:\> [OneDriveforBusiness.ProvisionOneDrive]::Execute(“https://donkeymind-admin.sharepoint.com&#8221;,”globaladmin@donkeymind.com”,”MyVerySecretPassWord1!”,”user1@donkeymind.com,user2@donkeymind.com,user3@donkeymind.com”) 

What you need to supply when running the code, is your SharePoint online admin address, a tenent admin account and password, plus a list of emailadresses to the users that will be provisioned with a OneDrive for Business.

Start by typing in this:

[OneDriveforBusiness.ProvisionOneDrive]::Execute

ISE4

What this does is call the code we just loaded from PowerShell, The Namespace is OneDriveforBusiness, the Class is ProvisionOneDrive and finally, the void or function is Execute.

<SharePointAdminURL>: The Admin address is available if you go the the Admin/SharePoint administration web. This will be visible in the address field of your browser:

Admin1x

Admin0x

Note the address: https://donkeymind-admin.sharepoint.com.

<GlobalTenantAdminAccount>: An account that is a global Office 365 Tenant Administrator.
The account must have this setting in Office 365 Admin Center/Users & Groups – User object:

Parameters1x

<AdminAccountPassword>: The password of the <GlobalTenantAdminAccount>. This will be entered in cleartext, not the ideal security solution but this is the only way I could solve it.
(Suggestions on how to prompt for the password in a secure way is welcome!)

<ListofUsersEmailSeparatedbyCommas>: This is the users that will have provisioned with OneDrive for Business. A list of UPN’s (User Principal Name) separated by commas. The UPN must be the one registered in Office 365. The UPN is in the form of a emailadress, for example: user@domain.com. Enter the string using double quotes on both sides.

This is what the string should look like: “user1@donkeymind.com, user2@donkeymind.com, user3@donkeymind.com, user4@donkeymind.com, user5@donkeymind.com”

When you have all the values in order, type in the command with your parameters and execute the provisioning:

PS C:\PSScripts> [OneDriveforBusiness.ProvisionOneDrive]::Execute(“https://donkeymind-admin.sharepoint.com&#8221;,”thomas@donkeymind.onmicrosoft.com”,”**********”,”testaccount@donkeymind.onmicrosoft.com”)

When executed ok, you will see this:

ISE9

The limit for submitting users to be provisioned have been set by Microsoft to 200 at the time. This code do allow more but it will cause issues. Better to do them 200 at the time, wait unitl done and then do 200 more, alternatively, alter the code to include a check so that every user have been provisioned ok Before moving onto the next.

Now, you can execute the commend again and again. You can also use the code obviously for other tenants. Simple provide the commend with a different account, a different admin URL and you are good to go. Good luck!

Back to Menu

5. Done! Verify….

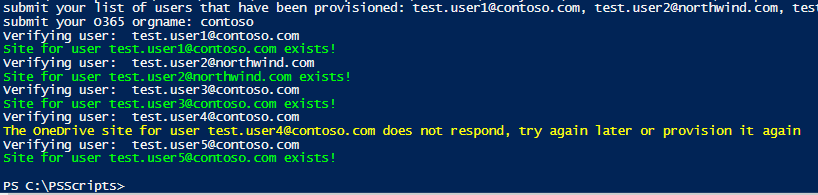
For a tool to verify your list of users directly, check out this guide: Office 365 guide series – Verify Provisioned OneDrives using PowerShell

Verify that the sites have been provisioned by browsing to the direct URL using your admin account. The URL will look like this:

User: thomas.balkestahl@donkeymind.onmicrosoft.com
URL: https://donkeymind-my.sharepoint.com/personal/thomas_balkestahl_donkeymind_onmicrosoft_com/

User: han.solo@alliance.org
URL: https://donkeymind-my.sharepoint.com/personal/han_solo_alliance_com/

Since you are using your admin account, you have access to the private part of the OneDrive/MySite.

Note: All the steps in this guide have been verified on a Windows 8.1 Update 1 machine, using PowerShell ISE and the Office AMS July 2014 Update 1. All tests have been done during August of 2014, the functionality of Office 365 may change over time and may thus cause this guide to fail. If this happens I will try to be alert and update the guide accordingly. 

Possible errors

1. You need to alter the script, then run the script again?

You have two choices if this happens, you have loaded the code once and you need to edit it and run again. If you do this you may get the error message saying that the ‘Type has already been added’ or similar. If you get this, simply restart your PowerShell prompt/ISE, OR, Change the name of the public class:

Code1x

Add for example a number after, so that the class is called: ProvisionOneDrive1, then 2 and so on.

2. Nothing happens, no OneDrive shows up?

Verify all your values, then execute the command again. Remember though, that the time it takes for a site to show up may vary and can take up to 5 minuter PER SITE. Wait a moment longer, try it again

If you have the wrong address when verifying, you will see either of these pages depending on the URL used:

A link like:
https://donkeymind-my.sharepoint.com/personal/testuser4_donkeymind_onmicrosoft_com/_layouts/start.aspx#/Documents/Forms/All.aspx?LoadProfile=TRUE

Error1

A link like:
https://donkeymind-my.sharepoint.com/personal/testuser4_donkeymind_onmicrosoft_com

error2

404 could also just mean that the site is in queue and has not been provisioned yet.

References and Credits


Stefan Gossners old post: Using CSharp (C#) code in Powershell scripts
http://blogs.technet.com/b/stefan_gossner/archive/2010/05/07/using-csharp-c-code-in-powershell-scripts.aspx

Office365 Developer Patterns & Practices/Office App Model Samples
http://officeams.codeplex.com/

TechNet Add-Type
http://technet.microsoft.com/en-us/library/hh849914.aspx

Credits & many thanks to

Kimmo Forss, Microsoft

Jörgen Andersson, Xperta

All the contributors of Office AMS

Always, Mattias Gutke at CAG

Stefan Gossner, Microsoft (Blog) for that short and concise post written a few years back.

My love for putting up with me while solving this problem and writing this post!

SP2013logo

_________________________________________________________

Enjoy!

Regards

Twitter | Technet Profile | LinkedIn

Export a document library using Export-SPWeb and itemurl


Export-SPWeb

(This is my better version of the TechNet articles on the same CMDlet that does a poor job with the details, I hope that it will help some of you)
SharePoint 2010 | SharePoint 2013
Applies to:  SharePoint Foundation 2010 | SharePoint Server 2010 | SharePoint Foundation 2013 | SharePoint Server 2013 

Exports a site, list, or library.


Export-SPWeb [-Identity] <GUID/Name/SPWeb object> -Path <String> [-AssignmentCollection <SPAssignmentCollection>] [-CompressionSize <Int32>] [-Confirm [<SwitchParameter>]] [-Force <SwitchParameter>] [-HaltOnError <SwitchParameter>] [-HaltOnWarning <SwitchParameter>] [-IncludeUserSecurity <SwitchParameter>] [-IncludeVersions <LastMajor | CurrentVersion | LastMajorAndMinor | All>] [-ItemUrl <String>] [-NoFileCompression <SwitchParameter>] [-NoLogFile <SwitchParameter>] [-UseSqlSnapshot <SwitchParameter>] [-WhatIf [<SwitchParameter>]]

——————–EXAMPLE———————–

Export-SPWeb http://site –Path "c:\temp\site export.cmp" -ItemURL "/subsite/documents"

This example exports the document library at http://site/subsite/documents to a new file called ‘site export.cmp' in the ‘C:\temp’ directory.

Parameters

Parameter

Required

Description

Identity Required Specifies the URL or GUID of the Web to be exported. The type must be either
– a valid GUID, in the form ‘12345678-90ab-cdef-1234-567890bcdefgh’
– a valid name of a SharePoint site (for example, MySPSite1)
or a URL: http://blog.blksthl.com
or an instance of a valid SPWeb object
Path Required Specifies the name of the export file. If the -NoFileCompression parameter is used, a directory must be specified; otherwise, any file format is valid.
Example: “c:\temp\exportedsite.cmp” or with the -NoFileCompression “c:\temp\exportedsite\”
AssignmentCollection Optional Manages objects for the purpose of proper disposal. Use of objects, such as SPWeb or SPSite, can use large amounts of memory and use of these objects in Windows PowerShell scripts requires proper memory management. Using the SPAssignment   object, you can assign objects to a variable and dispose of the objects after they are needed to free up memory. When SPWeb, SPSite, or SPSiteAdministration objects are used, the objects are automatically disposed of if an assignment collection or the Global parameter is not used.

                                                                                                                                         Note:
When the Global parameter is used, all objects are contained in the global store. If objects are not immediately used, or disposed of by using the Stop-SPAssignment command, an out-of-memory scenario can occur.
CompressionSize Optional Sets the maximum file size for the compressed export files. If the total size of the exported package is greater than this size, the exported package will be split into multiple files.
Confirm Optional Prompts you for confirmation before executing the command. For more information, type the following   command: get-help about_commonparameters
Force Optional -Force Forcefully overwrites the export package if it already exists.The type must be either of the following values:
True
FalseThe default value is False.
HaltOnError Optional Stops the export process when an error occurs.
HaltOnWarning Optional Stops the export process when a warning occurs.
IncludeUserSecurity Optional Preserves the user security settings except for SPLists that have broken inheritance and item level   permissions set.
(Use Import-SPWeb with –IncludeUserSecurity to preserve security on import)
IncludeVersions Optional Indicates the type of file and list item version history to be included in the export operation. If the
-IncludeVersions parameter is absent, the Export-SPWeb cmdlet by default uses a value of CurrentVersion. The type must be any one of the following versions:
LastMajor “Last major version for files and list items (default)”
CurrentVersion “The current version, either the last major version or the last minor version”
LastMajorAndMinor “Last major and last minor version for files and list items”
All “All versions for files and list items”
ItemUrl Optional Specifies the relative path to the object to be exported. Can also be a GUIDThe type must be a valid relative path, for example, /Subsite/Documents
or a valid GUID in the form: 12345678-90ab-cdef-1234-567890bcdefgh
NoFileCompression Optional Either enables or disables file compression in the export package. The export package is stored in the   folder specified by the Path parameter or Identity parameter. We recommend that you use this parameter for performance reasons. If compression is enabled, the export process can increase by approximately 30 percent.
NoLogFile Optional Suppresses the generation of an export log file. If this parameter is not specified, the Export-SPWeb   cmdlet will generate an export log file in the same location as the export package. The log file uses Unified Logging Service (ULS).It is recommended to use this parameter. However, for performance reasons, you might not want to generate a log file.
UseSqlSnapshot Optional Specifies a SQL Database Snapshot will be created when the export process begins, and all exported   data will be retrieved directly from the database snapshot. This snapshot will be automatically deleted when export completes.
WhatIf Optional Displays a message that describes the effect of the command instead of executing the command. For   more information, type the following command: get-help about_commonparameters

References:

Export-SPWeb
http://technet.microsoft.com/en-us/library/ff607895(v=office.15).aspx

Export a site, list, or document library (Search Server 2010)
http://technet.microsoft.com/en-us/library/ff428101(v=office.14).aspx

Thanks to:

Mattias Gutke – CAG – My main man!


___________________________________________________________________________________________________

Good Luckl!!

Regards

Twitter | Technet Profile | LinkedIn

Configure ULS log and Usage and Health log location


SharePoint jokers!

If you left the settings in SharePoint 2013 as default when installing and configuring, then you will probably have a log path that looks like this for both the ULS log and the Usage and Health log.
C:\Program Files\Common Files\microsoft shared\Web Server Extensions\15\LOGS

If you want to change this to a new path, maybe on a different disk like D: (recommended) or on a simpler path easier to remember, use the following commands:

You will need to run the commands in a PowerShell running as administrator and you will also need to load the SharePoint snapin first, add-pssnapin.
add-pssnapin microsoft.sharepoint

For the Diagnostics log(ULS)
set-SPDiagnosticConfig -LogLocation “D:\Program Files\Common files\Microsoft shared\Web server extensions\15\LOGS”
or
set-SPDiagnosticConfig -LogLocation “D:\SharePoint Logs\ULS”

For the Usage and Health log
set-SPUsageService -UsageLogLocation “C:\Program Files\Common files\Microsoft shared\Web server extensions\15\LOGS”
or
set-SPUsageService -UsageLogLocation “D:\SharePoint Logs\Health”

set-SPDiagnosticConfig -LogLocation “C:\Program Files\Common files\Microsoft shared\Web server extensions\15\LOGS”

In my environment, the Diagnostics trace log path looks like this:
ULS2

ULS1

And for the Usage and Health log, it looks like this:

U&H2

U&H1

References:

(If the two paths Point to a different location then you may see this in your event log)
6398 – The Execute method of job definition…SPUsageImportJobDefinition

https://blog.blksthl.com/2013/05/27/6398-the-execute-method-of-job-definition-spusageimportjobdefinition/

ULS Log Viewer download
http://archive.msdn.microsoft.com/ULSViewer

Thanks to:

Ankie at my customers, who pointed out the Usage and Health log issue 6398 in the first place.


___________________________________________________________________________________________________

Enjoy!

Regards

Twitter | Technet Profile | LinkedIn