

Kerberos…the two headed dog? Three heads? A weird kind of German sausage? Anything to do with a sidewalk? It is something you learn to respect deeply but don’t really know exactly just what it is…or how to manage? (At least this statement goes for the three headed dog…don’t know about the sausage…)

(Kerberos and Herakles)
I have had problems with getting SharePoint to work with Kerberos, I can’t lie about that. Most of the time, I have had TechNet articles, The Whitepaper (242 pages) and other peoples great blog posts to help me. All have been good and have aimed to help get it going, but none have given me the easy way to configure and verify. This is what I’m aiming at here with this bold title:
‘The final Kerberos guide for SharePoint technicians’
I hope to accomplish what others have failed at, not to try and explain everything about Kerberos and SharePoint, but only to show how to get it working easy and how to verify that you have succeeded, with as little work as possible and with the Tools at hand if possible.
Looking for the 2013 version of this guide? You will find it here.
I have during my struggles found that there are a few steps that you always need to take, and most of the time you do these steps and then nothing else. Follow this guide and most of you will be all right, I will later on try to add the same simple steps for more ‘advanced’ scenarios as well, like with SSRS or RSS feeds, SQL and such.
The steps I am talking about, what are they then…? Follow the guide below and you will find out.
Scenario 1 – Basic
Kerberos authentication to SharePoint 2010 site on default port 80 with a single SharePoint Web Server(Windows Server 2008 R2) from Windows 7, IE 9. (using Basic delegation/Unconstrained delegation)
This guide can be downloaded as a whitepaper from the Microsoft Technet Gallery.
The final Kerberos guide for SharePoint technicians
This guide is also available in a SharePoint 2013 version, adapted to the slight differences in SharePoint 2013 preview.
The first Kerberos guide for SharePoint 2013 technicians
(This guide assumes that a normal NTLM authentication to the same Web Application with the same user has been verified, by adding this line I’m among other things taking AAM and site permissions out of the equation. These things have to work before attempting to use this guide)
| Note: To perform some of these procedures, you must be a member of the Domain Admins group or the Enterprise Admins group in Active Directory and you have to be a member of the Farm Administrators Group in SharePoint, or you must have been delegated the appropriate authorities. As a security best practice, consider using ‘Run as’ when applicable to perform these procedures. |
Checklist:
| Step |
Summary |
| 1. Name Resolution |
An entry for the Web Applications URL must exist in either DNS or in the clients hosts file. |
| 2. Service Principal Names |
HTTP SPN’s must be created for the Web Application URL(s) and its Application Pool service account. |
| 3. Delegation |
The SharePoint Web Server must be ‘Trusted for delegation’ in Active Directory. |
| 4. Authentication Provider |
The Web Applications Authentication provider must be set toAuthentication type: WindowsIIS Authentication setting: Integrated Windows authentication/Negotiate(Kerberos) |
| 5. Verification of functionality(IMPORTANT!) |
Klist.exe on client must have a HTTP ticket for URL and User accountSecurity log on SharePoint Web Server must have event ID 4624 with user and kerberos.
(If Kerberos fails NTLM authentication will be used!) |
| References and Credits |
–
Step 1
Name Resolution
There are two ways to do this, one excellent and one less excellent, the lesser of the two is really only ‘allowed’ for developing or testing purposes, but it exists and should be taken into consideration. Testing is also something that you will want to do here, and the less modifications you must do that requires a service down or a (Service Management) change order at an early stage, the better. Use Hosts for testing, then DNS in production.
DNS
Make sure that the URL of the Web Application has a A-Record in DNS, if not, you need to create it.
A server that is joined to an Active Directory Domain gets a A-record created automatically, but verify that it is there.
Create a A-Record in DNS using the following:
1.1 Open DNS Management in Administrative Tools on a DNS server.
 1.2 Expand forward lookup zones container.
 1.3 Right click on the zone (domain name) and click on new host (A or AAAA).


1.4 Type in the name of the record, this is the URL of the Web Application (minus the domain part in a FQDN)

1.5 Type in the IP Address of the SharePoint Web Server

1.6 Click on ‘Add Host’
1.7 Click on ‘Done’
1.8 Verify that the record has been created in the right pane.

1.9 In a Command Prompt, ping the Web Application URL.

1.10 You are now done with step 1, Name Resolution. Move on to step 2. Service Principal Name(SPN).
| Note: A known issue exists with some clients (IE7 and IE8 included) that causes kerberos authentication to fail with the use of DNS alias instead of an A-Record. |
Hosts (not recommended method)
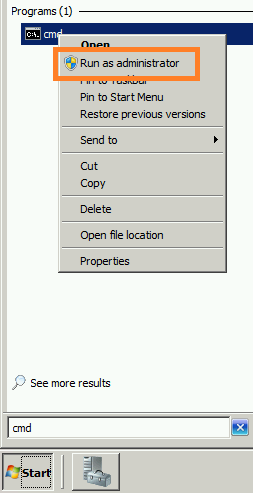
1.x1 Locate the hosts file on your client or server if this is what you are using as client. It is located in the following path: C:\Windows\System32\Drivers\etc\hosts. Use Notepad to open it(open notepad using right click and ‘Run as Administrator’ and you will be allowed to save the changes)
1.x2 At the bottom of the file, add a row with the following: IP-Address<tab>hostname/FQDN <enter>
– Example:
192.168.1.112 sharepoint
– Also add any FQDN’s needed, like in my example:
192.168.1.112 sharepoint.corp.balkestahl.se
| Note: Always end the last line with a Linefeed/Enter, else you may experience issues using the hosts file. |

1.x3 Save the file using the same filename(hosts only, no extension)
You are now done with step 1, Name Resolution. Move on to step 2. Service Principal Name(SPN).
Back to main menu
–
Step 2
Service Principal Name(SPN)
| Note: To perform these procedures, you must have membership in Domain Admins, Enterprise Admins, or you must have been delegated the appropriate authority. For information on delegating the permissions to modify SPNs, see Delegating Authority to Modify SPNs. |
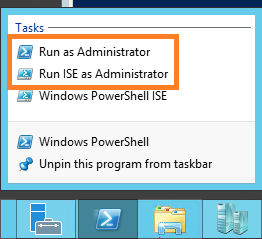
| Note: To use setspn, you must run the setspn command from an elevated command prompt. To open an elevated command prompt, click Start, right-click Command Prompt, and then click ‘Run as administrator’. |
When creating or setting up your SPN’s, you need some basic information first, as you will be creating HTTP SPN’s you need a URL and a Service account name. If the SharePoint Web Application has both a NetBIOS name and an FQDN, then you need to create separate SPN’s for both.
2.1 Start by opening a Command Prompt ‘Running as administrator’ (See note at the start of this step 2)

2.2 Next, list all SPN already in Place for the Service Account, type:
setSPN -L domain\serviceaccount (hit enter) or without the domain name setSPN -L serviceaccount (hit enter)
Wait for it…

Most likely, you get back nothing. This is ok. If you do get some registered SPN’s back, just make sure that they are not the same as the ones you are about to add, if they aren’t they you can leave them be.
2.3 Next, we create our own SPN’s for the service account paired with the Web Application and SPN type, to create this SPN type:
setspn -S HTTP/mywebappurl domain\serviceaccount (hit enter) Note: HTTP can be upper or lowercase, does not matter.

2.4 Next, verify that it has been created ok, type:
setspn -L domain\serviceaccount (hit enter)
Wait for it…

Now, the result should be one more entry than you had before, you should see your new SPN listed.
HTTP/mywebappurl
2.5 For good measure, add also an SPN for the FQDN, type:
setspn -S HTTP/mywebappurl.domain.com domain\serviceaccount (hit enter)

2.6 Listing the SPN’s now should list one additional SPN, type:
setspn -L domain\serviceaccount (hit enter)

If Everything has gone well and you had no previous SPN’s created from this service account, then the result from the command will be:
HTTP/mywebappurl
HTTP/mywebappurl.domain.com
The necessary SPN’s have now been created successfully and the service will be able to request tickets in your name.
| Note: Using the -S parameter with setspn when creating an SPN will check for duplicates before creating a new one, thus eliminating the risk of duplicate SPN’s, which would cause Kerberos to fail. |
You are now done with step 2, Service Principal Name(SPN). Move on to step 3. Trust for delegation.
Back to main menu
–
Step 3
Trust for delegation
| Note: To perform this procedure, you must be a member of the Domain Admins group or the Enterprise Admins group in Active Directory, or you must have been delegated the appropriate authority. As a security best practice, consider using Run as to perform this procedure. |
By default, no server is trusted for delegation, meaning that a service on a server in the Active Directory, cannot act on a user’s behalf, basically this means that a service if trusted for delegation, can impersonate a user and request a Kerberos ticket in the users name.
Change this setting in Active Directory using the following:
3.1 Open Active Directory Users and Computers.

3.2 In the console tree, click Computers. (Or the appropriate OU where your SharePoint Web Server resides)

3.3 Right-click the computer you want to be trusted for delegation, and click Properties
3.4 On the Delegation tab, click ‘Trust this computer for delegation to any service (Kerberos only)’.


3.5 Click OK.
You are now done with step 3. Trust for delegation. Move on to step 4. Authentication Provider.
Back to main menu
–
Step 4
Authentication Provider
| Note: To perform this procedure, you must be a member of the SharePoint Farm Administrators group, or you must have been delegated the appropriate authority. |
| Note: If you are creating a new Web Application at this Point, simply select ‘Classic Mode Authentication’ as authentication and ‘Negotiate(Kerberos)’ as Authentication provider in the Security Configuration dialog during Web Application creation. |
In order for the Web Application and SharePoint to use Kerberos instead of the default NTLM, we have to configure SharePoint to use just that. Unlike what many Think, there is no way to force SharePoint to use only Kerberos, what we have available is the option to use Kerberos if possible, else use NTLM. Don’t ask me why this is so, but this is what we have. However, if all of the Kerberos Components are configured correctly, this is what will be used for authentication at all times.
So…the last configuration Before testing it all out…configure SharePoint to use Kerberos using the following:
4.1 In the Central Administration, go to ‘Application Management’ – ‘Manage Web Applications’
4.2 Select the Web Application you want to configure, and click on Authentication providers in the top ribbon.

4.3 In the ‘Authentication Providers’ dialog, click on the authentication provider you want to alter, usually its default.

4.4 In the ‘Edit Authentication’ dialog, verify that ‘Authentication Type’ is set to: ‘Windows’.

4.5 Scroll down the dialog to ‘IIS Authentication Settings’, there change the setting from ‘Integrated Windows Authentication’ and NTLM, to ‘Integrated Windows Authentication’ and ‘Negotiate (Kerberos)’


4.6 Click OK in the popup dialog saying that ‘you have chosen to use Kerberos…’

4.7 Scroll down to the end of the dialog and click Save.

You have now made the modifications needed in SharePoint for Kerberos authentication to function, now we have to verify that the Changes has been made to IIS by SharePoint.
To verify the IIS Web Site Authentication settings, follow these steps:
4.8 In Internet Information Services (IIS) Manager, locate the Web Application under ‘Sites’.

4.9 Select the Web Application and in the middle pane under the heading ‘IIS’, locate ‘Authentication’

4.10 Select the ‘Authentication’ Icon and in the right ‘Actions’ pane, clikc on ‘Open Feature’.

4.11 In the Authentication dialog, select Windows Authentication (usually at the bottom).
4.12 Click on ‘Providers’ in the right ‘Actions’ pane.

4.13 Verify that ‘Negotiate’ and ‘NTLM’ are the only ones listed and that they are listed in that order, ‘Negotiate’ at the top.

4.14 Click Cancel and then again in the right ‘Actions’ pane click on ‘Advanced Settings’.
4.15 Verify in the ‘Advanced Settings’ dialog that ‘Extended Protection’ is ‘Off’ and that ‘Enable Kernel-mode authentication’ is unchecked.

4.16 Click Cancel.
4.17 Exit Internet Information Services Manager.
You are now done with step 4. Authentication Provider. Move on to step 5. Verification of functionality.
Back to main menu
Note: DO NOT make any Changes using the Internet Information Services Manager, if Changes need to be made, Always use the SharePoint Central Administration interface.
Another way to make changes to SharePoint is PowerShell, which is also a recommended way if you really know what you are doing. |
–
Step 5
Verification of functionality
Many Tools exist that can be used to verify that Kerberos authentication actually occurs, Tools such as NetMon(Network Monitor), WireShark, Fiddler, KerbTray and many more can be used for this step. I have however focused on two Tools that will be sufficient and that exists already in the Environment. I have chosen to focus on these two:
Klist (Client)
Security Log (Server)
Klist
(Klist is available on Windows server 2008 and later and on Windows 7 and later, for Windows Server 2003, see note at the end of this step)
Before anything, Close down all open Internet Explorers or other browser sessions you have open.
5.1 On the client, start a command prompt as administrator (Right click, ‘Run as administrator’).
5.2 Flush the DNS cache, type:
Ipconfig -flushdns (hit enter)
5.3 List all tickets on the system, type:
klist (hit enter)
Note: this does not affect any other functionality on the client or server
The tickets listed does not necessarily have anything to do with us at this point (SharePoint).
5.4 Now, we want to clean up this list so that we can see if a new ticket is granted to our user when logging on to SharePoint.
Clear the list, type:
klist purge (hit enter)
Note: this does not affect any other functionality on the client or server
In the prompt you will see:
Deleting all tickets:
Ticket(s) purged!

5.5 Try again listing all tickets, type:
klist (hit enter)

This time the list should be empty. (if not, then some service has managed to connect again during the time from that you purged until you ran Klist again)
5.6 With an empty Kerberos ticket list, open up a new Internet Explorer session and go to the URL of the Web Application.

5.7 When authenticated and logged into the site, all loaded ok

5.8 Switch back to the command prompt and again, type:
klist (hit enter)
Now, with Kerberos working, you will see two tickets, the most important one is the second ticket(#1) that contains:
Client: username@domain.com
Server: HTTP/mywebappurl
KerbTicket Encryption Type:
And a few timestamps and similar stuff. This is good!

If you see this ticket, things are working! Now, all we have to do is verify that it looks good on the Web Server as well.
Close down the Command Prompt and move on to the next task in this guide, the security log.
| Note: For Windows Server 2003, KLIST is available as a free download in the Windows Server 2003 Resource Kit Tools. To obtain the tools, visit the following Microsoft Web site: Download Klist here |
Security Log
Verify that the Web Server Authenticates the user using Kerberos using the following:
5.9 On the SharePoint Web Server, in Administrative Tools, open up Event Viewer.

5.10 Expand the ‘Windows Logs’ container and locate the ‘Security’ Log.
 5.11 In the Security log, locate a recent event with the ID of 4624. This event should be a successfull logon, and hold the security ID and accountname of the user that accessed the SharePoint Web Application using Internet Explorer on the client, and it should also state:
Logon process: Kerberos
Authentication Package: Kerberos.

If you can verify that you do have this event, then you are done, Kerberos works!
You are now done with step 5. Verification of functionality, there are no more steps from here…
This means that if you have successfully completed all steps in this guide, you have managed to configure Kerberos for SharePoint.
CONGRATULATIONS!
Back to main menu
–
Thanks to, for technical and spiritual support!
Hasain Alshakarti – Truesec
Mattias Gutke – Enfo Zipper
Anders Grönlund – Enfo Sweden
Markus Murray – Truesec
Herakles – Unknown
–
References
Configure Kerberos authentication for SharePoint 2010 Products
http://technet.microsoft.com/en-us/library/ff829837.aspx
Plan for Kerberos authentication (SharePoint Server 2010)
http://technet.microsoft.com/en-us/library/ee806870.aspx
Setspn (Windows Server 2008, Windows Server 2008 R2)
http://technet.microsoft.com/en-us/library/cc731241(v=ws.10).aspx
Klist (Windows Server 2008 R2)
http://technet.microsoft.com/en-us/library/hh134826(v=ws.10).aspx
Plan authentication methods (SharePoint Server 2010)
http://technet.microsoft.com/en-us/library/cc262350.aspx
DNS Server Overview (Windows Server 2008)
http://technet.microsoft.com/en-us/library/cc770392(v=ws.10).aspx
Trust for delegation (Windows Server 2003 but this still goes)
http://technet.microsoft.com/en-us/library/cc739764(v=ws.10).aspx
How the Kerberos Version 5 Authentication Protocol Works
http://go.microsoft.com/fwlink/p/?LinkID=196644
Kerberos Explained (old but still good)
http://technet.microsoft.com/en-us/library/bb742516.aspx
Microsoft Kerberos
http://msdn.microsoft.com/en-us/library/aa378747(VS.85).aspx
Kérberos (lat. Cérberus)
http://en.wikipedia.org/wiki/Cerberus
_________________________________________________________
Enjoy!
Regards

Twitter | Technet Profile | LinkedIn


