A quick-guide to setting up OWA with SharePoint 2013 – start to finish


Future and existing Office Web Apps – OWA Lovers!
😁
This time, I just found that a quick guide like this was something that I needed myself, and since I could not find anything that was short and compact enough, I made my own guide…
This Little guide is completely based on the TechNet articles mentioned in the references section, but this is nontheless a lot shorter and easier to follow.

Oakwood_clockx

The old Clock at Oakwood station


Click your OWA task of choice:
Step 1
Prepare a 2008 R2 Server to run OWA
Prepare a 2012 Server to run OWA
Step 2
Install Office Web Apps Server
Step 3
Deploy a single-server Office Web Apps Server farm that uses HTTPS
Step 4
Configure SharePoint to use OWA over https (recommended)
Configure SharePoint to use OWA over http
Additional
Disconnect SharePoint from OWA farm
Configure the Default open behavior for documents
Credits and References


Prepare a 2008 R2 server to run Office Web Apps Server

1. Install the following software (Minimum required):

2. Import the server module
(In a PowerShell prompt running as administrator and with the SharePoint snapin loaded)
Import-Module ServerManager

3. Add the required Features and Roles by running this command:
Add-WindowsFeature Web-Server,Web-WebServer,Web-Common-Http,Web-Static-Content,Web-App-Dev,Web-Asp-Net,Web-Net-Ext,Web-ISAPI-Ext,Web-ISAPI-Filter,Web-Includes,Web-Security,Web-Windows-Auth,Web-Filtering,Web-Stat-Compression,Web-Dyn-Compression,Web-Mgmt-Console,Ink-Handwriting,IH-Ink-Support

4. Restart the server if prompted when the command finishes.

5. Done

TechNet Reference
Back to menu


Prepare a 2012 server to run Office Web Apps Server

1. In a PowerShell prompt running as administrator, add the required Features and Roles by running this command:
Add-WindowsFeature Web-Server,Web-Mgmt-Tools,Web-Mgmt-Console,Web-WebServer,Web-Common-Http,Web-Default-Doc,Web-Static-Content,Web-Performance,Web-Stat-Compression,Web-Dyn-Compression,Web-Security,Web-Filtering,Web-Windows-Auth,Web-App-Dev,Web-Net-Ext45,Web-Asp-Net45,Web-ISAPI-Ext,Web-ISAPI-Filter,Web-Includes,InkandHandwritingServices

2. Done

TechNet Reference
Back to menu


Install Office Web Apps Server
1. Download Office Web Apps Server from the Microsoft Download Center (Link).

2. Run Setup and walk through the steps in the wizard.
Windows Server 2012, open the .img file directly and run Setup.exe
Windows Server 2008 R2 SP1, use any program that can mount or extract .img files. Then run Setup.exe

3. Download and install the Office Web Apps Server update KB2810007.

TechNet Reference
Back to menu


Deploy a single-server Office Web Apps Server farm that uses HTTPS

If components of the .NET Framework 3.5 were installed and then removed, you might see “500 Web Service Exceptions” or “500.21 – Internal Server Error” messages when you run OfficeWebApps cmdlets. To fix this, run the following sample commands from an elevated command prompt to clean up settings that could prevent Office Web Apps Server from functioning correctly:
In Windows Server 2008 R2:
%systemroot%\Microsoft.NET\Framework64\v4.0.30319\aspnet_regiis.exe -iru
iisreset /restart /noforce
In Windows Server 2012:
dism /online /enable-feature /featurename:IIS-ASPNET45

1. Create the Office Web Apps Server farm

New-OfficeWebAppsFarm -InternalUrl <InternalURL> -ExternalUrl <ExternalURL> -CertificateName <CertificateName> -EditingEnabled

<InternalURL> FQDN name of the server that runs Office Web Apps Server
<ExternalURL> FQDN name that can be accessed on the Internet
<CertificateName> Is the friendly name of the https/SSL certificate used
-EditingEnabled, optional and is added to enable editing in Office Web Apps

2. Verify that the Office Web Apps Server farm was created successfully

Go to the https://internal.url.com/hosting/discovery
If you see a (WOPI)-discovery XML file in your web browser then all is good.

Depending on the security settings of your web browser, you might see a message that prompts you to select Show all content before the contents of the discovery XML file are displayed.

3. Done

TechNet Reference
Back to menu


Configure SharePoint to use OWA over https (recommended)
(In a PowerShell prompt running as administrator and with the SharePoint snapin loaded)

The Web Application to be used must be configured to use Claims as authentication method, else OWA will not work.

1. Create new binding:
New-SPWOPIBinding -ServerName <WacServerName>
(<WacServerName> must be the FQDN internal URL)

2. Verify current zone:
Get-SPWOPIZone

3. Change to internal-https if it is set to http:
Set-SPWOPIZone –zone “internal-https

4. Verify https:
Get-SPWOPIZone

5. Verify functionality in a document library (Not using the system account, appearing as sharepoint\system)
Click on the ‘Three dots’ after a documents name and see if you get a preview, if you do, its all good!

6. Done

TechNet Reference
Back to menu


Configure SharePoint to use OWA over http
(In a PowerShell prompt running as administrator and with the SharePoint snapin loaded)

The Web Application to be used must be configured to use Claims as authentication method, else OWA will not work.

1. Create new binding:
New-SPWOPIBinding -ServerName -AllowHTTP
( must be the FQDN internal URL)

2. Verify current zone:
Get-SPWOPIZone

3. Change to internal-http:
Set-SPWOPIZone –zone “internal-http”

4. Verify http:
Get-SPWOPIZone

5. Check AllowoverHttp setting:
(Get-SPSecurityTokenServiceConfig).AllowOAuthOverHttp

6. Set AllowOAuthOverHttp to True.
$config = (Get-SPSecurityTokenServiceConfig)
$config.AllowOAuthOverHttp = $true
$config.Update()

7. Verify change:
(Get-SPSecurityTokenServiceConfig).AllowOAuthOverHttp

8. Verify functionality in a document library (Not using the system account, appearing as sharepoint\system)
Click on the ‘Three dots’ after a documents name and see if you get a preview, if you do, its all good!

9. Done

TechNet Reference
Back to menu


Disconnect SharePoint from OWA farm
(In a PowerShell prompt running as administrator and with the SharePoint snapin loaded)

1. Remove the binding
Remove-SPWOPIBinding –All:$true

2. Done

TechNet Reference
Back to menu


Configure the Default open behavior for documents

1. On a per farm level: Adjust the default open behavior on a per-file-type basis by using the New-SPWOPIBinding and Set-SPWOPIBinding Windows PowerShell cmdlets.

2. On a per Site Collection level by activating the ‘Open Documents in Client Applications by Default’ site Collection feature.

3. On a per Document library level using the Library setting – Advanced setting – ‘Default open behavior for browser-enabled documents’

4. Done

TechNet Reference
Back to menu


References:

Deploy Office Web Apps Server
http://technet.microsoft.com/en-us/library/jj219455.aspx

Configure SharePoint 2013 to use Office Web Apps
http://technet.microsoft.com/en-us/library/ff431687.aspx

Configure the default open behavior for browser-enabled documents (Office Web Apps when used with SharePoint 2013)
http://technet.microsoft.com/en-us/library/ee837425.aspx

Set-SPWOPIBinding
http://technet.microsoft.com/en-us/library/jj219454.aspx

Plan Office Web Apps (Used with SharePoint 2013)
http://technet.microsoft.com/en-us/library/ff431682.aspx

SharePoint authentication requirements for Office Web Apps
http://technet.microsoft.com/en-us/library/ff431682.aspx#authentication

Configuring Office Web Apps in SharePoint 2013 (Steve Peschka – Microsoft)
http://blogs.technet.com/b/speschka/archive/2012/07/23/configuring-office-web-apps-in-sharepoint-2013.aspx

Enabling Licensing and Editing for Office Web Apps in SharePoint 2013 (Steve Peschka – Microsoft)
http://blogs.technet.com/b/speschka/archive/2012/12/31/enabling-licensing-and-editing-for-office-web-apps-in-sharepoint-2013.aspx

Thanks to:

Mattias Gutke! All the time dude!
Ankie D – a great customer who has forced me to learn more on OWA
Stefan K – Another customer who made me refresh my knowledge
Steve Peschka, he wrote the original guide…see ref section


___________________________________________________________________________________________________

Enjoy!

Regards

Twitter | Technet Profile | LinkedIn

Export a document library using Export-SPWeb and itemurl


Export-SPWeb

(This is my better version of the TechNet articles on the same CMDlet that does a poor job with the details, I hope that it will help some of you)
SharePoint 2010 | SharePoint 2013
Applies to:  SharePoint Foundation 2010 | SharePoint Server 2010 | SharePoint Foundation 2013 | SharePoint Server 2013 

Exports a site, list, or library.


Export-SPWeb [-Identity] <GUID/Name/SPWeb object> -Path <String> [-AssignmentCollection <SPAssignmentCollection>] [-CompressionSize <Int32>] [-Confirm [<SwitchParameter>]] [-Force <SwitchParameter>] [-HaltOnError <SwitchParameter>] [-HaltOnWarning <SwitchParameter>] [-IncludeUserSecurity <SwitchParameter>] [-IncludeVersions <LastMajor | CurrentVersion | LastMajorAndMinor | All>] [-ItemUrl <String>] [-NoFileCompression <SwitchParameter>] [-NoLogFile <SwitchParameter>] [-UseSqlSnapshot <SwitchParameter>] [-WhatIf [<SwitchParameter>]]

——————–EXAMPLE———————–

Export-SPWeb http://site –Path "c:\temp\site export.cmp" -ItemURL "/subsite/documents"

This example exports the document library at http://site/subsite/documents to a new file called ‘site export.cmp' in the ‘C:\temp’ directory.

Parameters

Parameter

Required

Description

Identity Required Specifies the URL or GUID of the Web to be exported. The type must be either
– a valid GUID, in the form ‘12345678-90ab-cdef-1234-567890bcdefgh’
– a valid name of a SharePoint site (for example, MySPSite1)
or a URL: http://blog.blksthl.com
or an instance of a valid SPWeb object
Path Required Specifies the name of the export file. If the -NoFileCompression parameter is used, a directory must be specified; otherwise, any file format is valid.
Example: “c:\temp\exportedsite.cmp” or with the -NoFileCompression “c:\temp\exportedsite\”
AssignmentCollection Optional Manages objects for the purpose of proper disposal. Use of objects, such as SPWeb or SPSite, can use large amounts of memory and use of these objects in Windows PowerShell scripts requires proper memory management. Using the SPAssignment   object, you can assign objects to a variable and dispose of the objects after they are needed to free up memory. When SPWeb, SPSite, or SPSiteAdministration objects are used, the objects are automatically disposed of if an assignment collection or the Global parameter is not used.

                                                                                                                                         Note:
When the Global parameter is used, all objects are contained in the global store. If objects are not immediately used, or disposed of by using the Stop-SPAssignment command, an out-of-memory scenario can occur.
CompressionSize Optional Sets the maximum file size for the compressed export files. If the total size of the exported package is greater than this size, the exported package will be split into multiple files.
Confirm Optional Prompts you for confirmation before executing the command. For more information, type the following   command: get-help about_commonparameters
Force Optional -Force Forcefully overwrites the export package if it already exists.The type must be either of the following values:
True
FalseThe default value is False.
HaltOnError Optional Stops the export process when an error occurs.
HaltOnWarning Optional Stops the export process when a warning occurs.
IncludeUserSecurity Optional Preserves the user security settings except for SPLists that have broken inheritance and item level   permissions set.
(Use Import-SPWeb with –IncludeUserSecurity to preserve security on import)
IncludeVersions Optional Indicates the type of file and list item version history to be included in the export operation. If the
-IncludeVersions parameter is absent, the Export-SPWeb cmdlet by default uses a value of CurrentVersion. The type must be any one of the following versions:
LastMajor “Last major version for files and list items (default)”
CurrentVersion “The current version, either the last major version or the last minor version”
LastMajorAndMinor “Last major and last minor version for files and list items”
All “All versions for files and list items”
ItemUrl Optional Specifies the relative path to the object to be exported. Can also be a GUIDThe type must be a valid relative path, for example, /Subsite/Documents
or a valid GUID in the form: 12345678-90ab-cdef-1234-567890bcdefgh
NoFileCompression Optional Either enables or disables file compression in the export package. The export package is stored in the   folder specified by the Path parameter or Identity parameter. We recommend that you use this parameter for performance reasons. If compression is enabled, the export process can increase by approximately 30 percent.
NoLogFile Optional Suppresses the generation of an export log file. If this parameter is not specified, the Export-SPWeb   cmdlet will generate an export log file in the same location as the export package. The log file uses Unified Logging Service (ULS).It is recommended to use this parameter. However, for performance reasons, you might not want to generate a log file.
UseSqlSnapshot Optional Specifies a SQL Database Snapshot will be created when the export process begins, and all exported   data will be retrieved directly from the database snapshot. This snapshot will be automatically deleted when export completes.
WhatIf Optional Displays a message that describes the effect of the command instead of executing the command. For   more information, type the following command: get-help about_commonparameters

References:

Export-SPWeb
http://technet.microsoft.com/en-us/library/ff607895(v=office.15).aspx

Export a site, list, or document library (Search Server 2010)
http://technet.microsoft.com/en-us/library/ff428101(v=office.14).aspx

Thanks to:

Mattias Gutke – CAG – My main man!


___________________________________________________________________________________________________

Good Luckl!!

Regards

Twitter | Technet Profile | LinkedIn

A quick guide to configuring the Loopback check


Update: A free tool is available that does all this for you in a GUI: Loopback Check configuration Tool released – free download

Hi dear friends!

401.1 Access denied…
If you try to access your newly created web application with a real nice FQDN or NetBIOS name and you end up getting a 401.1 Access denied…

Even after adding the site to the local intranet zone in IE…
Even after beeing prompted 3 times and filling in the correct credentials…
After setting up your Search to crawl you sites in a small farm whith crawl and web services on the same server…

You check and doublecheck your credentials, you add yourself as the farm admin, you try logging on with the farm account, but nothing…still 401.1…

I know this has been written about many times Before, but some things seem to still be missing…
Now everyone seems comfortable with the sparse description on how to ‘add hosts to the list’ which is pretty much what you do when configuring the loopback check the ‘secure way’. You can also disable the loopbackcheck completely, but why if there is no real reason. Read Spencer Harbars excellent post on the topic if you need explaining why this is so. It is a few years but it is still the truth!

The KB article 896861 for this is an old one and the title does not really tell you that this is the one you are looking for, ‘type the host name or the host names for the sites that are on the local  computer, and then click OK.’ is not crystal…

Jump to:
Configure Loopback check using the GUI
Configure Loopback check using Powershell
Credits and References


What you need to do is this step by step:

In ‘Metro’ mode, type regedit

Regedit1x

Regedit will most likely be the only result, hit enter

Regedit2

In regedit, find the following registry key: HKEY_LOCAL_MACHINE\SYSTEM\CurrentControlSet\Control\Lsa\MSV1_0

First…

Regedit3x

then…

Regedit4x

Now, create a Multi-String Value under the MSV1_0 key.

Regedit5x

Type in the name of the new Multi-String value: ‘BackConnectionHostNames’, Hit Enter.

Regedit6x

Right click on the value BackConnectionHostNames and coose Modify.

Regedit7x

Add the URL you want to be able to access from a local browser on the server.

Regedit8

Don’t know why, but I seem to Always get this. Click Ok.

Regedit9

Viola!

Regedit10x

Adding multiple URL’s to the list of ‘trusted’ URL’s, simply make a new line between them.

Regedit11

That will look like this.

Regedit12x

To be extra sure that nothing else will sabotage functionality, check so that the URL’s are added to DNS.
(Or local hosts file)

DNS1x

Check so that the URL’s are added as bindings in IIS.

IIS1x

Verify that the URL’s are correct and are added to AAM.

AAM1x

Make sure that the URL is added to the Local Intranet Zone in Internet Explorer (if you need to browse the site from the server, NOT RECOMMENDED!).

IE3x

Try to access the URL in a browser.

IE1x

And the other URL.

IE2x

Done!

Doing the same using PowerShell

Using PowerShell to configure the Loopback check, requires two steps:

1. Add the multistring value to the registry
Get-Item -path “HKLM:\System\CurrentControlSet\Control\Lsa\MSV1_0” | new-Itemproperty -Name “BackConnectionHostNames” -Value (“coolsite.corp.balkestahl.se”, “alias.corp.balkestahl.se”) -PropertyType “MultiString”

2. Restart the IISADMIN service
Restart-Service IISADMIN

1. Add the multistring value to the registry

Given that you have Everything setup correctly, your AAM’s, your DNS entrys, (URL added to local intranetsites zone in IE), and so forth…you can use this single PowerShell command to exclude the URL’s for your sites from the loopbackcheck, this way, you don’t have to disable the loopbackcheck at all (Way better security).

The following command will add my two URL’s to the exclusion list, edit the values to add your own URL’s.

Run this in a PowerShell prompt running in elevaled mode/as Administrator

Get-Item -path “HKLM:\System\CurrentControlSet\Control\Lsa\MSV1_0” | new-Itemproperty -Name “BackConnectionHostNames” -Value (“coolsite.corp.balkestahl.se”, “alias.corp.balkestahl.se”) -PropertyType “MultiString”

Running this will if Everything is done right, show this

Powershell1

This is how it will look if it succeeds!

Powershell2

If you get ‘The property already exists.’, then you already have the ‘BackConnectionHostNames’ value added to the registry, check using registry editor to see if you can delete it or if it has other values that need to be there.

After a successful execution, check the registry to verify

Regedit12x

2. Restart the IISADMIN service

Now you have to restart the IISADMIN service in order for it to ‘reread’ the registry values and implement our Changes.
This is easy, in a PowerShell prompt running in elevaled mode/as Administrator

Restart-Service IISADMIN

Powershell3

Note the typo/bug in the text, it says stopping twice but what it does it stopping and starting

Done!

The command line in step 1 will add two (2) entries to the list, coolsite.corp.balkestahl.se and alias.corp.balkestahl.se. If you need to add more URL’s, add them to the Values, like: -Value (“coolsite.corp.balkestahl.se”, “alias.corp.balkestahl.se”, “mycoolnetbiosname”, “extraname.corp.balkestahl.se”).

Make sure that the doublequotes are formated in the proper way if you copy from this post!

That would make the command

Get-Item -path “HKLM:\System\CurrentControlSet\Control\Lsa\MSV1_0” | new-Itemproperty -Name “BackConnectionHostNames” -Value (“coolsite.corp.balkestahl.se”, “alias.corp.balkestahl.se”, “mycoolnetbiosname”, “extraname.corp.balkestahl.se”) -PropertyType “MultiString”

and

Restart-Service IISADMIN -force

References:

You receive error 401.1 when you browse a Web site that uses Integrated Authentication and is hosted on IIS 5.1 or a later version
http://support.microsoft.com/kb/896861

DisableLoopbackCheck & SharePoint: What every admin and developer should know. (Spencer Harbar folks)
http://www.harbar.net/archive/2009/07/02/disableloopbackcheck-amp-sharepoint-what-every-admin-and-developer-should-know.aspx

Can’t crawl web apps you KNOW you should be able to crawl (Todd Klindt’s oldie but goodie)
http://www.toddklindt.com/blog/Lists/Posts/Post.aspx?ID=107

Thanks to:

As Always, Mattias Gutke! Now at CAG. Always a great help and second opinion!


___________________________________________________________________________________________________

Enjoy!

Regards

Twitter | Technet Profile | LinkedIn

A guide to https and Secure Sockets Layer in SharePoint 2013


Hi dear friends!

LabCenter-stamp-v3

It has become something of a habit of mine, to jump over the tougher more difficult topics, the ones that I have spent a lot of energy avoiding before. Kerberos must be the worst of them all, and since I feel that I have Kerberos pretty much covered, I know everything and I can do anything…
This topic is something that I always avoided doing myself as well, if in production or in the lab, since certificates are difficult to understand and hard to come by for tests, I never got to try it much and thus it stayed a bit of a grey area for long.
But no more, by publishing this guide, I hope that I and you can all get over the fear of https/SSL together.
This guide is also available as a whitepaper to download Here
(Skip all the bullshit yada yada and jump straight to the steps.)

IMG_0419smallframed
This guide was created far from the ultrafast fibreoptic gigabit internet Connections

One important thing to remember though, this guide is only meant to be used in test or lab, it is not recommended to use exactly this setup in production. If you are looking to setup https in production, then you should have a certificate issued by your own Certificate Authority or have one bought from a trusted certificate issuer such as Verisign for example. I don’t know all the downsides, but for one, you cannot revoke a self-signed cert.

My requirements for https in testing are these:
– They should look and behave the same as it would in production
– It should be a real DNS URL or a real URL added to the host file
– It should not cause any red warnings in the browser
– IIS and SharePoint must be configured the same way as if it were a real life scenario

How do we do this? Let me show you how I would do it…

First we need a proper environment, in my setup I have:
– A single SharePoint 2013 server on Windows Server 2012 running all roles but the DB.
– A SQL server 2008 R2 on Windows Server 2008 R2 (OS here is irrelevant)
– A Windows Server 2012 DNS server
– A Windows Server 2012 Domain Controller (Any DC will do…)
– A Windows 7 client with Internet Explorer 9. (Most common customer setup, works from the server as well with loopback check disabled)

I am also using a utility from the IIS 6.0 Resource kit, download that before we start from this link: Download IIS 6.0 Resource Kit

In order for https / SSL and SharePoint to work we need a few things, lets add it all up in a checklist:

– A Web Application with a root site already created
– A URL (FQDN preferred)
– A DNS entry to go with the URL
– A Self-signed Certificate (or from a trusted issuer)
– AAM
– IIS Binding
– Certificate added to trusted authority on the client/server
– URL added to the local intranet zone in Internet Explorer for auto-logon

In my example, I will use the following:

Requirement In my test environment
– A URL (FQDN preferred) sharepoint2013.corp.balkestahl.se
– A DNS entry to go with the URL sharepoint2013.corp.balkestahl.se -> 192.168.1.130
– A Certificate (Self signed or from a trusted issuer) Certificate created using the IIS 6.0 RK utility SelfSSL.
– AAM Internal http and https, Public https only
– IIS Binding Bind my site to https and all IP using the created certificate


These are the steps we need to take (click on any link):

1. Create a new Web Application or use an existing one (use port 80 initially and not https/443 for this guide.)
2. DNS, create an A-Record
3. Create the certificate (or request, buy, get any way you choose the real deal)
4. Add IIS Binding with Host-Header (this has to be done manually)
5. AAM, Add the necessary Alternate Access Mappings
6. Add the certificate to the Trusted Certificate store on the client
7. Test functionality
8. T-Shooting
9. References and recognitions

Note: If there is something that I have missed in this guide, or that should be done differently, please let me know.
I will reply to any comment and feedback that you submit.


1. Web Application
This step can be skipped completely if you already have a working Web Application with http on port 80 with an existing Site Collection.
If you do not have that or don’t feel Confident that it will be adequate, follow these simple steps.

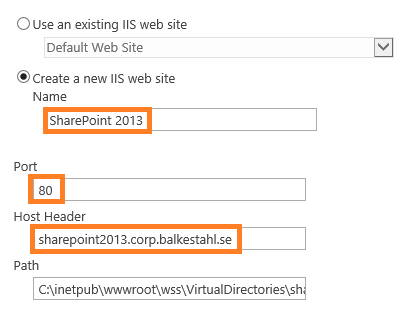
1.1 In Central Admin, go to Application Management, then Manage Web Applications, in the ribbon, click on new, fill in the form using your own values.

Note: The Name value is what the Web Application will be shown as in CA and in IIS.

NewWebApp1x

1.2 Note that I have not chosen to use SSL here, this will be added at a later time. Leave these choices as default.

NewWebApp2x

1.3 The http url for this web application. As we set this up initially on port 80 and using http only, this could be anything, I have chosen to use the same FQDN as my https address will use.

NewWebApp3x

Leave all other settings as is, the default values will do just fine for this test. The default is in 2013 using claims as authentication provider and this will serve our goal well.
I will not show you step by step how to create a Site Collection in the Web Application, something that you must do in order for the browser to later access the URL. But the steps are something like this:

1.4 Create a new Site Collection: In Central Admin select Application Management

1.5 Under Site Collections section, click on Create Site Collection.

1.6 In the dropdown, select the proper Web Application.

1.7 Enter a Name, Address and Description.

1.8 If only for test, use the Team site template under the Collaboration tab.

1.9 Add yourself as a site Collection administrator, or the account that will test access from a client, or add both in the primary and secondary fields.

1.10 Click OK. Wait until it has been created. Done!

Back to main menu


2. DNS

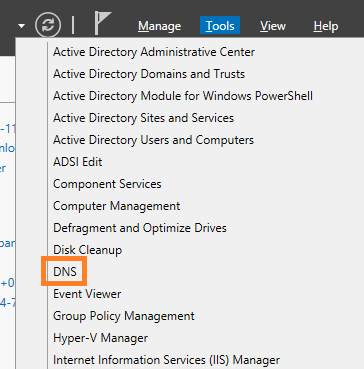
2.1 On your Windows Server 2012 running the DNS service, start server manager, then click on Tools and select DNS:

DNS1x

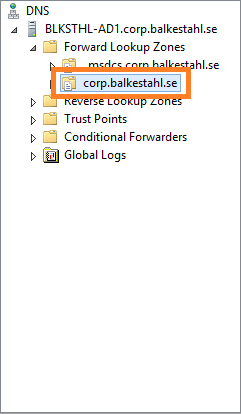
2.2 Locate the forward lookup zone for your domain:

DNS2x

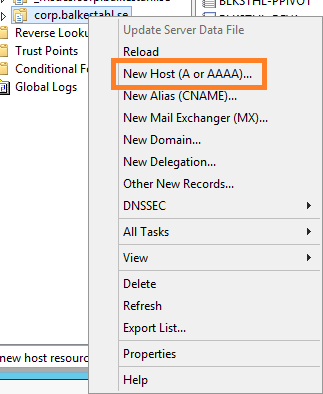
2.3 Right click the zone and select New Host (A or AAAA)…

DNS3x

2.4 Enter the name of your site, this together with the full domain path will form the FQDN, Fully Qualified Domain Name. In the IP address field you enter the IP address of the SharePoint web server:

DNS4x

2.5 Click on Add Host and then Done, when you see this and verify that the FQDN shown is correct, you are done with the DNS part.

DNS5x

Back to main menu


3. Create a certificate

In my test setup, I will create my own certificate but use a properly named one, this makes it feel more like the real thing. If you have not already done so, download and install the IIS 6.0 Resource kit that comes with the nifty little util called SelfSLL. This allows you to create a self-signed certificate that has a proper URL, a requirement if you want to avoid the red warning in the browser that a regular self-signed cert would give you. The RK can be downloaded here: Download IIS 6.0 Resource Kit

Content of the IIS 6.0 Resource Kit – the following tools are available in this package:

  • IIS 6.0 Migration Tool Version 1.0 Version 1.1 Now Available!
  • Apache to IIS 6.0 Migration Tool Version 1.0
  • CustomAuth Version 1.0
  • IISCertDeploy.vbs Version 1.0
  • IIS Host Helper Service Version 1.0
  • IISState Version 3.0
  • Log Parser Version 2.1 Version 2.2 Now Available!
  • Metabase Explorer Version 1.6
  • Permissions Verifier Version 1.0
  • RemapUrl Version 1.0
  • SelfSSL Version 1.0
  • TinyGet Version 5.2
  • Web Capacity Analysis Tool Version 5.2
  • WFetch Version 1.3

What we really want out of all this this time, is the small util called SelfSSL in bold. This little util allows you like I said before, to create a self-signed cert using an FQDN of choice. In my example, I want to use the URL: sharepoint2013.corp.balkestahl.se and have the cert created with the same URL. I’ll show you how step by step.
It’s really quite simple.

Note: You might consider even in a lab Environment, to install your own Certificate Authority and issue your own private Certificates, the following links will be of help when doing that:
Install the Certification Authority (Windows Server 2012)
Install a Root Certification Authority (Windows Server 2008 R2)
Active Directory Certificate Services Overview (Windows Server 2012) 

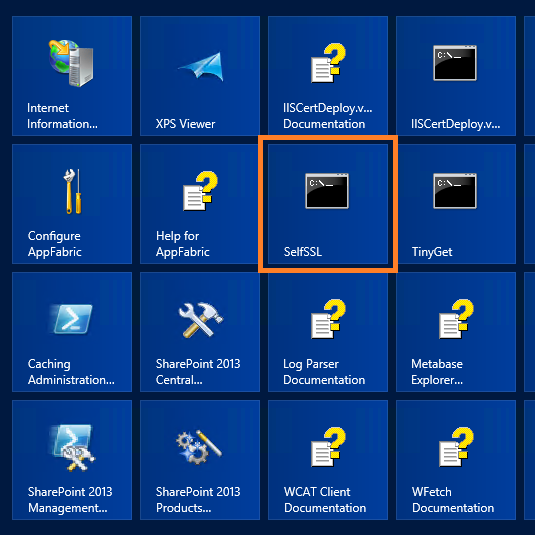
3.1 Run the tool from the start menu:

https2x

3.2 The command-line tool does not look much to the world:

https3

Note: You need to be logged on with an account that is a member of the local administrators Group in order to use this tool.

It gives you some options and I’m not going to go into what can be done with this tool, I’ll just go with the default and create a certificate using the suggested settings with one exception, we need to use the proper site ID.
Every site in IIS gets an ID, this is in this case used to put the certificate in the correct place on the correct site.

3.3 Get the correct ID from IIS, open up the IIS Manager, in server manager, click on Tools and then on Internet Information Services Manager:

SiteID01x

3.4 In Internet Information Services Manager, select your site:

SiteID1x

3.5 On the right pane, near the bottom, click on Advanced Settings…:

SiteID2x

3.6 In the next dialog, you will see a row called simply ID:

SiteID3x

3.7 Select the number in the field and right click and copy:

SiteID4x

3.8 Paste the ID after the /S: switch. You should also change the value for the /V: setting, this represents how many days the certificate will be valid, the default 7 is ok for me in a very temporary setup, but for longer test runs, make it 90 Days or so. If the certificate expires, you will get ugly warnings that the certificate has expired and that it is untrusted. Https wil still work but on probation…
Now you have all you need to proceed. Run the SelfSSL util and use the site ID but leave everything else default.
Answer yes to the question – Do you want to replace the SSL settings for site 724410038.

selfssl.exe /N:CN=SharePoint2013.corp.balkestahl.se /K:1024 /V:7 /S:724410038 /P:443

https51x

Note: One option that could be useful, if you add the /T to the command the certificate will be added to the local Machines trusted authority certificates list. This makes it trusted in the servers browser.

The certificate is now created and put into the personal store for this computer.
If you get an error here stating that the certificate could not be assigned to the site, then you most likely already have an instance of the same certificate name, locate any existence of the certificate and delete it. (See how later in the post under chapter 8. T-shooting)

Move on to Chapter 4 or go Back to main menu


4. IIS Binding

In order for the web server, IIS, to recognize any incoming traffic and locate the proper site to direct it to, IIS uses Host header bindings. This is done so that you can have more than one site on port 80 in the same web server. The default site has a blank Host header binding which will in affect make it claim all incoming requests as its own.
SharePoint stops the Default Web Site so that does not affect us now, but we need to take care of our own IIS Web Site that in reality is our SharePoint Web Application.

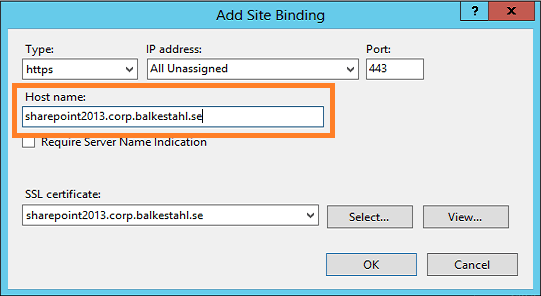
What we have to do, is make our IIS Web Site answer to all incoming traffic with a host header of https and the FQDN created in Chapter 2. DNS – sharepoint2013.corp.balkestahl.se

4.1 Start by opening up your IIS manager, in Server Manager, click on tools and the on Internet Information Services (IIS) Manager:

SiteID01x

4.2 Locate your Web Site:

SiteID1x

4.3 In the right hand pane, locate Bindings:

SIteID21x

4.4 What you see here is a list of the existing Bindings for this site, Type, Host Name, Port and IP address. If you have created the certificate using the SelfSSL util and added the ID of the Web Site, then you will most likely see at least two rows here (see 4.5).
https6x

4.5 This is what you will have if the SelfSSL successfully added the cert to the site using its ID:
If this is what you have, select the second row with the https/443 and click on Edit, then scroll down to step 4.11 in this guide.

https61x

4.6 Assuming that it was not added, we have to add the cert to the site. Click on Add.

https7

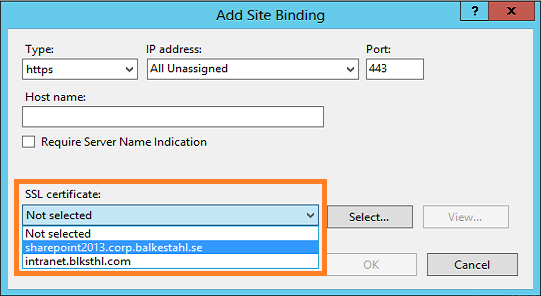
4.7 In this dialog, we must first select the proper protocol, https. Use the dropdown:

https8

4.8 Once you have selected https as the protocol, you will find that a new field appears. This is where you select the certificate to use.

https9x

4.9 Select the certificate created in Chapter 3. Create a Certificate, in my environment, that is the sharepoint2013.corp.balkestahl.se certificate listed.

4.10 Once selected, you can click on View to verify that it really is the correct certificate and that everything looks to be in order, click on OK.

https10

4.11 Next we add the Host Name that this Binding will be matched on, same as the certificate name, sharepoint2013.corp.balkestahl.se, click OK.

https11x

4.12 Now you should see two rows in the bindings list for this Web Site. One for the initial http/80 and one for https/443. This is goOoOod!

https12x

4.13 Now click on Close and Close the IIS manager.

Move on to Chapter 5 or go Back to main menu


5. Alternate Access Mappings – AAM

In order for SharePoint to know how to handle the incoming requests for this new URL, we need to add/configure Alternate Access Mappings, this basically tells SharePoint how to handle all URLs. AAMs Control if SharePoint should do a redirect or a translation of the incoming address. AAMs can be configured from Central Administration and using PowerShell, I will in this guide use only CA.

5.1 Open up your Central Administration site and click on Configure Alternate Access Mappings located under the System Settings category.
This will show you all Alternate Access Mappings for all of your Web Applications in the farm. In the top right dropdown, click on Change Alternate Access Mapping Collection and select the correct Web Application.
Now, it will look like this:


httpsAAM1x

5.2 Next thing we want to do, is to alter the existing Public URL so that it uses https instead of http. Since all else is ok, add the s…

httpsAAM2x

5.3 Ok on that will give you this view, note that both the Internal URL and the Public URL has changed. This site is now only accessible by the https protocol. (Not entirely true, but true enough)

httpsAAM3x

5.4 I always like to be able to type in the default http URL in my browser, and if the site uses https, be redirected automatically. This is rather easy to do in SharePoint, simply add an Internal URL using http and add it to the Default zone which will direct us to the Public URL using https. It may sound difficult but trust me, it just works.

If you are interested in Learning more about Alternate Access Mappings and the inner workings, I have a free whitePaper published on the subject for 2010 Here and a basic post for 2013 Here.


Anyways, click on the Add Internal URLs link and simply add the same URL using http, make sure that the default zone is selected.

Note: The zones used in AAM has NO RELATION with the zones in Internet Explorer, they are named similar, but they have no connection whatsoever.

httpsAAM4x

5.5 Now the list should look like this, note that you have http and https on the left (incoming traffic) and only https on the right (target):

httpsAAM5x

You are now done configuring your Alternate Access Mappings! Let’s move on to testing, start with Chapter 6.
Back to main menu


6. Add the Certificate to the Trusted Authorities store.

If we do nothing else from here, we will be able to access the site using https, but it will not be pretty…in order to mimic https using a ‘real’ certificate we need to also add the certificate to the trusted store. This will make the browser trust the cert as authentic and it will stop throwing us the errors.

Note: If you are doing these tests on the server itself, you will need to disable the loopback check Before accessing the site, else it will fail. See Chapter 8. T-shooting for information on how to do this.

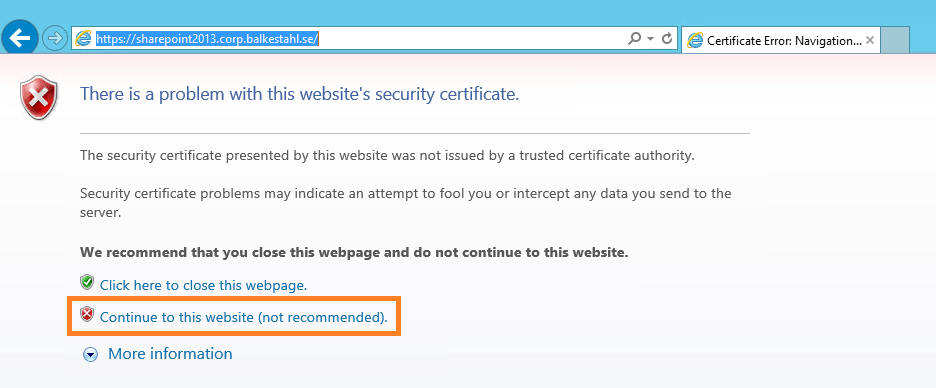
6.1 Try it first, open a browser, type in the address of the https URL and hit enter. You will first see this warning. Click on Continue to this website.

httpsTest61x

6.2 This will lead to a login prompt. This is to be expected at this Point, login using your credentials that you have made site Collection admin or that have access to the site Collection.

httpsTest62

6.3 Access! Yeay! or…no…hang on?! that’s not the way I pictured it…we don’t have access and we have a red certificate error. This is not what we want our users to see…
Two things cause this:

6.3.1. The White ribbon telling us that this is a secured browser comes from that the server in this case, has IE ESC – Internet Explorer Enhanced Security Configuration enabled.
If you are using a client like Windows 7 or 8, you will not see this but should actually see the site content.
To fix this, follow the steps in this blog post: How to disable IE Enhanced Security in Windows Server 2012 (Opens up in a new window)

6.3.2. The red Certificate error is there because the certificate comes from an untrusted source. This is as it should be, and can be fixed.
To fix this, keep reading…

httpsTest63

6.4 There are several ways to add the certificate to the trusted store, I will show you the easiest of them all. Click on the Certificate Error to the right of the red shield symbol. This will show this:

httpsTest65

6.5 It is all true what it says, except that nobody is trying to fool us…Click on View Certificates to show this dialog:

httpsTest66x

6.6 You can probably guess what the next step is going to be? Click on Install Certificate…

httpsTest67x

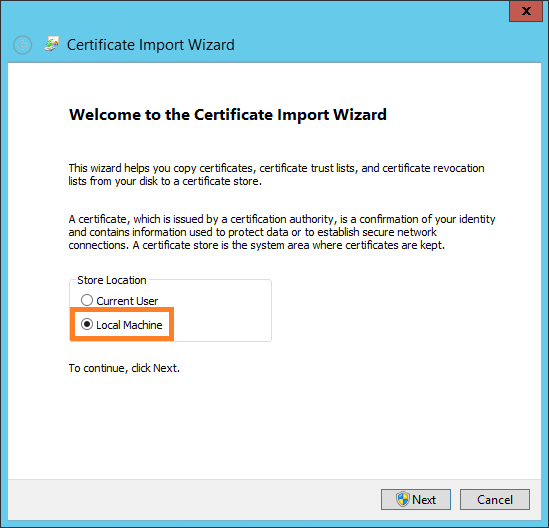
6.7 We want the certificate to be in the Computers store, select Local Machine and click Next.

httpsTest68x

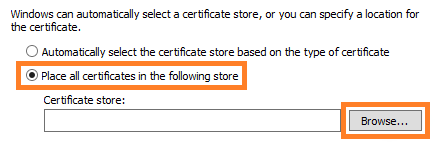
6.8 Select Place all Certificates in the following store and hit the Browse button.

httpsTest681x

6.9 Now, locate the ‘Trusted Root Certification Authorities’ and make sure it is selected, click OK.

httpsTest682x

6.10 Verify that this is what you see as well. Click on OK.

httpsTest683

6.11 Success! Try again to browse to the site, you should probably close the browser and start a new browser window.

httpsTest684x

6.12 Now we’re talking! that’s more like it, no red errors, no banner preventing us from loading the content…all is good, Life is GOOD!

Note: On my own server, it simply took a while for the error to go away, the IE cache has a renewal cycle of 50 minutes, to force a renewal, press Ctrl F5. That should do it.

Back to main menu


7. Test functionality

Testing has really already been taken care of in Chapter 6, but if you did what I did and used the servers browser (not recommended in production) to test access, then you really should test from a client to get the proper feel for it.
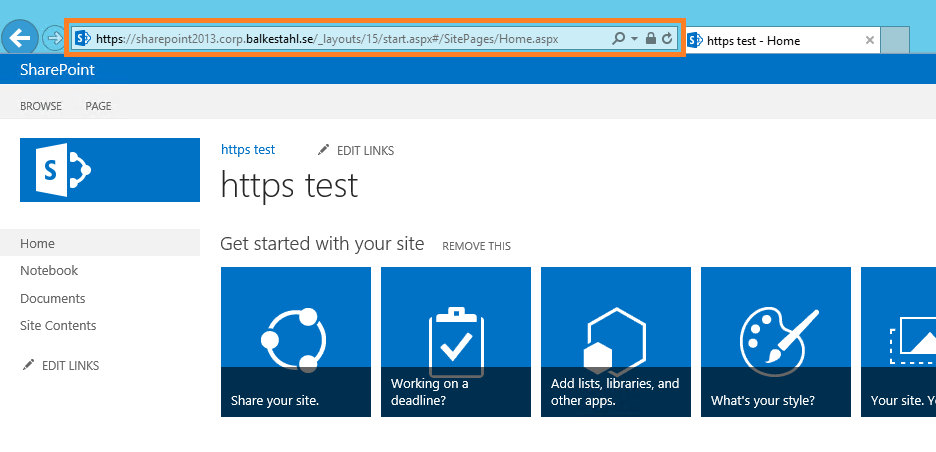
Use the steps described in Chapter 6 on the client computer as well. The dialog may look a bit of, but it’s the same steps basically. Sample dialog:

httpsTest4

You will get the Picture if you use the steps in Chapter 6. Once you see the image below in your browser, you are OK!

httpsTest684x
Back to main menu


8. T-shooting

T-shooting scenarios covered so far:
– 8.1 Delete redundant certificates
– 8.2 Configure Loopback check

8.1 Delete redundant certificates
If adding the cert fail and you want to delete every copy, do this:

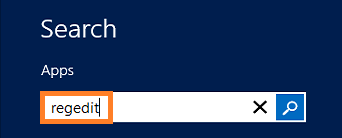
8.1.1 Press the start button, type Certificates…

https92x

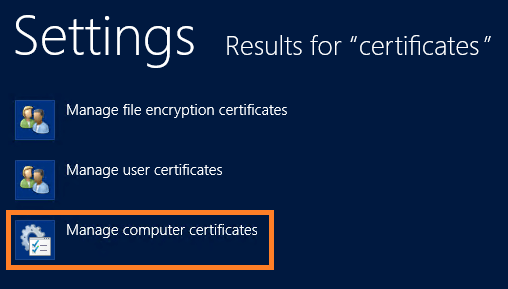
8.1.2 Select Manage computer certificates.

https93x

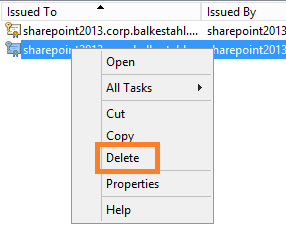
8.1.3 This will open up the ‘Certificates Manager’//MMC Certificates Snap in. Locate the Personal, Certificates folder. In the content, either delete them both, or, find out which is the newer and delete the old one.

https94x

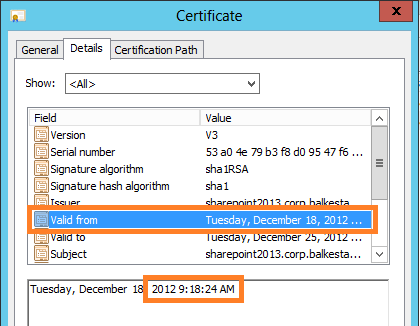
8.1.4 In the Certificate Details, you will see the Valid from timestamp, this is from when the certificate was created.

https95x

8.1.5 When you know which one to keep, delete the other, right click delete.
Done.
Back to main menu

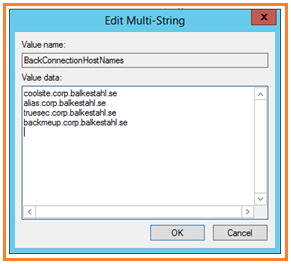
8.2 Configure Loopback check.

Note: Remember that the loopback check is a security feature that has been put there for a reason, it protects the server from a certain form of attacks. Disabling it will open up the server for such attacks. Read Spencer Harbars post at the link below for a deeper understanding of this concept.

Are you planning to do one of two things on your SharePoint server, then you need to configure this, configure, not necessarily disable it.
– If you have search on the server and the Content source Points to the server itself using an FQDN.
– If you want to use the servers browser to test functionality or to access CA using an FQDN. (This is us in this guide…)

Note: I strongly recommend against using any browser on any server! It is a security risk since use of the browser opens up new ways for unwanted code to enter the server. Always access the server from a client browser!
I use the servers browser in my lab to make it easier, but it is a contained lab environment and the accounts used do not have access to anything outside this particular lab environment. furthermore, the lab environment cannot be reached from outside nor can it access the Internet.
(Thanks Anders Janson, UAG/TMG/Security expert at Enfo Zipper for great feedback!)

Two links will tell you all you need to know:

8.2.1 DisableLoopbackCheck & SharePoint: What every admin and developer should know. (Spencer Harbar explains it all)

8.2.2 http://support.microsoft.com/kb/896861 (the best KB out there, it is old but still relevant)
Done

Back to main menu


9. Resources and Recognitions

Don’t know who the author is, but this article gave me the last piece in the https puzzle.

How to Create a Self Signed Certificate in IIS 7

My thanks to the following individuals who have in different ways helped me in my ambitions to create these guides on difficult subjects for SharePoint:

Anders Janson (Enfo Zipper) Thanks Anders for very good and constructive feedback!
Hasain Alshakarti (TrueSec) Blog
Mattias Gutke (Enfo Zipper)
Anders Grönlund (Enfo Sweden)
Andrija Marcic (Microsoft)
Mattias Karlsson (Microsoft)
Herakles (Unknown)

Back to main menu


___________________________________________________________________________________________________

Enjoy!

Regards

Twitter | Technet Profile | LinkedIn

A guide to Alternate Access Mappings Basics in SharePoint 2013


LabCenter-stamp-v2

Alternate Access Mapping Basics in SharePoint 2013

(This post is in its entirety valid for SharePoint 2010 as well)

Explains how you should look at Alternate Access Mappings – left to right.
Alternate Access Mappings is something that most SharePoint engineers or administrators struggles with. More often than not, you get it right in the end but we are not really sure why it works or if it really works the way we want it to.
This, is my attempt to make it easy to understand.

IMG_0430smallframed

Note: This is part 1 in a series, the next part will show how to configure DNS and a simple scenario adding a new NetBIOS name as URL to a Web Application.
Note: For the complete guide, with DNS steps and 4 different scenarios including https, download the free Whitepaper from TechNet: The final guide to Alternate Access Mappings

In order to make AAMs simpler to understand, look at it a bit differently, start with this simple table:

Left area            Internal URL’s
Right area          Public URL’s with a zone
Middle area        Zones, is what connects Internal URL’s to Public URL’s, many to one.

Internal URL redirects or transforms to a Public URL, from left, to right. The URL on the left, is what you enter in the address field in your browser, the Public URL on the right is what you will see once there, this goes for visible and invisible links as well.
Internal URL format: Protocol + URL (+non default port)

Public URL is the address of the Web Application for one of the five zones available. The ‘Default’ must be filled out and has some special properties/uses, the other four are optional. You can only have five Public URL’s per Web Application.
This is the URL that the browser will be redirected to in the end.
Public URL format: Protocol + URL (+non default port)

Zone is a label representing a Public URL, the zone is used to ‘connect’ an Internal URL to a Public URL. The zone names has no relation what so ever with the four Internet Explorer security zones (Internet, Local Intranet, Trusted sites and Restricted sites) and could just as easily been named 1,2,3,4 and 5. A zone can also represent an authentication provider.
Zones: Default, Intranet, Internet, Custom, Extranet

Example:

AAMTable1

Note: Based on the Zone selected for every Internal URL, they will be connected to a Public URL.

From left – to right…
The zones might as well be represented by numbers:

AAMTable2

Note: Try to always use the most used URL as   the default Public URL. This is what will be used by other services, like   crawl and in certain other links.

Translated to SharePoint GUI, this same setup would look like this:

AAM1

AAM2

Note: Filtered on this Web Applications   Alternate Access Mapping Collection only.
Same Alternate Access Mappings as in the Example table above.

You will see that if you click on any of the ‘Internal URLs’ that you can select zone, and with the zone, the Public URL it will be connected to:

AAM3
In addition to the actual Alternate Access Mapping in SharePoint Central Administration, you also have to add a Binding in IIS, contrary to what many believe, except for the initial hostheader when you create the web application, SharePoint does not do that for you, so you have to do it manually.
The example above would show up in IIS Bindings like this:

AAM4

As you can see, in IIS 8.0 and Windows Server 2012, the https binding does show up as a hostname, in IIS 7.5 and Windows Server 2008 R2, the hostname is determined by the name configured in certificate used when adding that binding and hidden in this view.

That’s it! When you have configured your AAM’s and Bindings correctly, given that you have name resolution and IP addresses in order and connectivity from the client to the server(s) and all other aspects in order, you can now start to use the URL’s you want.


_________________________________________________________

Enjoy!

Regards

Twitter | Technet Profile | LinkedIn

Whitepaper: The final guide to Alternate Access Mappings


This 45 page Guide is now available as a Free PDF download from Microsoft Technet Gallery.
Download : The final guide to Alternate Access Mappings

A preview of the whitepaper:


_________________________________________________________

Enjoy!

Regards

Twitter | Technet Profile | LinkedIn