

| NO DEVELOPMENT IN VISUAL STUDIO OR SHAREPOINT DESIGNER REQUIRED |
This is revision 2 of the A guide to quick SharePoint 2013 branding – part 2 – with Javascript. A few of the javasnippets turned out to stop working if MDS, Minimal Download Strategy was in affect which made the branding miss the target. The lines of javacode in this revised post has been corrected and will now work just as well with MDS.
I have to send a BIG thank you to Anurag Yagnik for getting me on the right track and for verifying the functionality. THANKS!
Hi dear SharePointies and SharePoints.
Welcome to the revised part 2, the revised version has some changes and rather updating the original post, I’ll keep some history and get a new post out with slightly different content.
I assume that you have seen and followed part 1, A guide to quick SharePoint 2013 branding so I will not cover every step needed, some you will have to get from part 1.
This is for all of you SharePoint technicians and enthusiasts out there who are not developers or don’t really have time or feel like learning the new ‘Design Manager’. All of the steps here can be done using only a Windows client and appropriate permissions.
| This guide has been verified in SharePoint Online. If you have done the steps in Onpremise server and/or Foundation, please drop me a comment and I will add that here and also give you credit for it. |
In part 1, we added a custom masterpage, a css/stylesheet file, a favicon and a logo image. We configured SharePoint to use the custom masterpage and in that we referenced the custom css, the favicon and the logo. All good.
Now, we want to get rid of the annoying default blue ‘banner’ with the Office 365 logo(SPO), the SharePoint text (Onprem/Foundation).
Without using Visual Studio…or SharePoint Designer…

In this short guide, I will use a site located in SharePoint Online (2013/Preview, link at the end), but the steps are exactly the same in an onprem environment.
| For the permanent production branding, I have to recommend using Visual Studio to create a wsp package, as long as you add the same files as I do here it will work the same. That way you will have an installable package that can be reinstalled and used in test and dev environment. You can also make sure the package works Before moving it into production. |
We will in part 2, make this (pretty good):
Look like this (even better):

In my opinion, a whole lot better!
Now let’s get on with branding our site:
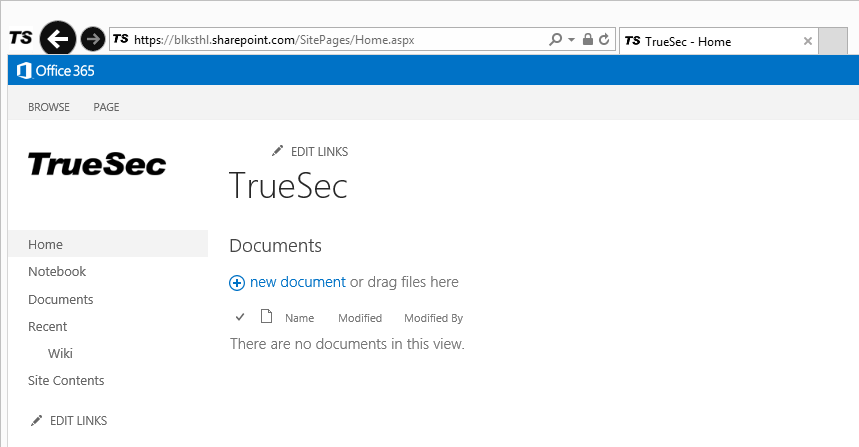
Use the sitecollection you used before, or simply any site collection will do. Work with the rootsite as usual.
To do what I am going to do, we need two new and one modified file:
truesec.js – New (Contains all the actual JavaScript code)
TrueSec_transparent_white.png – New (New logo, White on transparent for a nice effect)
truesec.master – Old (only modified to load the JavaScript file)
I will start by creating a simple JavaScript file, use a local folder to store your files in, we will later upload them to SharePoint.


Yes, you want to change the extension.
I added this JavaScript lines to my truesec.js file, see inline comments to see what it does
_spBodyOnLoadFunctionNames.push(“myinit”);
function myinit()
{
// This function makes sure that the script is executed after the page has completed loading
ExecuteOrDelayUntilScriptLoaded(function () {
if (typeof asyncDeltaManager != “undefined”)
asyncDeltaManager.add_endRequest(ConfigureBrandingsuite);
else ConfigureBrandingsuite();
}, “sp.js”);
}
function ConfigureBrandingsuite()
{
// Thanks to Anurag Yagnik for the enhanced script
var v_icon, v_iconbox;
var v_suiteBarLeftm, v_ribbonbox;
var v_link;
// Replace the default logo with my own shiny white with transparant background, oh-yeah!
var v_newImageSrc=”../_catalogs/masterpage/truesec/TrueSec_transparent_white.png”;
// get link reference so that we can point to our website, replace with your own
v_link = document.getElementById(“suiteBrandingLink”);
v_link.href=”https://blog.blksthl.com“;
// get icon reference so that we can change properties
v_icon = document.getElementById(“suiteBrandingIcon”);
v_iconbox = document.getElementById(“suiteBrandingIconBox”);
v_suiteBarLeft = document.getElementById(“suiteBarLeft”);
v_ribbonbox = document.getElementById(“s4-ribbonrow”);
// customize icon, icon box, background color and title
// Setting the background of the entire suitebarleft to jet-black for maximum effect
v_suiteBarLeft .style.background = “#000000”;
// v_ribbonbox.style.display=”none”;
// Setting the width to a little more than default, else the image may be cropped
v_iconbox.style.width=”200px”;
v_icon.src = v_newImageSrc;
v_icon.style.width=”150px”;
v_icon.style.left=”0″;
v_icon.style.top=”0″;
v_icon.alt=”Go to My Portal”;
v_icon.title=”Go to My Portal”;
// site specific – hide logo since we already have on on top left now
//document.getElementById(“ctl00_onetidHeadbnnr2″).style.display=”none”;
return false;
}
Make sure that your quotes and double quotes are correct, copying from a webpage often result in misformatted quotes. Avoid this by reviewing the code thoroughly in notepad. The ‘wrong’ kind usually leans to one or the other direction, whilst the ‘correct’ kind are straight. Example: |

Ok, thats one out of three files, moving on to the masterpage.
This you may allready have stored locally, but if you don’t, download a copy from SharePoint. I’ll use my custom truesec.master from part 1.
In your SharePoint site collection root, select Site Settings, then ‘Web Designer Galleries/Master pages’


In the master page gallery, navigate to your custom folder, mine is named ‘TrueSec’ obviously…
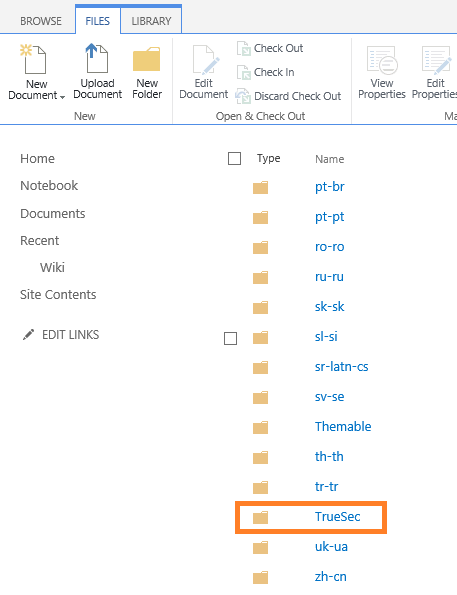
Open the custom branding folder and in it, locate you master page.
Select the file in the checkbox and click on ‘Download a Copy’.


Save the file to your local folder.

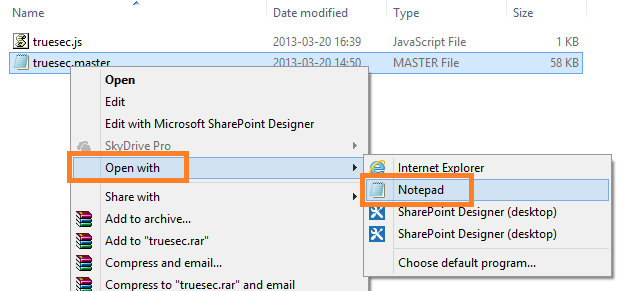
Now, we will add a simple line to the masterpage, right click on the masterpage and select edit in notepad.
Locate the following SharePoint:Scriptlinks:

After the line:
<SharePoint:ScriptLink language=”javascript” name=”suitelinks.js” OnDemand=”true” runat=”server” Localizable=”false” />
Add:
<SharePoint:ScriptLink ID=”ScriptLink1″ runat=”server” Defer=”False” Name=”~siteCollection/_catalogs/masterpage/TrueSec/truesec.js”></SharePoint:ScriptLink>
|
Make sure that your quotes and double quotes are correct, copying from a webpage often result in misformatted quotes. |
With the code added, that part of the masterpage will now look like this:
<SharePoint:ScriptLink language=”javascript” name=”sharing.js” OnDemand=”true” runat=”server” Localizable=”false” />
<SharePoint:ScriptLink language=”javascript” name=”suitelinks.js” OnDemand=”true” runat=”server” Localizable=”false” />
<SharePoint:ScriptLink ID=”ScriptLink1″ runat=”server” Defer=”False” Name=”~siteCollection/_catalogs/masterpage/TrueSec/truesec.js”></SharePoint:ScriptLink>
<SharePoint:CustomJSUrl runat=”server” /> <SharePoint:SoapDiscoveryLink runat=”server” />
or:

Save the file and leave it for now. We will upload all the files later.
So, two out of three done.
Time for the simplest one, the image. I wanted to add something a bit different than the logo I have already added, so I went with a logo in white on black instead of black on white. The image file is White on transparent and then the java script sets the background to jet-black which makes it all perfect. You use the images you want and for your customer/company/organization and make the decisions based on the colors you have there, I bet it will be beautiful!

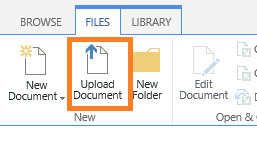
Ok, if you started out like I did with the ‘light branding’ already in Place, then you are pretty much done, all we need to do is upload the files and reload the page to see the result. Go to your site, open ‘Site settings’, ‘Master page’, browse to your folder, in my case its ‘/TrueSec’. Once here, select the ‘Files’ tab and ‘Upload Document’.
Now, if you already had the custom master selected in the site, it will load automatically with the JavaScript and all. Load the site in a browser to see the result:
If any of the branding does not show up, one good T-shooting step is to go to the MasterPage gallery again and the ‘truesec’ folder. In here, click on the dropdown for each file and make sure they are all published, if you get the option to ‘Publish a major version’ do it. That helps a lot of times when anything is wrong.
If anything is so wrong so that you can’t access any of the sites, use this link: [URL to your team site]/_layouts/15/ChangeSiteMasterPage.aspx, it will allow you to switch back to the ‘Seattle master’ and get access to the libraries and settings again. Make Changes, fix the problem, upload the new file and switch back to your custom master again to test.
Where to go from here?
In addition to the objects I have modified using java, there are several you can figure out how to configure for yourselves. If you want to find the objects, you can use F12 – Developer Toolbar that is built into IE.
Or, use any of these that are part of the 2013 default objects:
suiteBarLeft
suiteBarRight
suiteBrandingBox
DeltaSuiteLinks
suiteBarRight
RibbonContainer-TabRowRight
All og these have different properties to be configured, google, test, play around and find out what can be done.
References:
SharePoint 2013 Execute Javascript function after MDS load
http://blog.symprogress.com/2013/09/sharepoint-2013-execute-javascript-function-after-mds-load/
SharePoint 2013 Top links – Name, ID and How to Hide them (Excellent post on the objects and a start, how to hide them completely)
http://www.tuyrcorp.com/sharepoint-2013-top-links-name-id-and-how-to-hide-them/
A great place to learn html and css
http://www.w3schools.com/
Great overall branding blogger
http://blog.drisgill.com/
Map a network drive to the SharePoint 2013 Master Page Gallery
http://msdn.microsoft.com/en-us/library/jj733519.aspx
How to: Convert an HTML file into a master page in SharePoint Server 2013
http://msdn.microsoft.com/en-us/library/jj822370.aspx
Starter Master Pages for SharePoint 2013 (more advanced branding)
http://startermasterpages.codeplex.com/
Office 365 Preview
http://www.microsoft.com/office/preview/en/office-365-enterprise

___________________________________________________________________________________________________
Enjoy!
Regards
![]()

Hi, I have followed all the steps to change the blue banner in my SharePoint site, but then I understand the steps mentioned are for office 365. Hence, my site do not reflect the changes. Could you please help me what necessary changes that I need to make to have my own banner? I am using SharePoint 2013 on-premises.
Hi Sunitha.
Are you looking to change the text or add an image?
If ‘just’ the text in Onprem, then you can use this added to your custom css:
.ms-core-brandingText:after{
content:”Powered by Sunitha”;
}
.ms-core-brandingText{
margin-left: -95px;
}
Let me know how that works.
Ps. The examples in this post were tested in onprem as well, but in a preview version, things then changed…ds.
Regards
// Thomas
Hi Thomas, with the above css i was able to change the text., but I want to add an image (like the one you have showed in your article).
Hi Thomas, Thanks for your reply. With the above CSS i am able to change the text. However, my requirement is to add an image.
Ok, no problem.
Then you have to use a bit of javascript, I like to add it to my custom masterpage since I customize it anyway. If you want to do that, locate the following in your custom masterpage:
var suitebar = $(“#suiteBar”); “);
“);
var branding = suitebar.find(“.ms-core-brandingText”);
branding.html(“
(replace the image url to your own)
Then try it again.
Regards
// Thomas
Thanks Thomas. Changing the banner with text and using different font is more good than the image. So I used the CSS that you mentioned above to change the text. Thank you so much! This is very helpful.
Anytime Sunitha, Glad I could help!
Regards
// Thomas
Hi Thomas, Quick question… Using the CSS above, I was able to change the text and the font type. In addtiton to above, I have changed the default blue background color of #SuiteBarLeft id to my own… However, when I am navigating to List/Document library/any other page, it’s taking the default blue banner… Could you please help?
Default blue banner and default ‘SharePoint’ text…
In addition to default banner…it is also taking the default ‘SharePoint’ text……
Hi Sunitha.
Yes, I Think I know why that is, you have probably not changed masterpage in both locations, you have to change both the ‘Site master page’ and the ‘System master page’. The ‘System master’ Controls among other things the document libraries design.
Hope that helps
// Thomas
Hi Thomas
I am wondering if you can help. I have followed all of your above instructions in my O365 online site collection and it has not made any change. Please help! 🙂
Thanks
Atif
Hi Atif.
I need a bit more detail in order to help…what did you do and what did not work?
What was your expected outcome?
Logo, css, the javapart or what? Perhaps you can check Sunitha’s comment thread to get additional info on how to resolve it?
Regards
// Thomas
Hi Thomas, I’m working with office 365 and i can’t change blue banner. I have followed all step. Please help, Thanks!
Agustina
Hi.
Try the comments, the thread I had with Sunitha was regarding that, could be that it was onprem…
Try adding this to your custom css to change the text in the suitebar:
.ms-core-brandingText:after{
content:”Augustina Rules”;
}
.ms-core-brandingText{
margin-left: -95px;
}
Hope that helps
Rgds
// Thomas
Hi again Thomas
I have tried again and there is still no change to my masterpage.
I just want to remove the “Office365” logo at the top left – and replace it with my own logo – and then I will go on to find out how to amend the links to the right (Outlook/Calendar/People/ etc etc).
I am running Office365 and am using Sharepoint Designer 2013 to upload my files. I have followed all of your instructions above and the only modifications I have made are the names of the three files – where you have used “TrueSec” I have used “hs”, as well as my own branded logo (I changed the path to point to my logo in the .js file. So my code looks like this:
on the masterpage (hs.master):
In the hs.js file:
_spBodyOnLoadFunctionNames.push(“myinit”);
function myinit()
{
// This function makes sure that the script is executed after the page has completed loading
ExecuteOrDelayUntilScriptLoaded(function () {
if (typeof asyncDeltaManager != “undefined”)
asyncDeltaManager.add_endRequest(ConfigureBrandingsuite);
else ConfigureBrandingsuite();
}, “sp.js”);
}
function ConfigureBrandingsuite()
{
// Thanks to Anurag Yagnik for the enhanced script
var v_icon, v_iconbox;
var v_suiteBarLeftm, v_ribbonbox;
var v_link;
// Replace the default logo with my own shiny white with transparant background, oh-yeah!
var v_newImageSrc=”../_catalogs/masterpage/hs/owlywithhair.png”;
// get link reference so that we can point to our website, replace with your own
v_link = document.getElementById(“suiteBrandingLink”);
v_link.href=”https://blog.blksthl.com”;
// get icon reference so that we can change properties
v_icon = document.getElementById(“suiteBrandingIcon”);
v_iconbox = document.getElementById(“suiteBrandingIconBox”);
v_suiteBarLeft = document.getElementById(“suiteBarLeft”);
v_ribbonbox = document.getElementById(“s4-ribbonrow”);
// customize icon, icon box, background color and title
// Setting the background of the entire suitebarleft to jet-black for maximum effect
v_suiteBarLeft .style.background = “#000000″;
// v_ribbonbox.style.display=”none”;
// Setting the width to a little more than default, else the image may be cropped
v_iconbox.style.width=”200px”;
v_icon.src = v_newImageSrc;
v_icon.style.width=”150px”;
v_icon.style.left=”0″;
v_icon.style.top=”0″;
v_icon.alt=”Go to My Portal”;
v_icon.title=”Go to My Portal”;
// site specific – hide logo since we already have on on top left now
//document.getElementById(“ctl00_onetidHeadbnnr2″).style.display=”none”;
return false;
}
I know that the javascript is being processed from the masterpage because on one occasion when I had a typo the page failed to load (I have since fixed the typo).
I really dont know where I am going wrong here.
Ok.
Lets try again, a bit different:
For Office 365:
Locate the following in your custom masterpage:
Exactly above it, add this:
var companyLogo=document.getElementById(“suiteBrandingBox”);
companyLogo.innerHTML = ““;
Beware the quotes and double quotes, you will need to replace them if you copy paste from here.
If that fails, use F12 developer toolbar in IE, the Script tab to debug the code, if the JavaScript fails you should see why and how it fails.
Good luck
// Thomas
Thanks Thomas – where exactly on the masterpage should this line go?
Like I said, in the custom master(hs.master?), locate:
(Somewhere around line 110 in the master…)
and put the code i gave you in the last comment just below that.
Regards
// Thomas
Could you please tell me which line I need to locate? Your reply above has a blank space for the line that I should locate at around 110. Thanks and much appreciated Thomas!
Ahh 🙂
The code is removed obviously…stupid me!
Look for the suiteBarRight tag
Rgds
// Thomas
Ive found the following at line 84 and have tried to add it just after the tag but it just displayed the text as HTML on my site page. Pls forgive my coding skills as I am just starting out. Could you please show me how to add the line in?:
I have got it working now, thanks! I have placed the code after the last /div tag for suiteBarLeft and now the logo is gone. Thank you so much for your help!
No worries.
Glad I could help.
Perhaps the post needs Another update…
Regards
// Thomas
I like the start of the page “NO DEVELOPMENT IN VISUAL STUDIO OR SHAREPOINT DESIGNER REQUIRED ” as I work front end not back end on sites.
This looks like a great walk through, I can follow it all unlike many other posts I hit. Branding is great, the standard SharePoint look isn’t flattering. I will give this a go on a test site and see what it brings 🙂 thanks.
Hello Thomas Just checking back in regarding feedback. Any updates yet?
Hi EPW.
Sorry for the late response, things came up.
If the onprem suitebar left is what you want to modify, then you can do that without any java.
Use the css:
.ms-core-brandingText
{
Color:Same as background to hide SharePoint;
}
.ms-core-brandingText:after
{
Content: ‘Text that comes before’;
Color:white;
}
.ms-core-brandingText:before
{
Content: ‘Text that comes before’;
Color:white;
}
Play around with it a bit and you will get what you want.
Regards
// Thomas
Also, to change the background color:
#suiteBarLeft{
background-color: rgb(234, 41, 97);
}
// Thomas
Good Morning Thomas. What do you mean by Content: ‘Text that comes before’;. I dont see thast on my css, do I add that in. This is all I have for your first line. I know how to change the colors etc (suitebars, delta suite). My main objective is to change the color themes, add a image banner across the top, remove the “Sharepoint” wording and publish it to be able to choose it from “Change the Look”.
.ms-core-brandingText
{
font-size:1.2em;
padding-left:20px;
width:100%;
I dont want to hide “Sharepoint” I want to change it and make it stay. Using the developers tab I can change it in html, type in my text, but how do I keep it after I close it.
One more thing. My navigation went away could some one help with this as well. Thank You kindly.
Firstly, that would have to be one of the best written, and easiest to follow, user guides that I have ever come across. Well done.
Secondly, I seem to have run into an issue. Now that I have uploaded (and published) all of the files, the [ITEMS] and [LIST] tabs now disappear from the Master Page Gallery when I click on them. For example: In the Master Page Gallery, I left-click on [FILES], the Files Ribbon very briefly drops down, then the Files Ribbon, the [FILES] tab, and the [LIBRARY] tab all disappear… therefore, I am unable to access the Files or Items Ribbons, or use their features, such as, Upload Document.
Has anybody else reported this issue? Do you know if there’s a way to fix this? (I’m guessing it may be a missed ” or ; somewhere).
Thanks.
Richard.
Hi Richard.
Thanks for the great feedback!
If anything goes wrong manipulating the masterpage, it can be tricky to get back.
But, there are a few ways to save the situation.
1. Use the direct link to the masterpage settingspage – https://yourURL/_layouts/15/ChangeSiteMasterPage.aspx
Switch back to seattle.master and fix the issues.
2. Use SharePoint designer…switch back to the default seattle.master
Hi Richard.
I typed in an answer before but then something happened and it got lost.
If you lose your way with your masterpages, switch back to the default masterpage seattle. Use the direct link YourSiteURL/_layouts/15/ChangeSiteMasterPage.aspx
or SPD to do it.
Most likely, you have a quote or double quote wrong. Replace them all.
Regards
// Thomas
I’ve also just noticed that the Office 365 logo is still in the top left corner. Not sure where I could’ve gone wrong.
Richard.
I’ve noticed that as well, I’ll get back with an update.
Regards
// Thomas
Not sure if O365 is changing and that is why the logo is so hard to get a grip on, once a code wroks, something gets changed and it stops…
This js worked and others before it…
Regards
// Thomas
I have SharePoint Online 2013 – I followed the first part and whenever I ChangeMasterPage to my new folder path it basically crashes and I have to revert the masterpage back to seattle.master. At first I thought this was happening because I opened it in SPD13, so I tried only opening the master file in notepad but i got the same result. ‘Something went wrong’.
I also made sure I replaced the copied quotes with newly entered quotes so I am not sure what I am doing wrong here…
I have my cs.master , cs.js, cs.png, cs.css, and favicon.ico all in the masterpage section inside it’s own cs folder.
I was able to edit the CSS file to fix the Global Navigation text wrap by using an alternate CSS but like I said I always get the ‘Something went wrong’ when trying to point the masterpage to my cs.master file.
I’d love if you could help me personally as I was thrown to the wolves on this Project and am new to SharePoint as a whole, although I do have experience in Jscript, HTML, and CSS.
Article has been very helpful but i want to get rid of the Office 365 branding and the SharePoint icon. Help kind sir!
Hi. Sorry to hear that you are having trouble, but…
The guide is made a while back and SPO is constantly evolving. This is one reason.
Another worthchecking, could be the ‘new’ Custom Script security feature in O365. This could easily thwart any atempt at customizations.
The basics in the guide should be good though…if you skip using SPD…I never say use SPD do I? 😃