Office 365 News – Move and Copy files and folders in OneDrive for Business


 Office365logo       SP2013logo       SharedLove

Now, finally, we can move and copy files within our OneDrive for Business web GUI

Dokument

Some random document…

Some time, early 2015, Microsoft introduced the ability to move/copy files in OneDrive for Business. This has been one of the major obstacles for using OneDrive for Business as a E1 user without the Office applications installed locally. Or rather, as a Online only user no matter what license. As a long time SHarePoint user and technician, this is a long awaited feature in SHarePoint as well, so now I’m keeping my fingers crossed for this ‘simple’ little feature to appear there as well. (I do not for one second think that this has been easy to implement at all) In addition, the function is quick!

Want to see how it looks and works?

The following table lists the tested and verified behaviour of the Copy/Move functionality in OneDrive for Business:

Action Behavior Notes
Move File(s) Moves the selected file(s) to the designated target container Retains metadata Retains sharing Does not overwrite if filename exists, reports back error
Move Folder(s) Moves the selected folder(s) to the designated target container Recreates a new copy of the folder Retains sharing Does not overwrite if filename exists, reports back error
Copy File(s) Copies the selected file(s) to the designated target container Recreates a new copy of the file(s) with new metadata Does not retain sharing Does not overwrite if filename exists, reports back error
Copy Folder(s) Copies the selected folder(s) to the designated target container Recreates a new copy of the folder with new metadata Does not retain sharing Does not overwrite if filename exists, reports back error
Copy or Move in SharePoint N/A – ‘Send to’ a predetermined location is the closest we get in SharePoint Server or SharePoint Online N/A

How it looks in reality:

Move or Copy a single file

SingleFileMove1

Move or Copy multiple files/folders

MultipleFilesMove1

Select the target, check the ‘Copy’ box if you want to Copy and not Move

MultiMoveDialog

After copying/Moving, you will get a Little reciept in the top right corner

Shared15

Ok

or

SharedCopy

If one or many of the files allready exist at the target, they are not overwritten, not even with a new name or new version. You will instead get a note on this and the result

Error

Now, we all hope for the same in SharePoint! Until it comes, we all to this ‘simple’ feature say: FINALLY!

References and Credits

None at this time…

Credits & many thanks to

Everyone!   SP2013logo

_________________________________________________________

Enjoy!

Regards

Twitter | Technet Profile | LinkedIn

Advertisement

Export a document library using Export-SPWeb and itemurl


Export-SPWeb

(This is my better version of the TechNet articles on the same CMDlet that does a poor job with the details, I hope that it will help some of you)
SharePoint 2010 | SharePoint 2013
Applies to:  SharePoint Foundation 2010 | SharePoint Server 2010 | SharePoint Foundation 2013 | SharePoint Server 2013 

Exports a site, list, or library.


Export-SPWeb [-Identity] <GUID/Name/SPWeb object> -Path <String> [-AssignmentCollection <SPAssignmentCollection>] [-CompressionSize <Int32>] [-Confirm [<SwitchParameter>]] [-Force <SwitchParameter>] [-HaltOnError <SwitchParameter>] [-HaltOnWarning <SwitchParameter>] [-IncludeUserSecurity <SwitchParameter>] [-IncludeVersions <LastMajor | CurrentVersion | LastMajorAndMinor | All>] [-ItemUrl <String>] [-NoFileCompression <SwitchParameter>] [-NoLogFile <SwitchParameter>] [-UseSqlSnapshot <SwitchParameter>] [-WhatIf [<SwitchParameter>]]

——————–EXAMPLE———————–

Export-SPWeb http://site –Path "c:\temp\site export.cmp" -ItemURL "/subsite/documents"

This example exports the document library at http://site/subsite/documents to a new file called ‘site export.cmp' in the ‘C:\temp’ directory.

Parameters

Parameter

Required

Description

Identity Required Specifies the URL or GUID of the Web to be exported. The type must be either
– a valid GUID, in the form ‘12345678-90ab-cdef-1234-567890bcdefgh’
– a valid name of a SharePoint site (for example, MySPSite1)
or a URL: http://blog.blksthl.com
or an instance of a valid SPWeb object
Path Required Specifies the name of the export file. If the -NoFileCompression parameter is used, a directory must be specified; otherwise, any file format is valid.
Example: “c:\temp\exportedsite.cmp” or with the -NoFileCompression “c:\temp\exportedsite\”
AssignmentCollection Optional Manages objects for the purpose of proper disposal. Use of objects, such as SPWeb or SPSite, can use large amounts of memory and use of these objects in Windows PowerShell scripts requires proper memory management. Using the SPAssignment   object, you can assign objects to a variable and dispose of the objects after they are needed to free up memory. When SPWeb, SPSite, or SPSiteAdministration objects are used, the objects are automatically disposed of if an assignment collection or the Global parameter is not used.

                                                                                                                                         Note:
When the Global parameter is used, all objects are contained in the global store. If objects are not immediately used, or disposed of by using the Stop-SPAssignment command, an out-of-memory scenario can occur.
CompressionSize Optional Sets the maximum file size for the compressed export files. If the total size of the exported package is greater than this size, the exported package will be split into multiple files.
Confirm Optional Prompts you for confirmation before executing the command. For more information, type the following   command: get-help about_commonparameters
Force Optional -Force Forcefully overwrites the export package if it already exists.The type must be either of the following values:
True
FalseThe default value is False.
HaltOnError Optional Stops the export process when an error occurs.
HaltOnWarning Optional Stops the export process when a warning occurs.
IncludeUserSecurity Optional Preserves the user security settings except for SPLists that have broken inheritance and item level   permissions set.
(Use Import-SPWeb with –IncludeUserSecurity to preserve security on import)
IncludeVersions Optional Indicates the type of file and list item version history to be included in the export operation. If the
-IncludeVersions parameter is absent, the Export-SPWeb cmdlet by default uses a value of CurrentVersion. The type must be any one of the following versions:
LastMajor “Last major version for files and list items (default)”
CurrentVersion “The current version, either the last major version or the last minor version”
LastMajorAndMinor “Last major and last minor version for files and list items”
All “All versions for files and list items”
ItemUrl Optional Specifies the relative path to the object to be exported. Can also be a GUIDThe type must be a valid relative path, for example, /Subsite/Documents
or a valid GUID in the form: 12345678-90ab-cdef-1234-567890bcdefgh
NoFileCompression Optional Either enables or disables file compression in the export package. The export package is stored in the   folder specified by the Path parameter or Identity parameter. We recommend that you use this parameter for performance reasons. If compression is enabled, the export process can increase by approximately 30 percent.
NoLogFile Optional Suppresses the generation of an export log file. If this parameter is not specified, the Export-SPWeb   cmdlet will generate an export log file in the same location as the export package. The log file uses Unified Logging Service (ULS).It is recommended to use this parameter. However, for performance reasons, you might not want to generate a log file.
UseSqlSnapshot Optional Specifies a SQL Database Snapshot will be created when the export process begins, and all exported   data will be retrieved directly from the database snapshot. This snapshot will be automatically deleted when export completes.
WhatIf Optional Displays a message that describes the effect of the command instead of executing the command. For   more information, type the following command: get-help about_commonparameters

References:

Export-SPWeb
http://technet.microsoft.com/en-us/library/ff607895(v=office.15).aspx

Export a site, list, or document library (Search Server 2010)
http://technet.microsoft.com/en-us/library/ff428101(v=office.14).aspx

Thanks to:

Mattias Gutke – CAG – My main man!


___________________________________________________________________________________________________

Good Luckl!!

Regards

Twitter | Technet Profile | LinkedIn

Move your SharePoint IIS sites from the systemdrive(C:)


Move your SharePoint IIS sites from the systemdrive(C:)
or avoid putting them there in the first Place.

Lionx

Do you see the lion that is totally in the wrong Place…or is it the Jeeps that are…?

Deal fellow SharePointlovers!

This time, I’ll try to show you how to avoid the messed up situation most SharePoint installations are in, with everything on the systemdrive, or C:
Now, us people have over time been better and better at one thing, we understand that the logfiles should not be located on the systemdrive, so we have learned over time to move the ULS log and the Usage and Health log from C:, some have even been clever enough to move even the IIS log from C:

But, what do we still always, always, always, find installed on C:?… … …yes, C:\inetpub!

It not very strange though, the developers of Windows Server have made a point out of not giving us an option to install inetpub on a different path, not unless you do an unattended installation or otherwise script or Control your installation. The ‘Add/Remove roles’ wizards in Server 2008, 2008R2 and 2012 all lack this option (for a reason).

BUT! This is intentially, the default inetpub location should and must be in the systemdrive, IIS is considered an operating system Component and has to be there for a number of reasons. At the end you will find a link to a KB article that explains this in more detail. Leave inetpub and its subfolders where it is!

So, why would we want to do this anyway
why move the inetpub and all of its content, or at least the separate site catalogs to a different drive?
– Separation (Performance and Security)
– Compartmentalization (Performance and Security)
Having averything on the same drive is bad for a few reasons, primarily performance and security. Perfomance since the OS is on the C drive and security because if an attacker by some means gets access to a different less secure applications sitecatalog, they also get access to the systemdrive and possible also all other webapplication sitecatalogs. Moving them to other drives, same or different, helps mitigate both possible issues.
I therefore recommend doing this:

Do your regular installation, add the Web Server role and let the inetpub folder end up on C:, like I said, no worries. Whats important for us will not be located there anyway.
Next, edit the registry to make the default location of inetpub be for example D: (unless this is were you will be putting all of your logfiles, then select a third or fourth drive)
Install the SharePoint as you would normally do, Central administration will now end up were you pointed the default location.
Create your Web Applications using the GUI or PowerShell and leave out the path, the IIS sites will be were you wanted them.

So, how do we do this in more detail? A Guide…

Configure the Web Server(s)

1. Configure the default location

On all of your web servers in the farm, and on your Central Administration server(s), edit the registry key that Controls the default location:

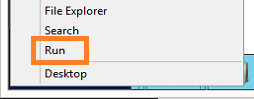
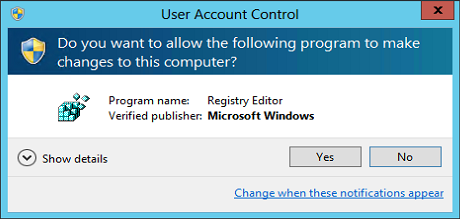
Start regedit by, Right clicking in the very lower left corner and you will get a list of actions, click on Run.

Reg1x

Type Regedit and click Ok.

Reg2x

Click Yes in the UAC dialog.

Reg3

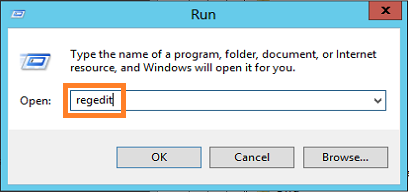
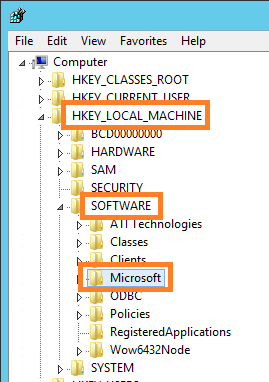
In Registry Editor, we locate the following path: HKEY_LOCAL_MACHINE\SOFTWARE\Microsoft\InetStp

Reg4x

Reg5x

Under ‘InetStp’ we have a number of keys.

Reg6x

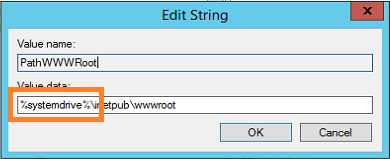
Locate and Edit the key PathWWWRoot from the default: (%systemdrive%)

Regbeforex

to: (D: or where you prefer to locate it, E: F: G: H:…)

Regafterx

There you go! All set, no IIS reset or restarts of any kind required.
Like said before, go on and do this on all servers that will host a webserver (WFE or CA). If you don’t, then you will have an inconsistent setup making Everything very hard to setup and t-shoot.

2. Add SharePoint
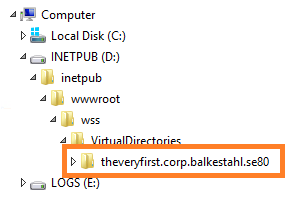
After this has been changed on all of you r web servers, you can go ahead and install the SharePoint binaries and configure your farm, The Central Administration site will now be located on the drive you have specified, it will be in the exact same path as it normally would but on a different drive. For example: ‘D:\inetpub\wwwroot\wss\VirtualDirectories\20000\’

Note that the Central Administration UI will now be default suggest a different path:

NewWeb1x

If you create a new site using PowerShell, it will also by default put it in D: even if you don’t specify any path:

New-SPWebApplication -Name TheVeryFirst -ApplicationPool SharePoint -HostHeader theveryfirst.corp.balkestahl.se -Port 80 -Url theveryfirst.corp.balkestahl.se -DatabaseServer blksthl-sql -DatabaseName SP11_Content_TheVeryFirst

As you can see, were done! 🙂

Donex

For the logfiles, I’ll make a separate post, they should also be moved, more so even than the sitefolders. Logfiles will fill up the disks, they will slow performance and maybe most importantly, they contain delicate information that you want to keep separated from the OS and IIS.

References:

Guidance for relocation of IIS 7.0 and IIS 7.5 content directories
http://support.microsoft.com/kb/2752331

Configure ULS log and Usage and Health log location
https://blog.blksthl.com/2013/06/05/configure-uls-log-and-usage-and-health-log-location/

Thanks to:

Mikael Nyström (The Deployment Bunny) – Truesec
Mattias Gutke – CAG


___________________________________________________________________________________________________

Good Luckl!!

Regards

Twitter | Technet Profile | LinkedIn