https://admin.onedrive.com
‘ ‘Say no more!
‘
‘
References and Credits
Credits & many thanks to
Everyone!‘
 _________________________________________________________ Enjoy!
Regards
![]()
Mostly what I know and share about…
‘ ‘Say no more!
‘
‘
Everyone!‘
_________________________________________________________ Enjoy!
Regards
![]()
This was promised to us a long time ago, and it has now finally come to be. At the same time, the 20.000 file limit from before has also been removed (Improved)
Here is the proof:
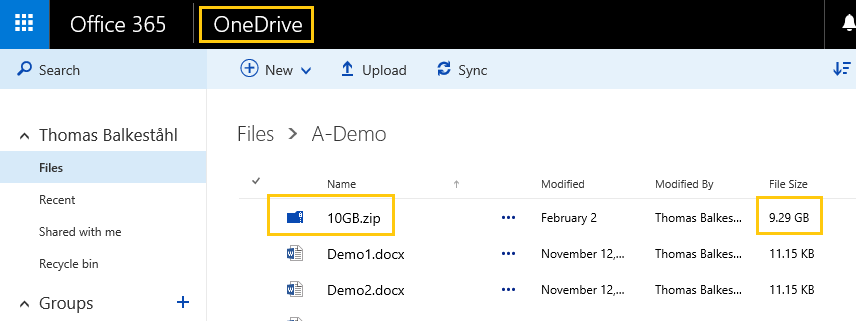
The file was in addition, uploaded using the new OneDrive sync client!
(Dropped the file in the local cache and let the sync do its stuff)
References:
Read the official story on the Office 365 blog about the (then upcoming) news here:
OneDrive for Business update on storage plans and Next Generation Sync Client
https://blogs.office.com/2015/12/16/onedrive-for-business-update-on-storage-plans-and-next-generation-sync-client/
_________________________________________________________
Enjoy!
Regards
![]()

‘
”
Recently, right-click functionality was introduced in SharePoint Online and OneDrive for Business both, it really is a great feature that simplifies the lives of all users.
I will show in Pictures what I mean, no more ‘three dots’ or select and then ‘three dots’ again. Now, with right-click, we can easily access the properties and functions to manage a file or folder simply by right-clicking on it. (I assume though, that the dots and More will be left in Place, not all devices have a right button…)
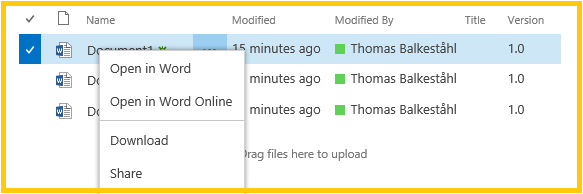
So, here is what its all about, right-click and you can now access:
Open in Word, Open in Word Online, Download, Share, Rename, Delete, Move or Copy, Version History, Properties, Check out, Follow, Workflows, Shared with and Compliance details.
This is how it looks:
1. Right-click in OneDrive for Business
2. Right-click in SharePoint Online
4. Caveat no 1 – Right-click breaks with Managed Metadata columns in view *
5. Caveat no 2 – Copy shortcut is gone
* Right-click does work with Content types, site columns with non Managed metadata datatypes and views with multiple columns
‘
1. Right-click in OneDrive for Business

‘
2. Right-click in SharePoint Online

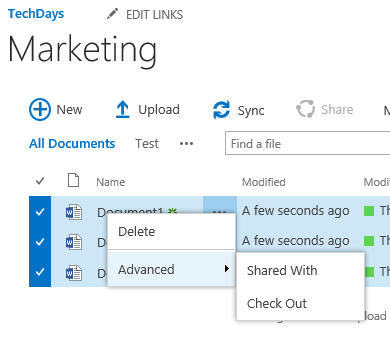
3. Right-click on Multiselect
4. Caveat no 1 – Right-click breaks with Managed Metadata columns in view
Yes, add an Managed Metadata column is fine, but if you show it in a view, right-click breaks and goes back to IE default.
In the example below I created and added a column actually named Managed Metadata…
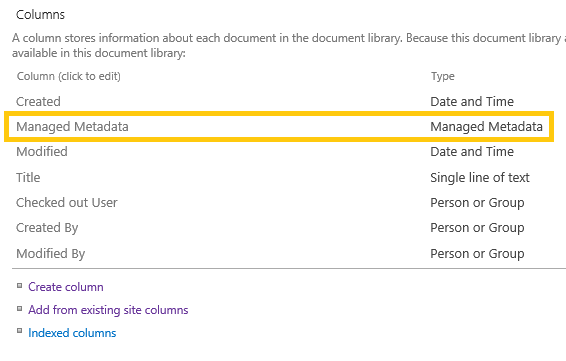
When the Managed Metadata based column is added to the view, right-click breaks.
5. Caveat no 2 – Copy shortcut is gone
This may not seem like a big deal…but for admins, developers or designers, this is a bit cumbersome. You often want to get the URL from a resource file (js, css or similar) and now you can’t. Type it in folks….

Thats it. The news is out.
Only me this time…
My team, my collegues and Mattias Gutke! A good friend!
‘ _________________________________________________________
Enjoy!
Regards
![]()

” ‘
Some random document…
Some time, early 2015, Microsoft introduced the ability to move/copy files in OneDrive for Business. This has been one of the major obstacles for using OneDrive for Business as a E1 user without the Office applications installed locally. Or rather, as a Online only user no matter what license. As a long time SHarePoint user and technician, this is a long awaited feature in SHarePoint as well, so now I’m keeping my fingers crossed for this ‘simple’ little feature to appear there as well. (I do not for one second think that this has been easy to implement at all) In addition, the function is quick!
Want to see how it looks and works?
The following table lists the tested and verified behaviour of the Copy/Move functionality in OneDrive for Business:
| Action | Behavior | Notes |
| Move File(s) | Moves the selected file(s) to the designated target container Retains metadata Retains sharing | Does not overwrite if filename exists, reports back error |
| Move Folder(s) | Moves the selected folder(s) to the designated target container Recreates a new copy of the folder Retains sharing | Does not overwrite if filename exists, reports back error |
| Copy File(s) | Copies the selected file(s) to the designated target container Recreates a new copy of the file(s) with new metadata Does not retain sharing | Does not overwrite if filename exists, reports back error |
| Copy Folder(s) | Copies the selected folder(s) to the designated target container Recreates a new copy of the folder with new metadata Does not retain sharing | Does not overwrite if filename exists, reports back error |
| Copy or Move in SharePoint | N/A – ‘Send to’ a predetermined location is the closest we get in SharePoint Server or SharePoint Online | N/A |
How it looks in reality:
Move or Copy a single file

‘
Move or Copy multiple files/folders
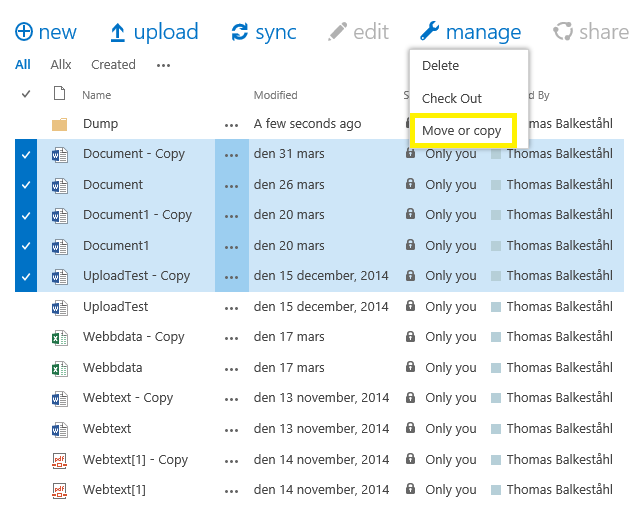
‘
Select the target, check the ‘Copy’ box if you want to Copy and not Move
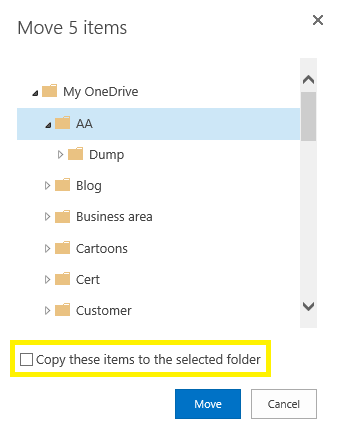
‘
After copying/Moving, you will get a Little reciept in the top right corner


or

‘
If one or many of the files allready exist at the target, they are not overwritten, not even with a new name or new version. You will instead get a note on this and the result‘

‘
Now, we all hope for the same in SharePoint! Until it comes, we all to this ‘simple’ feature say: FINALLY!
None at this time…
Everyone!‘
_________________________________________________________
Enjoy!
Regards
![]()
‘

How can we manage these items…?
‘
‘
This is a pure guide to using PowerShell to manage and manipulate files and folders, libraries and all document management related tasks in a SharePoint Online or OneDrive for Business environment.
The sections in this guide are:
– Prerequisites
– Load assemblies
– Load a CSOM Context
– Web
– List/Library
– GetFileByServerRelativeUrl and GetForlderByServerRelativeUrl
– Create a file from a local copy
– Create a folder from a local copy
– Set properties on a file
– Set properties on a folder
– ResolveUser (Function)
– GetItemProperties (Function)
‘
Before beeing able to do much in SharePoint Online or OneDrive for Business, you have to start using CSOM, or Client Side Object Model, this allows us to do pretty much everything we could do before using regular PowerShell and the SharePoint CMD’lets from the SharePoint PowerShell add-on.
Install assemblies:
Download and install ther latest version of the SharePoint Server 2013 Client Components SDK, this can be downloaded from here: http://www.microsoft.com/en-us/download/details.aspx?id=35585
After the SDK and the CSOM assembly DLL’s are in place, make sure you load the assemblies before calling them.
 Add-Type -Path "C:\Program Files\Common Files\Microsoft Shared\Web Server Extensions\15\ISAPI\Microsoft.SharePoint.Client.dll"
 Add-Type -Path "C:\Program Files\Common Files\Microsoft Shared\Web Server Extensions\15\ISAPI\Microsoft.SharePoint.Client.Runtime.dll"
This will open up for usage of CSOM in PowerShell.
$SPOUser = "administrator@blksthl.onmicrosoft.com"
# Uses a hardcoded password, use only during test/lab:
$SPOPassword = convertto-securestring "Password01" -asplaintext -force
# Better: $SPOPassword = Read-Host -Prompt "Please enter your password" -AsSecureString
$SPOODfBUrl = "https://blksthl.sharepoint.com/personal/jeffrey_lebowski_blksthl_com"
$Context = New-Object Microsoft.SharePoint.Client.ClientContext($SPOODfBUrl)
$Credentials = New-Object Microsoft.SharePoint.Client.SharePointOnlineCredentials($SPOUser,$SPOPassword)
$Context.RequestTimeout = 16384000
$Context.Credentials = $Credentials
$Context.ExecuteQuery()
Returns: $Context
(Using $Context from the section on Context above)
$Web = $Context.Web
$Context.Load($Web)
$Context.ExecuteQuery()
Returns: $Web
$SPODocLibName = "Documents"
$SPOList = $Web.Lists.GetByTitle($SPODocLibName)
$Context.Load($SPOList.RootFolder)
$Context.ExecuteQuery()
Returns: $SPOList
In order to use the ‘Get…ByServerRelativeUrl’ methods you have to supply a relative path to the file or folder, this means a path starting from the FQDN.
Example 1
https://company.sharepoint.com/get/fileorfolder/by/relative/url
FQDN: https://company.sharepoint.com
ServerRelativeUrl: /get/fileorfolder/by/relative/url
Example 2
https://company-my.sharepoint.com/personal/firstname_lastname_company_com
FQDN: https://company-my.sharepoint.com
ServerRelativeUrl: /personal/firstname_lastname_company_com
Example file:
"/personal/jeffrey_lebowski_blksthl_com/documents/report1.xlsx"
Example folder:
"/personal/jeffrey_lebowski_blksthl_com/documents/subfolder"
This can be accomplished in several ways, this is one:
1.
$LocalFile = Get-ChildItem -path "C:\Homedirs\jeff\report1.xlsx"
$FolderRelativeUrl = $SPOList.RootFolder.ServerRelativeUrl
$FileName = $LocalFile.Name
$FileUrl = $FolderRelativeUrl + "/" + $FileName
[Microsoft.SharePoint.Client.File]::SaveBinaryDirect($Web.Context, $fileUrl, $LocalFile.OpenRead(), $true)
Returns: New file created in SPO/ODfB
$SPOFolder = $SPOList.RootFolder
$LocalFolder = Get-ChildItem -path "C:\Homedirs\jeff\" -Recurse -Include "folder1"
$FolderName = $LocalFolder.Name
$NewFolder = $SPOFolder.Folders.Add($FolderName)
$Web.Context.Load($NewFolder)
$Web.Context.ExecuteQuery()
Returns: New folder created in SPO/ODfB
Input: $FileRelativeUrl, $SPOItemModifier, $SPOItemOwner, $ItemCreated, $ItemModified
$CurrentFile = $Context.web.GetFileByServerRelativeUrl($FileRelativeUrl)
$Context.Load($CurrentFile)
$Context.ExecuteQuery()
$ListItem = $CurrentFile.ListItemAllFields;
$ListItem["Editor"] = $SPOItemModifier; # Get object from ResolveUser
$Listitem["Author"] = $SPOItemOwner; # Get object from ResolveUser
$Listitem["Created"] = $ItemCreated;
$Listitem["Modified"] = $ItemModified;
$ListItem.Update()
$Context.Load($CurrentFile)
$Context.ExecuteQuery()
Returns: Folder stamped with new properties in SPO/ODfB
Input: $FolderRelativeUrl, , $SPOItemModifier, $SPOItemOwner, $ItemCreated, $ItemModified
$CurrentFolder = $Context.web.GetFolderByServerRelativeUrl($FolderRelativeURL)
$Context.Load($CurrentFolder)
$Context.ExecuteQuery()
$SPOFolderItem = $CurrentFolder.ListItemAllFields;
$SPOItemOwner = ResolveUser $UserEmail # For ResolveUser see separate function described later in this post
$SPOFolderItem["Editor"] = $SPOItemModifier # Must be a userobject, see 'ResolveUser'
$SPOFolderItem["Author"] = $SPOItemOwner # Must be a userobject, see 'ResolveUser'
$SPOFolderItem["Created"] = $ItemCreated # In the format: "8/10/2013 7:04 PM", see 'GetItemProperties'
$SPOFolderItem["Modified"] = $ItemModified # In the format: "8/10/2013 7:04 PM", see 'GetItemProperties'
$SPOFolderItem.Update()
$Context.Load($CurrentFolder)
$Context.ExecuteQuery()
Returns: Folder stamped with new properties in SPO/ODfB
Function ResolveUser ($InputUPN)
# Resolves a user to a userobject
{
    $OutputUserObject = $Web.Context.web.EnsureUser($InputUPN)
    $Web.Context.Load($OutputUserObject)
    $Web.Context.ExecuteQuery()
    Return $OutputUserObject
}
Returns: UserObject for $InputUPN (UserPrincipalName/Email)
Function GetItemProperties ($InFileObject)
# Gets basic properties to set on files and folders
{
    $Global:ItemCreated = $InFile.CreationTime
    $Global:ItemModified = $InFile.LastWriteTime
}
Returns: Global: Variables for ItemCreated and LastWriteTime of $InFileObject (File or Folder)
‘
Thats all for now, I hope that you let me know if there is anything that seems to be wrong or does not work. The problem with describing all this in a complete way, is that it is easy to leave something out and it is also difficult to test every aspect while writing. Time is limited for all of us…
Anyway, my goal was to write a post that covered what I was myself missing…I hope that this is it. And again, please let me know if there are any mistakes in here.
None at this time…
LabCenter – you guys always publish my articles!
My family, my parents, Ia and the kids!
_________________________________________________________
Enjoy!
Regards
![]()
‘
The new- new document dialog
‘
Before yesterday, I knew that the ‘new document’ button in a document library became useless when you enabled Content types in a document library. This has for me and many of my customers been a huge drawback since the ‘new document’ button was still there, in plain view and for the regular user, what they were meant to use.
This old behavious was that when you pressed on ‘new document’ in a document library with multiple content types, you got the upload document dialog.
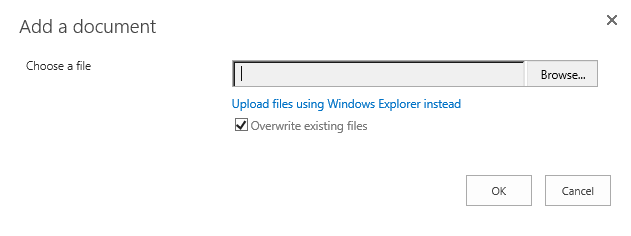
Old behaviour
What I was so glad to discover yesterday, during a live demo at a customer, that this has been fixed now in SPO! Instead of the upload dialog, I could now get this:

Fixed!
One down!
Next step, make content types available to Office Online…(They still seem to require the Office Applications installed on the client, nothing for E1 users or less in other words…)
I would also like the new folder option back with the content types 🙂
None at this time…
Cramo, this is where I did the demo when this change presented itself to me! A pleasure to work with you guys!
_________________________________________________________
Enjoy!
Regards
![]()
‘
‘
It has been disclosed to me that Microsoft has implemented a change on all Office 365 tenants to the way an unlicensed user can access SharePoint Online services…in a bad way…
Previously, the behaviour was that if you did not give a user a the SharePoint license in Office 365, the user could not access SharePoint.
This is the expected behaviour and this is how most companies restricted access to SharePoint Before they were ready to offer the service to their organizations.
This is no more, or at least not the current behaviour…Microsft has ‘temporarily’ made a change that allows ALL users, with a license or not to have access to all SharePoint Services.
The imidiate affect may be that your organization sleeps safely in the belief that SHarePoint may not be accessed, except by you in IT or by a limited number of individuals, meanwhile, the users go crazy and start using SharePoint in ways you never intended…
Well, this is something I don’t like, I would like this change to be limited to the ones who specifically asked for it, and if you needed it, you could request it, not the other way around.
| Note 1: If you find that you do not want this behaviour, you want access only to your licensed users. Open a Service Request with Microsoft and ask them to change it back, they will help you then. |
‘
| Note 2: The change does not affect OneDrive for Business, unprovisioned users do not get access to their ODfB without the SharePoint license. |
‘
The reason given by Microsoft representatives is this: ‘Microsoft recognizes assigning licenses to users that are synced to the O365 services is cumbersome for larger tenants, to alleviate this pain point; a temporary change has been released to SharePoint Online that will allow users to access SharePoint Online even without license.’
None at this time…
Pihlen!
_________________________________________________________
Enjoy!
Regards
![]()
‘ ‘
 SPO Admin setting (with a dead link)
‘
‘
During the end of 2014, beginning of 2015, a new security feature in SharePoint Online has been rolled out. The feature in itself is great, it has been introduced to (From the SharePoint admin interface):
Control whether users can run custom script on personal sites and self-service created sites. Note: changes to this setting might take up to 24 hours to take effect.
What is good to know without Reading too much on this feature, is that these things for example will be missing:
| Site feature | Behavior | Notes |
| Save Site as Template | No longer available in Site Settings. | You can still build sites from templates created before scripting was disabled. |
| Save document library as template | No longer available in Library Settings. | You can still build document libraries from templates created before scripting was disabled. |
| Solution Gallery | No longer available in Site Settings. | You can still use solutions created before scripting was disabled. |
| Theme Gallery | No longer available in Site Settings. | You can still use themes created before scripting was disabled. |
| Help Settings | No longer available in Site Settings. | You can still access help file collections available before scripting was disabled. |
| Sandbox solutions | Solution Gallery will not appear in the Site Settings so you can’t add, manage, or upgrade sandbox solutions. | You can still run sandbox solutions that were deployed before scripting was disabled. |
| SharePoint Designer | Site Pages: No longer able to update web pages that are not HTML.Handling List: Create Form and Custom Action will no longer work.Subsites: New Subsite and Delete Site redirect to the Site Settings page in the browser. Data Sources: Properties button is no longer available. | You can still open data sources. |
For a good detailed description of what the feature does, have a look here. It affects mostly Everything and since it is activated by default, a lot of settings and functionality is suddenly missing. The feature has two ‘levels’, for personal sites and for self service created sites. (for me, it affects all site Collections)
Turn scripting capabilities on and off (Microsoft support article)
https://support.office.com/en-us/article/Turn-scripting-capabilities-on-and-off-1f2c515f-5d7e-448a-9fd7-835da935584f?ui=en-US&
The feature in itself is great, but perhaps, since it removes so much of the default functionality, it should have been left off be default? Or, would cause some kind of popup to all affected users?
Well, it is here now anyway…lets consider the feature a great idea, it increases the built in security of SharePoint Online and OneDrive for Business!
The complete list of settings affected and webparts missing: Save Site as Template, Save document library as template, Solution Gallery, Web Designer Galleries, Theme Gallery, Help Settings, Sandbox solutions, the Blog Archives, Blog Notifications, Blog tools Blog Webparts, the Business Data Actions, Business Data Item, Business Data Item Builder, Business Data List, Business Data Related List, Excel Web Access, Indicator Details, Status List, Visio Web Access Business Data Webparts, the About This Community, Join, My Membership, Tools, What’s Happening Community Webarts, the Categories, Project Summary, Relevant Documents, RSS Viewer, Site Aggregator, Sites in Category, Term Property, Timeline, WSRP Viewer, XML Viewer Content Rollup Webparts, the Document Set Contents, Document Set Properties Document Sets Webparts, the HTML Form Webpart, the Content Editor, Script Editor, Silverlight Webpart Media and Content Webparts, the Refinement, Search Box, Search Navigation, Search Results Search Webparts, the Catalog-Item Reuse Search-Driven Content Webparts and the Contact Details, Note Board, Organization Browser, Site Feed, Tag Cloud, User Tasks Social Collaboration Webparts.
None at this time…
Everyone!‘ _________________________________________________________ Enjoy!
Regards
![]()
Finally, after too long, Microsoft has released the first preview version of a sync client to the MAC plattform.
Until now, this was the last gap in the ODfB access portfolio, now we can finally say, no more. We are complete! (Or soon will be anyway, it’s a preview…)
All is now covered, Windows, Windows Phone, Android phone, Android tablet, Iphone, Ipad and now, MAC OSX.
Download the preview here, OneDrive for Business Mac sync client Preview – Download Center
Read more about this news here on the Official OneDrive blog (Also covers OneDrive for Business…)

Read the official story on the Office 365 blog about this news here:
http://blogs.office.com/2015/01/28/onedrive-business-comes-mac-ios-devices/‘
_________________________________________________________
Enjoy!
Regards
![]()
Fellow SharePoint lovers! (And OneDrive for Business…)
Share the Love
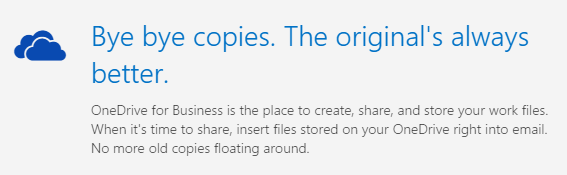
More and more individuals and organizations are starting to realize the beauty of OneDrive for Business, the way it allows you to be always up to date and to be able to always access your information no matter where you are or on what device you are on.
This article will delve© into detail on how you can keep the information in one place, instead of spreading multiple copies and versions around like we have always done using email as the sharing method of choice (Not to mention USB sticks). As you all most likely know, every time you send an email with an attachment of one of your files, a new copy and possible a new version of that document is created, it happens out of your control as well and this is not something that we want, it has simply been the only way to share, externally for sure and internally it has been the easiest way for the lazy.
Now, what has changed? What’s new? What’s so special with OneDrive for Business so that we can share thru some kind of Microsoft magic and files never have to be sent in email? What’s up with that? Well, implementing OneDrive for Business as a part of Office 365 is one step, you can however still work like you always have…removing the old Home directory and the Shared folders is another. You can however still work like you always have, sending attachments using email, but, these steps will allow you and your coworkers to adopt a new way of doing things, a better more secure and controlled way to work.

Traditional sharing, send a copy of the original to each user, same as when printing a letter and posting it…

Modern sharing, one original, no copies. Everyone reads or edits the same file.
As you all also probably know and think right now, there are other cloud services that can do this and yes, I agree, but if you have invested in Office 365 already, then you get OneDrive for Business with 1TB (!) storage for free (or it is included in the price but free sounds better, and compared to using a different service like dropbox or box, then it IS free). You have a single sign on between the different applications in Office 365 and if you have implemented ADFS, then you will even have single sign on from your PC. Yes, I know that storage will be unlimited soon…but honestly, 1TB IS unlimited…
But enough of that, now I will show you where you can share a document from your OneDrive for business.
First off, there is a setting that are configured globally in the SharePoint admin portal of Office 365 that we need to know about.

External Sharing, there are 3 levels to select from. Can be set on the tenant or per Site collection. This setting can only be configured by a Global Office 365 Administrator.
The third level means anonymous access…(No! You really shouldn’t)

(Note also that if you restrict sharing on the tenant, then you cannot allow it on the site collection level) When these are set, you can start sharing.
There are a lot of places to do this for the mobile OneDrive for Business user

– OneDrive for Business Online
– OneDrive for Business Offline (from the local cache)
– The Office Applications
– The OneDrive for Business mobile app (Windows Phone, IOS, Android)
– Office Mobile (Windows Phone, IOS, Android) only shares a link, does not grant access
– Outlook Online (formerly known as Outlook Web Access)
It is more or less the same experience everywhere, the web dialog for sharing a document looks like this, from here you can share with internal users as well as external users, and all you need is an email address.

Click SHARE then select how to share, or select the document(s) and click on the Share ‘button’

The dialog then looks like this
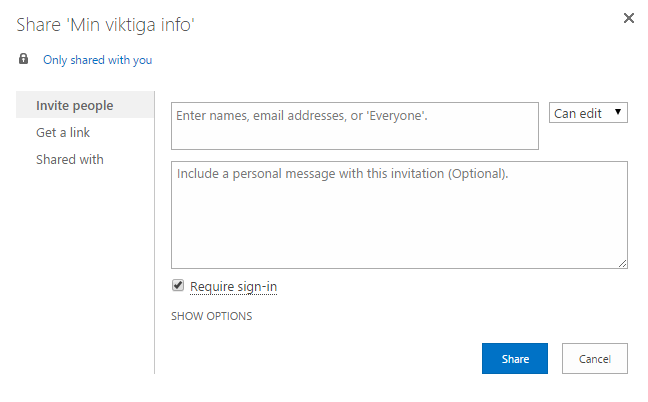
As you can see, the checkbox for ‘Require sign-in’ is checked by default, unchecking that allows anonymous access to this document.
This checkbox is only available if anonymous sharing is enabled at the tenant and at the site collection level.
The names can be internal users by name or email address, it can be external users by email or it can be everyone.

The permission level can also be set here, they speak for themselves. (Note that sharing with edit allows the recipient to in turn share with or without edit)

You can type in a message, this will be the text in the email that is sent to the recipient

Under SHOW OPTIONS you have the option to not send an email at all.

The recipient receives an email with this content

Clicking the link takes the user straight to the shared file, in its location.
Under Shared with, you can see who currently has access to this document.
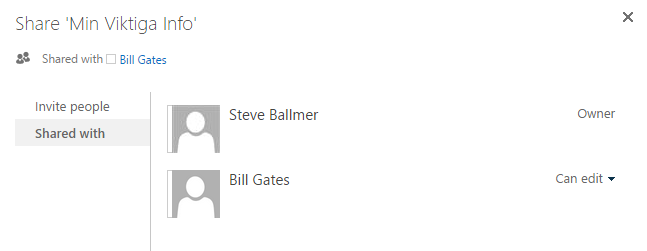
When a document is shared, you can also see that the little user icon is replaced to show that someone else besides you now also has access to this document or this file.

Unshare the file again by clicking on that icon and in the Shared with dialog, select Stop sharing and save Changes.

After a quick refresh, you will see that the little icon is back to the Padlock.

This is how you share things in the OneDrive for Business Online, it is very similar in SharePoint Online (A few exceptions like unsharing differs).
The rest you will know when you see them:


Select INSERT

Select Share with OneDrive (They really should stop confusing the business version with the consumer version…)

Apply the proper permission level, read or read/write


Note that the file is not sent as an attachment unless you specifically choose to do so. It only looks like an attachment, the file never leaves your personal OneDrive for Business.
And, to sum it all up, a message from inside Outlook Online:
‘
None at this time…
‘
LabCenter – you guys always publish my articles!
Mattias Gutke at Xperta
My family.
_________________________________________________________
Enjoy!
Regards
![]()