Office 365 guide series – Prevent unwanted use of SharePoint Designer


 Office365logo       SP2013logo

SPD_Warning

SharePoint Designer, bad in the wrong hands

Prevent unwanted use of SharePoint Designer (SPD)

Hi SharePoint Online administrators!

You have all Heard the nickname SharePoint Destroyer right? I’m not a SharePoint Designer hater at all, quite the opposite actually. Some things can simply just be done from SPD and no Place else. Like for example saving a SharePoint online Site Collection from a failed branding attempt…or a miscoded masterpage…
No, SPD is a really good tool for the ones who know how to use it and with the proper skills and the proper permissions it can be a real help in many scenarios, onprem or in the cloud.

However, what I want to Point out here in this post, is that not everyone has the skills needed, and way to many users have too high permissions for their own good.
A powerfull tool like SPD in the wrong hands can be dangerous…
The only example we need: OneDrive for Business…until Microsoft makes a change and restricts every users completely unmotivated administrative privilieges to the OneDrive for Business/Mysite, we want to stop our users any way we can.

So, this is what I have found that can assist in this task in a Office 365 scenario:

1. Remove SPD as a download from Office 365 (Makes it harder)

2. Prevent the use of SPD (Not easy to accomplish in OneDrive for Business)

3. Educate your users. (Often not realistic at all)

1. Remove SPD as a download from Office 365

OK, if you did not know this, Office 365 has a link for every user, where they can freely or included in the license, download software. It includes the Office 365 Proplus and Lync+Outlook for Mac and more, one of the applications offered to the users is SharePoint Designer.
The link to download SharePoint Designer can be removed by a global Administrator though…(thank you Microsoft)
This is what you do:

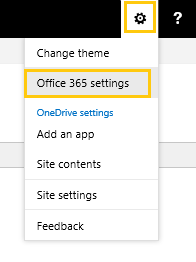
Click the ‘startbutton’ in the Applauncher of your Office 365 tenant, then click on Admin

O365 Admin0

Expand Service Settings and select User Software

O365 Admin1x

Deselect the SharePoint Designer checkbox and hit Save.

O365 Admin2x

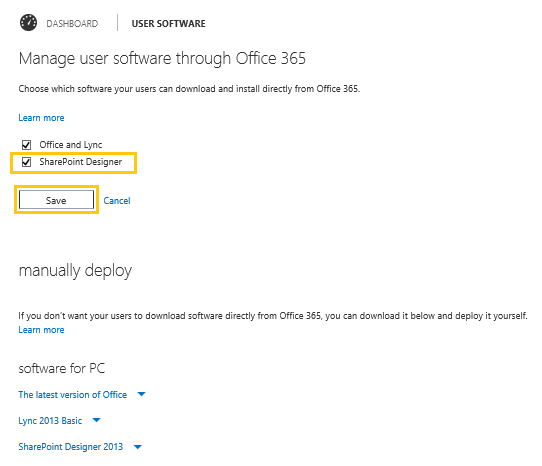
Done. This configuration will stop users from easily finding SharePoint Designer inside of Office 365

Note: Remember however, they can still install it from other sources.

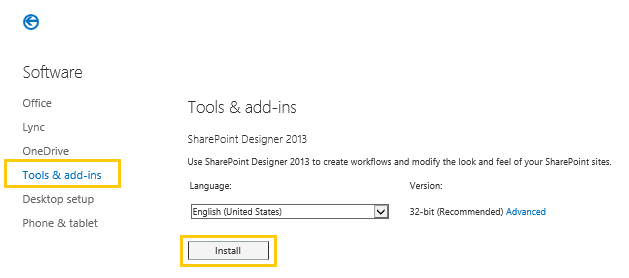
If you did not know this, the software is installed by the users from here:

A

Software1x

B

Software2x

C

Software3x

This setting will be removed/Hidden from the user if you follow the steps above.

2. Prevent the use of SPD

Before ywe begin, this is NOT easily done in OneDrive for Business. Since every OneDrive for Business is its own Site Collection (or part of the mysite) it has to be configured on every single OneDrive for Business. And even if this is accomplished, it can be ‘unconfigured’ by the user since he/she has administrative privileges.

Stop the use of SharePoint Designer completely in a single Site Collection this way:

In the Site Settings menu, select the Site Collections Site Settings

Site Settings 1x

Select SharePoint Designer Settings

Site Settings 2x

Deselect Enable SharePoint Designer to stop its use completely. Or, if you rather let the users do some things but not all, select the minor options as you choose.

Site Settings 3x

Hit OK and you are safe!

3. Educate your users

This is actually not a bad idea, depending on the type of users and the kind of business you are and the size and so on, this can be the very best way, but it can also be the hardest, the most expensive and the least secure way.
My recommendation, do keep this in mind. It can be a good adea to put some trust in your users and give them some responsibility, sometimes…
How to do this step, that is not my area of expertese, but there are others who know this. If you are a small organization, use email! Or Office 365 Video?

With that, we are done for this time.

References and Credits

Organize your Office 365 with the new app launcher
http://blogs.office.com/2014/10/16/organize-office-365-new-app-launcher-2/

Introducing Office 365 Video
http://blogs.office.com/2014/11/18/introducing-office-365-video/


Credits & many thanks to

Always, Mattias Gutke, now at Xperta

My excellent colleges/coworkers at Xperta! All of you! My team, Johanna, Oscar, Micke and again, Mattias!


SP2013logo

_________________________________________________________

Enjoy!

Regards

Twitter | Technet Profile | LinkedIn

Advertisement

Site Settings by Powershell part 1 – Navigation


Configuring your site settings is really something that you want to do using PowerShell, this is for many reasons but the most obvious ones are that you get more control. You can test your script with settings in a test environment and see the effect, when it is perfected you simply run the script against a different URL and the result is moved to the proper target environment.
One more benefit is repeatability, you can do one configuration and repeat it for every site or web in your farm. Doing the same thing manually would take time and would increase the risk of making mistakes.
(See more Site settings by Powershell in my Whitepaper that can be downloaded from here: SharePoint 2010 Site Settings explained. I have tried to cover most every site setting and how it can be done using Powershell only. )

All of these settings can also be configured during site creation, in order to do that, get your publishingweb object of the websites you are creating, set the values and same as always, finish off with an update().

In this post I will try to cover most of the settings you can do in the Navigation part of your site settings. The Navigation settings are available only in sites in a site collection that has the SharePoint Server Publishing Infrastructure Site Collection Feature activated.

Activating this feature gives you among many other things, control over the global and current navigations. These settings are available in Site Settings under Look and Feel.

The settings that I will show how to configure using PowerShell are as shown in the below image. There are also ways to add and remove items from the navigations in the same dialog, but these will not be covered here.

First off, we need an object to work with. In this case we need a Publishing Web object, so first we create a spweb object, then a publishing web object:

$SPWeb = Get-SPSPWeb http://server/sitecoll/spweb/spweb
$SPPubWeb = [Microsoft.SharePoint.Publishing.PublishingWeb] 
::GetPublishingWeb($SPWeb)

Some changes, like unchecking the Show subsites, require that you first allow unsafe updates. You can set the show subsites to false, but it will never be reflected unless you first allow unsafe updates. This is done on the SPWeb object by:

$SPWeb.AllowUnsafeUpdates = $true

Using our Publishing Web object, we can now configure the different settings, from the top in the graphical user interface:

Global Navigation

Display the same navigation items as the parent site:

$SPPubWeb.Navigation.InheritGlobal = $true

Display the navigation items below the current site:

$SPPubWeb.Navigation.InheritGlobal = $false

Show subsites:

$SPPubWeb.Navigation.GlobalIncludeSubSites = $true

Show pages:

$SPPubWeb.Navigation.GlobalIncludePages = $true

Maximum number of dynamic items to show within this level of navigation:

$SPPubWeb.Navigation.GlobalDynamicChildLimit = 20 (int32)

Current Navigation

Display the same navigation items as the parent site: (both values in combination)

$SPPubWeb.Navigation.InheritCurrent = $true
$SPPubWeb.Navigation.ShowSiblings = $false

Display the current site, the navigation items below the current site, and the current site’s siblings: (both values in combination)

$SPPubWeb.Navigation.InheritCurrent = $false
$SPPubWeb.Navigation.ShowSiblings = $true

Display only the navigation items below the current site: (both values in combination)

$SPPubWeb.Navigation.InheritCurrent = $false
$SPPubWeb.Navigation.ShowSiblings = $false

Show subsites:

$SPPubWeb.Navigation.CurrentIncludeSubSites = $true

Show pages:

$SPPubWeb.Navigation.CurrentIncludePages = $true

Maximum number of dynamic items to show within this level of navigation:

$SPPubWeb.Navigation.CurrentDynamicChildLimit = 20 (int32)

Sorting

Sort automatically:

$SPPubWeb.Navigation.OrderingMethod = "Automatic"

Sort manually:

$SPPubWeb.Navigation.OrderingMethod = "Manual"

Sort sites manually and pages automatically: (This is option is only available with publishing pages)

$SPPubWeb.Navigation.OrderingMethod = "ManualWithAutomaticPageSorting”

When Sort automatically is selected

Sort by Title (shown left):

$SPPubWeb.Navigation.AutomaticSortingMethod = "Title"

Sort by Created Date:

$SPPubWeb.Navigation.AutomaticSortingMethod = "CreatedDate"

Sort by Last Modified Date:

$SPPubWeb.Navigation.AutomaticSortingMethod = "LastModifiedDate"

Sort in ascending order (shown left):

$SPPubWeb.Navigation.SortAscending = $true

Sort in descending order:

$SPPubWeb.Navigation.SortAscending = $false


That’s it, that covers all of the settings I meant to show and this will hopefully be useful to you when scripting the creation and configuration of your sites.
In order to help you get started, you can modify the script included below and that will allow you to configure all of the above settings the same way on all sites in a designated site collection.

Sample script

# get a sitecollection object(SPSite)
$SPSite = Get-SPSite -Identity “http://farm.company.local/sitecollection“
# loop through all the subwebs(SPWebs) in the site collection
foreach ($SPWeb in $SPSite.AllWebs)
{
  # check so that this is not the root web
  if (!$SPWeb.IsRootWeb)
  {

 # Save AllowUnsafeUpdates setting and set it to allow.
    $AllowUnsafeUpdatesStatus = SPWeb.AllowUnsafeUpdates
 SPWeb.AllowUnsafeUpdates = $true
 # Get a PublishingWeb object for the current web
    $SPPubWeb = [Microsoft.SharePoint.Publishing.PublishingWeb]
 ::GetPublishingWeb($SPWeb)

    # UnComment the setting you will use:
    # Global settings
    # $SPPubWeb.Navigation.InheritGlobal = $true
    # $SPPubWeb.Navigation.InheritGlobal = $false
    # $SPPubWeb.Navigation.GlobalIncludeSubSites = $true
    # $SPPubWeb.Navigation.GlobalIncludeSubSites = $false
    # $SPPubWeb.Navigation.GlobalIncludePages = $true
    # $SPPubWeb.Navigation.GlobalIncludePages = $false
    # $SPPubWeb.Navigation.GlobalDynamicChildLimit = 20
    # Current settings
    # See combination of the two below
    # $SPPubWeb.Navigation.InheritCurrent = $true
    # $SPPubWeb.Navigation.ShowSiblings = $false
    # $SPPubWeb.Navigation.CurrentIncludeSubSites = $true
    # $SPPubWeb.Navigation.CurrentIncludePages = $true
    # $SPPubWeb.Navigation.CurrentDynamicChildLimit = 20
    # Sorting
    # $SPPubWeb.Navigation.OrderingMethod = "Automatic"
    # $SPPubWeb.Navigation.OrderingMethod = "Manual"
    # $SPPubWeb.Navigation.OrderingMethod = "ManualWithAutomaticPageSorting”
    # $SPPubWeb.Navigation.AutomaticSortingMethod = "Title"
    # $SPPubWeb.Navigation.AutomaticSortingMethod = "CreatedDate"
    # $SPPubWeb.Navigation.AutomaticSortingMethod = "LastModifiedDate"
    # $SPPubWeb.Navigation.SortAscending = $true
    # $SPPubWeb.Navigation.SortAscending = $false
    $SPPubWeb.Update()
  }
  # cleanup 
 # Set AllowUnsafeUpdates back to original value
 $SPWeb.AllowUnsafeUpdates = $AllowUnsafeUpdatesStatus
  $SPWeb.Dispose() }
# cleanup
$SPSite.Dispose()

Please allow some time for the changes to take affect, it can take a couple of minutes until the changes are reflected in your navgation.

Reference:

PortalNavigation Members

http://msdn.microsoft.com/en-us/library/microsoft.sharepoint.publishing.navigation.portalnavigation_members.aspx

2012-02-16 Updates: Added $SPWeb.AllowUnsafeUpdates section to script.