

Greetings SharePoint Online users!
This is the second in the Office 365 and SharePoint Online series.
| 1. Office 365 guide series – Create a new list from an Excel spreadsheet |
| 2. Office 365 guide series – A guide to SharePoint Navigation using metadata (This post) |
| 3. Office 365 guide series – Using your document templates in SharePoint online |
This time, I will explain how to:
Use Managed metadata and the termstore to control your Navigation.
‘

This is not as complicated as it may seem, the difficult parts have been taken care of by Microsoft when setting up the ManagedMatadata Service Application for us.
Navigation is part of the Publishing Infrastructure features in SharePoint, so in order to manage Navigation, the Publishing features must be activated. So if you do not already have it activated, lets do so now.
In your SharePoint root site: https://orgname.sharepoint.com (in my case I’m using a separate Site Collection for this https://blksthl.sharepoint.com/sites/donkeymind) do this:
1. Go to Site settings.
2. In Site settings, locate the column Site Collection Administration, click on Site collection features

3. In the list of Site Collection features, scroll down to the one called SharePoint Server Publishing Infrastructure

4. On the far right, click on Activate

5. Wait for it, it will take a little while and then it will to show that it is Active. Scroll to the top while waiting, there you will see the ‘Working on it twirl’…

6. Next step is to go back to Site Settings, and locate the category Look and Feel and there you now have Navigation.
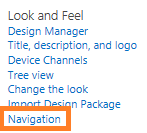
7. Click on Navigation.
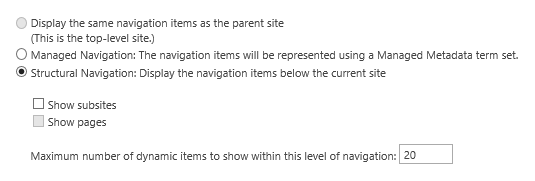
8. The Navigation settings will by default be configured to use Structural Navigation
| Note! You have the same choice for both the Global Navigation (Top) and the Current Navigation (Left) In this guide, we will focus on the global, but in order to manage the current navigation follow the same steps. |
9. We want to change the Global Navigation setting to Managed Navigation as below.

10. Scroll down a bit past the Current Navigation setting to the area called Managed Navigation: Term set
11. Here you will see your Term Store content

12. Expand the Taxonomy node, and you will see the shared terms and the site collection specific node, in my example: Site Collection – blksthl.sharepoint.com-sites-donkeymind

13. Click on the button Create Term Set and a termset for your navigation will be created.

14. In the Term Store tree you will also see a new node:

15. This is were your navigation entries will be stored. Next we will go to the Term Store Management Tool to start on our new navigation.
16. Before you do, notice the setting below the term windows, these settings will allow you to control what happens when new pages are created.
17. Make changes if you want to, I’ll just leave them as is, I will be creating subsites, not pages.

18. Now, click on the link to the Term Store Management Tool

19. or if you go via Site settings, find the Site Administration Category
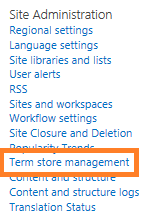
20. Click on Term store management
21. In the Term Store Management Tool, you will same as before, see some shared metadata and a site collection node.
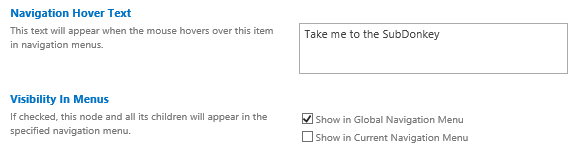
22. Expand the site collection node, now you will see the Navigation node we just created.

23. In this example, I will add an entry to the global navigation that is for a subsite I have created, named SubDonkey. It will only be one entry in the navigation and that will open my subsite SubDonkey.
24. Right-click on orgname Navigation

25. Click on Create Term
26. Type in the name of the term, use the same name as you want to show up in the Navigation when done, in my case I named it SubDonkey, hit enter
27. A new empty termlabel will show up but simply click on the new term to make it go away.

28. When the new term is selected, you get a list of choices and configurations you can make.
29. You can here type in a description, add a second label, language and some more. Let this page be as it is.
30. Now click on the tab Navigation

31. This brings up a new page of navigation specific settings.

32. In here, I’m making a few modifications.
33. I add a Navigation Hoover Text: Take me to the SubDonkey.
34. I set Visible In Menus to: Show in Global Navigation Only (deselect the show in current)
35. I select Simple Link or Header, I hit browse and locate my subsite

36. select the icon for the subsite, like in my case, SubDonkey.

37. Click on Insert at the bottom right.

38. Verify your navigational settings for the new node. When done, hit the Save button.

39. Now you are done, go to your rootsite to verify the result.

40. Note the SubDonkey Navigational link with the Hoover Text showing (Mouse is over in image).
41. Repeat the steps 20 to 40 to add more terms and new nodes to your navigation.
| Note! Do not be afraid of trying new things, link to pages, to external sites, you can always delete the node if you don’t like the result. |
42. Done!
‘
| Note: All the same steps apply in SharePoint Online as well as SharePoint 2013 onpremise, you will need to first configure the Managed Metdata Sevice Application before any of these steps can be performed though. |
‘
References
‘
None so far 🙂

_________________________________________________________
Enjoy!
Regards
![]()
