One Bastion to access them all (All peered vNets)


azure

Until now, Azure Bastion has been restricted to use within the one vNet where it is connected.
It could not work across vNet peerings or vNets connected to Virtual VAN’s.
If you wanted to use Bastion, you needed to create separate Bastions per vNet. Bastion with regular use comes with a cost of approximately $120/Bastion and Month, $1500/Bastion/Year. (10 vNets = $15.000)
This have now changed. Now, $1500/customer/year is enough (Well worth it!). (10 vNets = $1.500)

Bastion can now work across vNet peering!
https://docs.microsoft.com/en-us/azure/bastion/vnet-peering

Note.
If you have a virtual VAN and your vNets are connected this way, you can add peering in a hub & spoke modell to the vNet where your Bastion is located, this will allow you to use Bastion anyway without disturbing the Virtual VAN functionality.

All you have to do, is create a 2 way peering between the vNet with a Bastion, and the second vNet, and Bastion will show up in the portals ‘Connect’ dialogue.

Bastion2

Bastion1

 
References

https://docs.microsoft.com/en-us/azure/bastion/vnet-peering


___________________________________________________________________________________________________

Enjoy!

Regards

 Thomas Odell Balkeståhl on LinkedIn

Use PowerShell to clear out all local admin accounts


azure

In a true scenario, we got from a pentest report, that to many of our servers had local active accounts that were local administrators. To mitigate this, we planned to  do the following:

  • Delete all accounts except the default administrator (Disable default on 2016)
  • Rename the default to a different name
  • Set a new ‘impossible’ password that nobody knows (45chrs)
  • Leave as-is domain users in the local administrators group

Simple enough if done on one server, via the Windows GUI…but given the circumstanses, having about 100 Windows servers, we decided to do it using PowerShell and to run the script from the Azure portals ‘Run command’ feature (Recommended). Both can however also be used locally on the servers.
What differs in the two versions are, if the servers are running 2016 or later, or 2012R2 or earlier. We had both so we needed two scripts.
(Apologies for the bad formatting in this blog-template)

Windows Server 2016 and later:

# Delete all local admin but default, rename it to Osadmin and reset pwd to 45 chrs random string
$NewAdminName = "OSAdmin"
$Admins = Get-LocalGroupMember -Group 'Administrators' | Select-Object ObjectClass, Name, PrincipalSource | Where-Object {$_.PrincipalSource -eq "Local"} | Select-Object Name
$DefaultAdmin = (Get-WmiObject Win32_UserAccount -filter "LocalAccount=True" | ? {$_.SID -like "S-1-5-21-*-500"}).Name
foreach($Admin in $Admins) {
$UserName = ($Admin.Name).ToString().split("\")[1]
Disable-LocalUser $UserName
If ($UserName -ne $DefaultAdmin) {
Remove-LocalUser $UserName
Write-Host "Removed Admin: $UserName"
}
else {
$Random = ConvertTo-SecureString ((1..45 | ForEach-Object {('abcdefghiklmnoprstuvwxyzABCDEFGHKLMNOPRSTUVWXYZ1234567890!"§$%&/()=?}][{@#*+')[(Get-Random -Maximum ('abcdefghiklmnoprstuvwxyzABCDEFGHKLMNOPRSTUVWXYZ1234567890!"§$%&/()=?}][{@#*+').length)]}) -join "") -AsPlainText -Force
Set-LocalUser -Name $DefaultAdmin -Password $Random
Write-Host "Default Admin password reset to 45 chrs long random string"
if ($DefaultAdmin -ne $NewAdminName){
Rename-LocalUser -Name $DefaultAdmin -NewName $NewAdminName
Write-Host "Renamed default Admin: $UserName to $NewAdminName"
}
}
}
Write-host "Done - Server secured :-)"
 
– – – – – – – – – – – – – – – – – – – –
Pre Windows Server 2016:
 
# Delete all local admin but default, rename it to Osadmin and reset pwd to 45 chrs random string
$NewAdminName = "OSAdmin"
$LocalAdmins = (get-wmiobject -ComputerName $Env:Computername win32_group -filter "name='Administrators' AND LocalAccount='True'").GetRelated("win32_useraccount")

foreach ($LocalUser in $LocalAdmins){
$UserName = $LocalUser.Name
$UserSID = $LocalUser.SID
$userDomain = $LocalUser.Domain
if ($LocalUser.Domain -eq $Env:Computername)
{

If ($userSID -like "S-1-5-21-*-500"){
Write-Host "OK Default: $userName $userDomain" -ForegroundColor Green
If ($UserName -ne $NewAdminName){
$LocalUser.Rename($NewAdminName)
}

$Random = (1..45 | ForEach-Object {('abcdefghiklmnoprstuvwxyzABCDEFGHKLMNOPRSTUVWXYZ1234567890!"§$%&/()=?}][{@#*+')[(Get-Random -Maximum ('abcdefghiklmnoprstuvwxyzABCDEFGHKLMNOPRSTUVWXYZ1234567890!"§$%&/()=?}][{@#*+').length)]}) -join ""
[adsi]$User = "WinNT://./$NewAdminName,user"
$User.SetPassword($Random)
$User.SetInfo()
}
else {Write-Host "DELETE: $userName $userDomain" -ForegroundColor Red
[ADSI]$server = "WinNT://$Env:computername"
$server.delete("user",$UserName)
}
}
else {Write-Host "OK Domain: $userName $userDomain" -ForegroundColor Green}
}
 
Happy PowerShell scripting!
 

References
Not this one


___________________________________________________________________________________________________

Enjoy!

Regards

 Thomas Odell Balkeståhl on LinkedIn

Use PowerShell to Add ACL, permission or Role assignment on all objects in all subscriptions


azure

The following script is made for those of you who has many subscriptions, or many objects, and you want to do something with them…
In my case, I needed to add the DBA’s AAD Group as Reader to all the disks of the SQL Server VM’s. Migrated servers, 6 disks each…you do not want to do that manually in the portal…

Run it a PowerShell tool of choice, prompt from script, ISE, VS Code or in CloudShell.
! However, there is a verified bug in a Az module used by New-AzRoleAssignment, tested and verified to work in CloudShell with Az module az.resources 2.5.1

  • Get-AzDisk can be replaced with Get-AzXXX to get any type of object you need.
  • New-AzRoleAssignment can be replaced with just about anything you want to do to the objects.
# Adds a Role assignment(ACL/RBAC) on all disks in all subscriptions based on strings in disks names
# In this example, the AAD Group ‘AAD-Group’ is added as Reader on all disks in all subscriptions, where the disks name contains the keywords: VM1, VM2 or SQL1
 
$Group = Get-AzADGroup -SearchString “AAD-Group”
$MySubs = Get-AzSubscription
Foreach ($Sub in $MySubs){
    Write-host $Sub.name
    Select-AzSubscription $sub.Name
    $Disks = Get-AzDisk | Where-Object { $_.Name -match ‘VM1’ -or $_.Name -match ‘VM2’ -or $_.Name -match ‘SQL1’}

    ForEach ($Disk in $Disks){
        Write-Host $Disk.name
        # Reader, Contributor, Owner, etc.
        New-AzRoleAssignment  -ObjectId $Group.Id -RoleDefinitionName ‘Reader’ -ResourceName $Disk.Name -ResourceGroupName $Disk.ResourceGroupName -ResourceType $Disk.Type
    }
}
 
– – – – – – – – – – – – – – – – – – – –
 
# Adds a Role assignment(ACL/RBAC) on all recovery vaults in all subscriptions
# In this example, the AAD Group ‘AAD-Group’ is added as Reader on all Recovery vaults in all subscriptions.
$Group = Get-AzADGroup -SearchString “AAD-Group”
$MySUbs = Get-AzSubscription # Get-AzSubscription
#Write-Output $MySubs
Foreach ($Sub in $MySubs){
    Write-host $Sub.name
    Select-AzSubscription $sub.Name
    $Vaults = Get-AzRecoveryServicesVault

    ForEach ($Vault in $Vaults){
        Write-Host $Vault.name
        # Reader, Contributor, Owner, etc.
        New-AzRoleAssignment  -ObjectId $Group.Id -RoleDefinitionName ‘Reader’ -ResourceName $Vault.Name -ResourceGroupName $Vault.ResourceGroupName -ResourceType $Vault.Type
    }
}
 
Happy PowerShell scripting!
 

References
https://docs.microsoft.com/en-us/powershell/azure/install-az-ps


___________________________________________________________________________________________________

Enjoy!

Regards

 Thomas Odell Balkeståhl on LinkedIn

Install the PowerShell Az module (even if AzureRM is installed)


azure

If you are having trouble getting from the ‘old’ AzureRM PowerShell commends to the ‘new’ Az…
The following script solves it for you, run it and you will end up having the ‘new’ Az module installed (New-AzVM etc.) and if you had a conflicting AzureRM installed, that is resolved for you, by itself!

Run it a PowerShell tool of choice, prompt from script, ISE or VS Code. But run the tool as Administrator, the operation requires elevated mode.

# This script needs to be run in an elevated PowerShell, prompt, ISE or VSCode
# Written by Thomas Odell Balkeståhl - www.candelit.se

Write-Host "Starting AZ Module installer" -ForegroundColor Green

if ((New-Object Security.Principal.WindowsPrincipal([Security.Principal.WindowsIdentity]::GetCurrent())).IsInRole([Security.Principal.WindowsBuiltInRole]::Administrator))
{
Write-host "Running in elevated mode - Ok'" -ForegroundColor Green
if ($PSVersionTable.PSEdition -eq 'Desktop' -and (Get-InstalledModule -ErrorAction Ignore -WarningAction Ignore -Name 'azureRM'))

{

Write-Warning -Message ('AzureRM module is installed. Having both the AzureRM and ' +

'Az modules installed at the same time is not supported.')

Write-host "Would you like to uninstall the AzureRM module now? (Default is Yes)" -ForegroundColor Yellow

$Readhost = Read-Host " ( y / n ) "

Switch ($ReadHost)

{

Y {Write-host "Yes, Uninstalling AzureRM"; $UninstallSetting=$true}

N {Write-Host "No, Skip uninstall..."; $UninstallSetting=$false}

Default {Write-Host "Default, Uninstalling AzureRM"; $UninstallSetting=$true}

}

If ($UninstallSetting){

Uninstall-Module AzureRM -Force

Write-Host "AzureRM module uninstalled"

Write-Host "Next, Installing Az Module"

try {

Install-Module -Name Az -AllowClobber -SkipPublisherCheck

Get-InstalledModule -Name Az -AllVersions

Write-Host "Az Module installed!" -ForegroundColor Green

}

catch {

Write-Host "Something went wrong, try running the command 'Install-Module -Name Az -AllowClobber' manually to see what went wrong" -ForegroundColor Yellow

}

}


}

else {

if (!(Get-InstalledModule -Name Az -AllVersions -ErrorAction Ignore)){

Write-Host "Az Module missing, Installing"

try {

Install-Module -Name Az -AllowClobber -SkipPublisherCheck

Get-InstalledModule -Name Az -AllVersions

Write-Host "Az Module installed!" -ForegroundColor Green

}

catch {

Write-Host "Something went wrong, try running the command 'Install-Module -Name Az -AllowClobber' manually to see what went wrong" -ForegroundColor Yellow

}

}

else {

Get-InstalledModule -Name Az -AllVersions

Write-Host "Az Module is installed" -ForegroundColor Green

}

}
}
else{
Write-host "You have to run the script in elevated mode - 'run as admin'" -ForegroundColor Yellow
}
Happy PowerShell scripting!

References
https://docs.microsoft.com/en-us/powershell/azure/install-az-ps


___________________________________________________________________________________________________

Enjoy!

Regards

 Thomas Odell Balkeståhl on LinkedIn

List all NSG security rules in one query using Azure Resource Graph


azure

The kusto query below will give you a list of all manually added security rules on all of your NSGs in all of your subnets. (Where you have access).
This is a great way to keep track of your vNets and subnets, what is allowed where…

You will get the following info from each NSG security rule:

Subcription Name
Resource Group Name
Subnet Name
NSG Name
Direction
Priority
Destination IP Prefix
Destination Port
Source IP Prefix
Source Port
Description
(Optional: SubscriptionId, extended.properties)

In my current Azure network, the count is around 200, in 75 different NSGs. Its not easy to keep track and find the ‘holes’ if you cannot get a good overview.

Use different sort or where clauses to filter and sort on what you are currently looking for, if you for example filter on
| where destport == ‘*’
you will see only the rules allowing traffic to any port.
| where destprefix == ‘*’
will list all rules allowing traffic to any ip address on the subnet, and so on.

Resources
| where type =~ "microsoft.network/networksecuritygroups"
| join kind=leftouter (ResourceContainers | where type=='microsoft.resources/subscriptions' | project SubcriptionName=name, subscriptionId) on subscriptionId
| where resourceGroup == 'production' or resourceGroup == 'testing'
// Only if you don't want to see all, add more resourceGroups as needed: or resourceGroup == 'xxx'
| mv-expand rules=properties.securityRules
| extend direction = tostring(rules.properties.direction)
| extend priority = toint(rules.properties.priority)
| extend description = rules.properties.description
| extend destprefix = rules.properties.destinationAddressPrefix
| extend destport = rules.properties.destinationPortRange
| extend sourceprefix = rules.properties.sourceAddressPrefix
| extend sourceport = rules.properties.sourcePortRange
| extend subnet_name = split((split(tostring(properties.subnets), '/'))[10], '"')[0]
//| where destprefix == '*'
| project SubcriptionName, resourceGroup, subnet_name, name, direction, priority, destprefix, destport, sourceprefix, sourceport, description //, subscriptionId, rules.properties
| sort by SubcriptionName, resourceGroup asc, name, direction asc, priority asc
Happy resource mining!

References
https://docs.microsoft.com/en-us/azure/governance/resource-graph/samples/advanced?tabs=azure-cli


___________________________________________________________________________________________________

Enjoy!

Regards

 Thomas Odell Balkeståhl on LinkedIn

Error creating WVD hostpool – validation failed


azure

Error trying to create a new VWD hostpool in WVD v2 (spring update)
(Resolution at the end)

WVD spring update, create new hostpool from the Azure Portal – you fill in all the information about the setup, and when you run the validation on the last step, it fails with the shady error message:
‘Validation failed. Required information missing or invalid.’

All the properties are filled in correctly, no ‘red dot’ is shown to indicate what is wrong.

The details of the error are:

ERROR TYPE
ERROR DETAILS
The template deployment failed with multiple errors. Please see details for more information.
—-

WAS THIS HELPFUL?

Well, not that helpful. In the scenario I was in when this occurred, the company had given up on the spring update due to this. No error, no indication…
The facts of the setup is, the environment where the hosts where to reside are in West Europe, and in WVD, you can only select US for the hostpool(The service/metadata), so we went with East US (Closest to Europe).
So, all hosts to be created in West Europe and Hostpool in East US (Can be any of the US options available)

Resolution:
We found a similar issue after some time with Google, in that scenario, after trying a number of suggestions, the users found that they had a Azure policy attached to the subscription selected. It only allowed a few select regions, the East US was not one of them.
Same for us, when having a look at the policy on the subscription, it only had West Europe, North Europe, France and Global.
Adding East US to the allowed regions and hitting save immediately solved the problem.

Go to the subscription where you are creating your WVD hostpool, under ‘Settings’ you will find ‘Policies’

Locate a policy that has a ‘Location restriction’

Open it, click ‘Edit assignment’ at the top, then ‘Parameters’. In the dropdown, check the US region where the hostpool is to be created. Click on ‘Review + Save’ at the bottom. (This may require the owner role).
(Disclaimer – if the policy is a centralized policy, you may have to go the the owner of the policy to have it edited, like if it is applied to a management group)

Now, you can retry the ‘Validation’ of the creating of the Hostpool. If nothing else, the policy and location restriction will not be an issue any more.

References

https://docs.microsoft.com/sv-se/azure/virtual-desktop/create-host-pools-azure-marketplace

Thanks to:


___________________________________________________________________________________________________

Enjoy!

Regards

 Thomas Odell Balkeståhl on LinkedIn


Enable Azure Update Management in Azure Firewall


azure

When you have Windows VM’s in an Azure network and internet traffic is routed through your Azure Firewall, and you need to allow them to update, either with Automatic updates, or Azure Update management. There are a few things you need to allow to get through your FW.
Add the following rules and you will have it up and running in no time.

Go to the Azure Firewall in the Azure portal.
Rules -> Application Rule Collection
+ Add application rule collection

Rule 1
Name: Windows_Update (No whitespace)
Priority: 2000 (A number between 100-65000)
Action: Allow
Rule, FQDN Tags:
Name:Windows Update
Source Type: IP Address
Source: Prefix of vNet/Subnet or host, ex. 10.1.0.0/22
FQDN tags: WindowsUpdate (Select in the dropdown)

Rule 2
Name: Monitoring_Agent (No whitespace)
Priority: 2100 (A number between 100-65000)
Action: Allow
Rule, Target FQDNs:
Name:OMS Agent
Source Type: IP Address
Source: Prefix of vNet/Subnet or host, ex. 10.1.0.0/22
Protocol:Port: https:443
Target FQDNs: *.ods.opinsights.azure.com,*.oms.opinsights.azure.com,*.blob.core.windows.net

Rule 3
Name: Hybrid_Runbook_Worker (No whitespace)
Priority: 2200 (A number between 100-65000)
Action: Allow
Rule, Target FQDNs:
Name:Hybrid Runbook Worker
Source Type: IP Address
Source: Prefix of vNet/Subnet or host, ex. 10.1.0.0/22
Protocol:Port: https:443
Target FQDNs: *.azure-automation.net


References

FQDN tags overview
https://docs.microsoft.com/en-us/azure/firewall/fqdn-tags

Connect Operations Manager to Azure Monitor
https://docs.microsoft.com/en-us/azure/azure-monitor/platform/om-agents

Hybrid Runbook Worker overview
https://docs.microsoft.com/en-us/azure/automation/automation-hybrid-runbook-worker


Thanks to:
Joakim Gräns – Asurgent AB


___________________________________________________________________________________________________

Enjoy!

Regards

 Thomas Odell Balkeståhl on LinkedIn


Azure Firewall and DNS forward timeout – SNAT UDP utilization at 100%


azure

Issue:

External DNS queries dropped causing timeouts and unresponsive services, web-browsing, Office 365, Windows Virtual Desktop(WVD), etc.

(Resolution at the end…)

Azure based environment.
Classic AD with a few VM based Domain controllers in Azure.
DC’s are acting as the primary DNS service for all servers, services and clients in the environment.
Azure firewall is configured as the primary firewall solution for the Azure based environments.
The subnet(s) where the DC’s are located are routed (UDR) to use the Azure Firewall for outgoing internet traffic
The DC’s IP are the added as the primary and secondary DNS for all vNets in Azure, for office subnets, VPN, etc.
DNS service on the DC’s are configured to forward external DNS queries, as is the default, either a custom Forwarder, or the DNS hints.

As the workload increases, you may notice a congestion in the Azure Firewall, at a certain amount of external forwarded DNS queries, the Azure Firewall will choke at 100%.
You may notice this as a user, when simple internet pages in a browser no longer opens, if you use WVD, the environment may stop responding all together due to the lack of DNS service in the WVD hostpool.
As an admin, you may see that a repeated number of NSLOOKUP to an external address, will result in intermittent timeouts.

Azure Firewall.
A part of the DNS service is that it uses UDP, and Azure Firewall uses SNAT for address translation from every internal source, resulting in every UDP request from one IP to an external provider (8.8.8.8, 8.8.4.4, 1.1.1.1 etc.) will use one port out of the 65.000 available in the TCP protocol for that unique destination. When the number of DNS requests to the same address (say google.com) gets repeated, every request gets its own port, and after a while, all 65.000 are taken. Causing congestion in the Firewall and it starts to drop requests. Two requests to google.com and two to microsoft.com will thus result in 4 ports being used, while single requests to 1000 different addresses will only use the one port.

In our case, we saw that during office hours, after enough users and systems were migrated, the Firewall reached 100% in UDP SNAT utilization, causing timeouts on our DNS servers (DC’s) causing services and systems to fail.

Issue can clearly be seen starting at the beginning of day on Thursday July 2nd, then on Friday July 3rd, stopped over the weekend, then up again on Monday July 6th. The graph also shows that we have users in Europe as well as in America, which prolongs the period a bit.

After some t-shooting, severity A case with Microsoft premier support and help from Microsoft FastTrack, we had two ways to quickly mitigate the problem and get the services operational again.

Resolution

  1. For us, the fastest we could implement, was to add a second public IP on the Azure Firewall, doubling the amount of ports used for SNAT to 130.000 (65.000 x2). REMEMBER, you cannot control what goes to what port, so if any of your internal servers or systems connect to an external service, and the Azure Firewalls public IP is whitelisted, you have to add this second IP to the whitelist as well. Every place that has it whitelisted. This because Azure Firewall randomly selects the public IP to use for outgoing traffic.
    This immediately reduced the UDP SNAT util from 100%+ to 60-70%

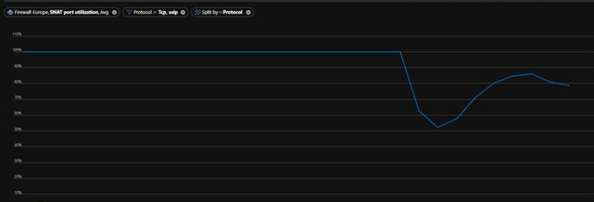
    The utilization quickly dropped, to about 60-70%
  2. The best solution, which we implemented a few minutes later, is to add Microsofts Azure ‘public’ DNS IP as the forward DNS server on our DNS servers (the DC’s). This is an Azure Datacenter service, and as such, it will be recognized and accesses using the Azure backbone and never going through the Azure Firewall at all. This reduced the load from 60-70% on UDP SNAT to 0%!
    The IP to use is: 168.63.129.16 (This will only be accessible from Azure environments, do NOT use on onprem DNS servers!)

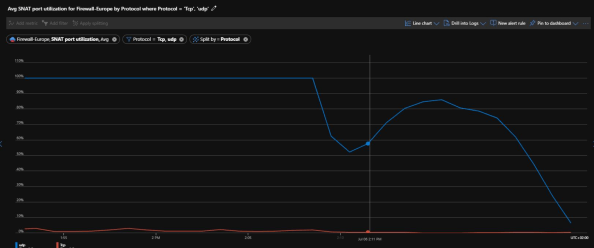
    The utilization here dropped completely to 0%, since all DNS queries now go to the Azure ‘internal’ DNS

Microsoft Azure DNS IP: 168.63.129.16


Azure Firewall SNAT private IP address ranges
https://technet.microsoft.com/en-us/library/mt683473(v=office.16).aspx

Deploy an Azure Firewall with multiple public IP addresses using Azure PowerShell
https://docs.microsoft.com/en-us/azure/firewall/deploy-multi-public-ip-powershell

Thanks to:
Thomas Vuylsteke – Microsoft Azure Fasttrack team
Microsoft Premier Support
Akelius Residential Property AB (Martin Supan, Mattias Segerström)


___________________________________________________________________________________________________

Enjoy!

Regards

 Thomas Odell Balkeståhl on LinkedIn


TCP/IP Ports of SharePoint 2016


SharePoint 2016 huh?!
(Long time since I last posted anything real here…)

Actually, this post is by popular demand 🙂 This is the 2016 version of the post a wrote when SHarePoint 2013 was new, as you can see, not much has changed…I have updated a few lines with what I know now that I did not know then, thats it. Please let me know if I missed something.

The recommended approach is to create a GPO with these firewall rules and apply that rule to the SharePoint servers in your farm. Add all of them, best that way to avoid extreme t-shooting in the future.

Another but related recommendation is to configure the Loopback check funktion in Windows server to allow the FQDN’s of your web applications (Use the Loopback check tool).

List of ports used by SharePoint 2013 and its related services.
Reference links at the end.

Protocol Port Usage Comment
TCP 80 http Client to SharePoint web server traffic
(SharePoint – Office Online Server/Office Web Apps communication)
TCP 443 https/ssl Encrypted client to SharePoint web server traffic
(Encrypted SharePoint – Office Online Server/Office Web Apps communication)
TCP 1433 SQL Server default communication port. May be configured to use custom port for increased security
UDP 1434 SQL Server default port used to establish connection May be configured to use custom port for increased security
TCP 445 SQL Server using named pipes When SQL Server is configured to listen for incoming client connections by using named pipes over a NetBIOS session, SQL Server communicates over TCP port 445
TCP 25 SMTP for e-mail integration Cannot in 2016 be configured (Use SMTP ports other than the default (25).)
TCP 16500-16519 Ports used by the search index component Intra-farm only
Inbound rule Added to Windows firewall by SharePoint. (GPO may override this change)
TCP 22233-22236 Ports required for the AppFabric Caching Service Used by the Distributed Cache…
TCP 808 Search – Query processing component
Windows Communication Foundation communication
Search – Query processing component
(WCF)
TCP 32843 Communication between Web servers and service applications http (default) To use custom port, see references section
Inbound rule Added to Windows firewall by SharePoint
TCP 32844 Communication between Web servers and service applications https
Inbound rule Added to Windows firewall by SharePoint
TCP 32845 net.tcp binding: TCP 32845 (only if a third party has implemented this option for a service application)  Custom Service Applications
Inbound rule Added to Windows firewall by SharePoint
TCP 32846 Microsoft SharePoint Foundation User Code Service (for sandbox solutions)  Inbound on all Web Servers
Inbound rule Added to Windows firewall by SharePoint
Outbound on all Web and App servers with service enabled.
TCP 636 User Profile Synchronization Service/Active Directory Import Synchronizing profiles between SharePoint 2016 and AD using SLDAP (Secure LDAP)
TCP 5725 User Profile Synchronization Service Synchronizing profiles between SharePoint 2016 and Active Directory Domain Services (AD DS)
TCP + UDP 389 User Profile Synchronization Service LDAP Service
TCP + UDP 88 User Profile Synchronization Service Kerberos
TCP + UDP 53 User Profile Synchronization Service DNS
UDP 464 User Profile Service Kerberos change password
TCP 809 Office Online Server/Office Web Apps Office Online Server/Office Web Apps intra-farm communication.

References:

Security for SharePoint Server 2016
https://technet.microsoft.com/en-us/library/mt683473(v=office.16).aspx

TCP/IP Ports of SharePoint 2013
https://blog.blksthl.com/2013/02/21/tcpip-ports-of-sharepoint-2013/


___________________________________________________________________________________________________

Enjoy!

Regards

Twitter | Technet Profile | LinkedIn