Office 365 guide series – Using your document templates in SharePoint online


Office365logo      SP2013logo

Greetings SharePoint Online users!

This is the third in the Office 365 and SharePoint Online series.

1. Office 365 guide series – Create a new list from an Excel spreadsheet
2. Office 365 guide series – A guide to SharePoint Navigation using metadata
3. Office 365 guide series – Using your document templates in SharePoint online (This post)

This time I will explain how to:

Use Office templates within your SharePoint Online document libraries. In every organisation, or at least the majority, you talk about templates and you know that you have them, somewhere, but in the end, you and everyone else end up using an existing document and make changes, like you take an agreement from one customer and make changes to the numbers and customer names…would it not be nice if you could get everyone to use the same template? And if a change to the template affected everyone? Wouldn’t that be just smashing eh?

Now I’ll show you the easy steps you have to follow to just get started, We’ll use a simple word template in this example, but you can use any template that you allready have.

Note: In this guide, I will show the quick and easy method, in a later post, I wil show how to use Content Types wich will also allow you to use custom templates, but in a much more controlled way. A link to that post will be added here when that guide has been posted. 

Start by locating a word template, or create one, add some info to the header with logo and company name and address maybe, and add something to the footer for example and save the file as a dotx file. Save it locally so that you easily can access it when we want to upload it to our SharePoint online. – I have created a simple letter template for the company DonkeyMind, with their logo and some additional info in it. I’ll use this in my step by step guide below. I saved this as letter.dotx in my ..\documents\DonkeyMind templates\ folder.

Letter1

In a SharePoint Online site, now do this:

1.0 Upload the template file. This is not the easies thing to do, unfortunately Microsoft has choosen to make it a lot harder in SPO and SharePoint 2013 than it really has to be (Browse button from 2010 has been removed), unknown to me why. But this is how you do it:

1.1 Browse to your document library in SharePoit online, where you want to use your own custom document template.

Documents1

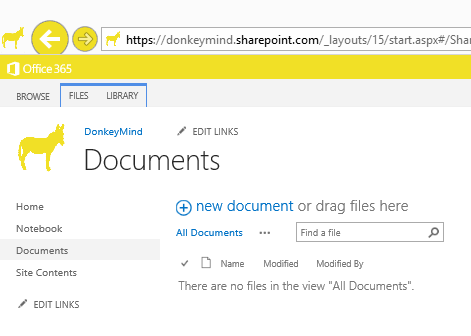
1.2 Click the tab, Library. This will present the ribbon for you with the settings available for a document library.

Documents2

1.3 In the ribbon, click on Open with Explorer

Documents3

Note: The site URL has to be added to the ‘Local intranet sites’ or ‘Trusted sites’ with added logon automatically, if it isn’t, you will get a popup telling you that it will not work otherwise.

1.4 Click ok on the Internet Explorer Security warning

Documents4

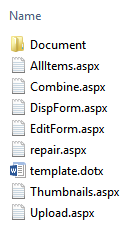
1.5 The library will now open in a Explorer window, in this windows you will see a folder named forms which is a bit greyed out.

Documents5

1.6 Double-click on the folder forms, now you will see the following list of files

Documents6

1.7 Now, in a separate explorer window on your computer, locate your saved template file (dotx)

Note: In my case, I stored it under ..\Documents\DonkeyMind templates\

Documents7

1.8 Put the tw0 explorer windows side by side

Documents8

1.9 Drag and drop the template file from your local folder to the SharePoint library forms folder

Documents9

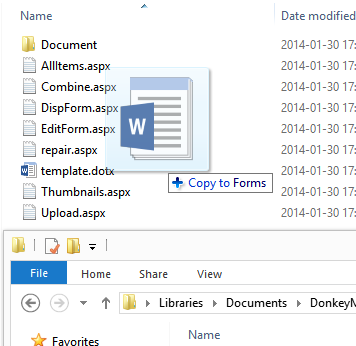
1.10 The file will now be uploaded to the SharePoint forms folder

Documents91

2.0 When the file is uploaded ok, go back to your browser and the document library

Documents1

2.1 Now, we need to change the template used from the default template.dotx to our own template, in my case, letter.dotx. Again, click on the Library tab.

Documents2

2.2 Click on Library Settings

Library1

2.3 In the Library Settings dialog, click on Advanced settings

Library2

2.4 Locate the Document Template section

Library3

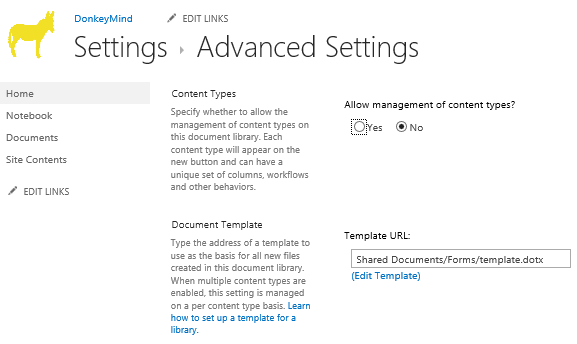
2.5 Change the filename in the Template URL to reflect your template files name

Library4

2.6 Click on OK

Library5

2.7 Click on Documents in the ‘breadcrumbs’ to go back to the library again.

Library6

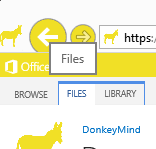
2.8 Click on the Files tab

Library7

2.9 Now, on the New Document button, click on the dropdown and New Document

Library8

2.10 Press Yes in the dialog asking if you really want to open this file, because you do…

Note: Avoid this by changing the Trust Center settings in your Office applications.
1. Allow trusted locations on my network.
2. Add new location
3. Type in the https path to your SharePoint Online tenant
(See references for 2007 and 2010)

Library9

2.11 You may also get prompted for your username/email address for the Office 365 account. Type it in and press Next

Note: This dialog only shows up if you are not logged into your office applications using your Office 365 account 

Open1

2.12 And Password…Sign in

Open2

2.13 The new document opens, based on the template

Word2

2.14 When you have types your letter and are done, simply press Save, this will show you the save as dialog with the path to the SharePoint document library at the top

Word3

2.15 Select that and type in a filename and save the file

2.16 You are done, use the New Documents button to create your standard letters based on the custom template, again and again.

Done1

3.0 Done!

Note: All the same steps apply in SPO as well as SharePoint 2013 onpremise, exept for the ‘add site URL to trusted sites’ issue. In an onprem situation the URL is most of the time already considered Trusted or Local intranet.

References

Learn how to set up a template for a library.

How to enable or disable hyperlink warning messages in 2007 Office programs and in Office 2010 programs
http://support.microsoft.com/kb/925757

SP2013logo

_________________________________________________________

Enjoy!

Regards

Twitter | Technet Profile | LinkedIn

Advertisement

Office 365 guide series – Create a new list from an Excel spreadsheet


 Office365logo       SP2013logo

Greetings SharePoint Online users!

This is the first in a series of Office 365 and SharePoint Online guides primarily aimed at users and power users, my aim with these guides is to show in an easy to grasp way, how you do a few relatively easy but important tasks in SharePoint Online/Office 365. Tasks that will give you a lot of functionality with relatively little effort. Since a lot have been covered already for SharePoint onprem in blogs and other online documentation like TechNet, but not specifically for Office 365 or SharePoint Onlne, I feel that there is a gap to fill here.

1. Office 365 guide series – Create a new list from an Excel spreadsheet
2. Office 365 guide series – A guide to SharePoint Navigation using metadata
3. Office 365 guide series – Using your document templates in SharePoint online

This first time, I will explain how to:

Create a new custom list from an existing excel spreadsheet
This task is simple if everything goes smoothly, but if you have never done it before, or if you have tried but got stuck on any of the little hickups you may encounter, then this may be the perfect guide for you.

– Start by creating your Excel spreadsheet. Make sure that it is a xlsx file. You may also use an existing spreadsheet with your listdata, copy from an old file, save another format as xlsx.

In the spreadsheet, follow the following rules to get a good result:
– Make sure that you do not have any empty column headers between columns. This will cause all headers to be imported as row 1 instead of beeing headers, new column headers will be created as 1, 2, 3 and so on.
– Keep the spreadsheet ‘clean’, remove empty rows, empty columns and any text above the header row and to the right or under of the table or cell range.
– The first column to the left will be the default edit field in the SharePoint list. Make sure that it has values on all rows.
– For best result, avoid formulas with calculated values.
– Use Excel 2013.

In a SharePoint Online site, do this:
1. Decide on a name for the list, it will be the URL and name of the list.
2. Go to the ‘cogs’/Settings and select Add an app

AddanApp

3. You will now see a list of all available apps (installed)
4. Search for Import or scroll down until you find the app called Import Spreadsheet
5. Click on Import Spreadsheet

ImportSpreadsheet

6. Type in the Name of the new list
7. Type in a optional Description
8. At the File location field, click Browse…
9. Browse to your xlsx file on your computer
10. Click on Import

AddApp1

11. The Import Wizard starts, by default, the Range type is set to Table Range
12. Change this to Range of cells
13. Click in the Select Range field
14. In the Spreadsheet, select the top left cell and then make sure that you select the entire table of data you want imported
15. It should now read something similar to: Sheet1!$A$1:$G$400 (top left : bottom right)

ImportWiz2

16. Now you click on Import
17. You may now get a logonprompt from Excel, enter the emailaddress for the SPO account and click next
18. Enter the account password and click on Sign in
19. Excel will now create the list and start importing the data, you will see a little progressbar at the bottom of the Excel application.
20. When the import is done, the new list will open and you will see the columns from the top

NewList

Note: You may note sometimes that a ‘mailto:’ has been added to the email column values.
ColumnError2
This is added in excel but hidden when a cell is formatted as an email address. In the example above, note that the first row has the value of ‘Email’ which made the list field be formatted as single line of text instead of email.
The trick is most of the time to make sure that all fieldvalues in a column are consistent in format. One cell with a different format will cause the entire column to get a different formatting.

21. Done!

– You may now want to add a link in the left hand navigation to the list. Check the url in the addressbar of IE and copy it.
– Click on EDIT LINKS
– Click on +Link
– Type in the Text to display (will be seen in the navigation), for example ‘Contacts’ and paste the URL into Address
– Click OK
– Try the link out to make sure
Done! (Again)

Error list

1
You get ‘The specified file is not a valid spreadsheet or contains no data to import’
When: When you browse to your Excel spreadsheet and click Import
Fix: Add site URL to trusted sites in Internet Explorer, it has to be in either trusted sites or Local Intranet sites.

2
A new header row is created instead of the headers I got (Column1, Column2, Column3…) and the headers becomes values if the first datarow
When: You have one or many empty headers in your cellrange
Fix: Remove all columns with blank headers, or add a value to them, this is only within your cell span.

ColumnError2

3
If you get the error, ‘An unexpected error has occured. (-2147467259)’
When: Something is wrong with the SPO User session you have open
Fix: Sign out of your SPO session, close all IE windows, Close Excel – logon again to SPO, Add app…same procedure as last time.

Error1


4

Very large files, field data types get wrong, you expect Single line of text but get Multiple lines of text
When: The cellrange probably contain one or more ‘special’ values that is interpreted by excel/SPO as something else than it is.
Fix: With large files, create a new excelfile with only header and one row, make sure that the header row or the data row do not contain any value or characters out of the ordinary. Then, copy paste the rest of the rows in quick edit or datasheet view.

5
The wrong Column becomes the default edit column with the ‘…’ for the edit dropdown meny.
When: The column you want to use for default edit is not the first from the left.
Fix: First column will be the default edit field with the …make sute the Cell range starts with the top left cell.

Note: All the same steps apply in SPO as well as SharePoint 2013 onpremise, exept for the Excel logon prompt and the ‘add site URL to trusted sites issue. In an onprem situation the URL is most of the time already considered Trusted or Local intranet.

References

None so far 🙂

SP2013logo

_________________________________________________________

Enjoy!

Regards

Twitter | Technet Profile | LinkedIn