![]()
G’day Windows lovers.
Again, this is not a SharePoint post per se, but hey, we all need to Schedule a task from time to time, unless we have completely flown into the clouds…
No need for any command prompt, at.exe, schtasks.exe or anything like that. This can all be done from the gui.
| Note: Some people may state that it is a bad idea running a scheduled task as system, that this is bad for security reasons. I can agree with both sides but a fact is that Microsoft has a number of their default scheduled tasks running as system, so it can’t all be wrong. Also, running the task as a different administrator account is even worse, so…do as you like here. Secure the location of the script files, at least do that. Good or bad, it is still a fact that some people in some situations want to do this, run a script as system, perhaps for the simplicity of it, for not having to rely on service accounts beeing created or other reasons good or bad. |
Step by step:
| Note: These steps have been verified on Windows Server 2012, but will function just as well on Windows Server 2012 R2 or Windows Server 2008R2/Windows Server 2008, Windows 7 nd Windows 8x |
–
| Note: You have to be logged on as a local administrator in order to follow these steps. |
Start the Windows Task Scheduler, from the ‘Start’ menu or search, any way works…
When the Windows Task Scheduler is open, Browse to a task under Microsoft. I’m using a .NET Framework task in my example, that will work…

Have a look at the tasks in the .NET Framework container. Select the task at the top and make sure that it is a task running as System by checking its properties.

The properties at the bottom will show you if the task is configured to run as SYSTEM. If the task selected is not, pick another task in the list until you find one that is.

Right-click on the task and select export.

Save the file to a good location locally on the server and give it a good name.

Replace the default name with something of your own:

Save the file, then back in Task Scheduler, select the top of the tree, Task Scheduler Library.

Right-click on Task Scheduler Library and select Import Task…
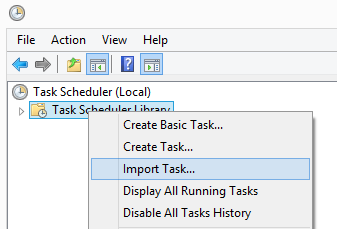
Browse to the file you just exported.

Click on Open to start the import of the task. Name the new task with the name you want, you now have an exact copy of the default .NET framework task, now we need to make modifications so that it will suit your needs.
Right-click on the task, select Properties to make all the settings available for change.
In my example, I want the task to start a PowerShell script as system.
In order to do that, go to the Actions tab.

Delete the existing action, in my example ‘Custom handler’ and add your own.

If you like me, want to run a PowerShell script, type powershell in the program field and type the path to your .ps1 file in the Add Arguments field.
Save the new action and verify the values.

Now, change all the parameters to suit your needs. For example, you might want to add a scheduled trigger.
Click on the Triggers tab and add the Schedule you need.
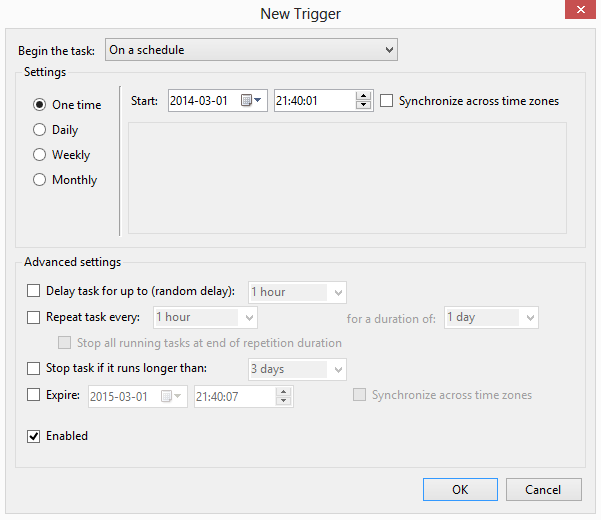
In my example, I added a Schedule that starts the task at 07:00 every day and keeps doing this forever…

Now, as a last step, select the completed task under the Task Scheduler Library and verify all the settings, especially, make sure that it is configured to run as SYSTEM!
I also selected Run with highest privilieges in my example because the script I had writted required Run as Administrator to function properly.

Thats all, you’re done! Good luck!
References:
Thanks to:
Me, Myself and I!
![]()
___________________________________________________________________________________________________
Enjoy!
Regards
![]()